
Ready to create a beautiful artist website in WordPress?
It will be mobile responsive, fast loading, and include a customizable portfolio for your work.
Most artists just want a homepage, portfolio, statement, resume, contact page, and maybe a blog. Well the good news is, artist websites are one of the easiest types of websites to create!
Many years ago, I used to design artist websites using themes from ThemeForest and Elegant Themes, but they always got discontinued and didn’t look as nice as I hoped. Astra Starter Sites changed the game and are really what you should be using. Astra’s artist themes are beautiful, they are all 1-click import, and very easy to customize. This helps you avoid a lot of headaches!
How To Create A Beautiful Artist Website
- Get Domain & Hosting
- Install WordPress
- Login To Your Dashboard
- Install SSL
- Choose An Artist WordPress Theme
- Block Your Website From Google Until You Launch
- Name Your Website
- Customize Your Theme
- Create Your Pages
- Create Your Navigation Menu
- Create Your Portfolio
- Create Your Other Pages
- Design Your Blog
- Write Your First Blog Post
- Customize Your Mobile Website
- Install Essential WordPress Plugins
- Delete Unwanted Pages + Templates
- Control How Your Website Appears In Google
- Make Your Website Format Nicely On Facebook + Twitter
- Setup Google Analytics + Search Console
- Optimize For Google (SEO)
- Make Your Website Load Faster
- Launch Your Website
- Get A Custom Artist Website Design
View A Live Demo Of The Artist Website
Alternate Example #1 Alternate Example #2
1. Get Domain & Hosting
Domain name: it’s easiest to get domain & hosting from the same place.
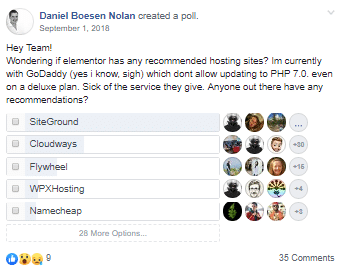
Hosting: SiteGround is who I recommend and was rated the #1 host in numerous Facebook polls. Most bloggers try to refer you to Bluehost (because of affiliate commissions), but Bluehost is owned by EIG who runs over 60 different hosting companies and is infamous for slow servers. This is well-known in Facebook Groups. Many people end up moving away from Bluehost to SiteGround for faster load times, so it’s easiest to start with them in the first place.


SiteGround has 3 plans:

I recommend their StartUp or GrowBig plan. The main difference is the GrowBig plan can host multiple websites, has more storage, server resources (makes your site faster), and comes with a free website transfer if you’re moving from another host. If you don’t need those, do StartUp. Be sure to sign up through their WordPress hosting page which makes the setup process easy.

You Don’t Need The Add-Ons: hosting companies will try to sell you domain privacy, site scanners, SEO packages, etc. You don’t need any of those; unless you want domain privacy, but everything else is a waste of money. There are plenty of free WordPress plugins for these.
2. Install WordPress & SSL
Once you sign up, they will send you an email with a Launch Wizard.

Click “Start a new website,” select the WordPress option, and create your WordPress login.

All good!

3. Login To Your Dashboard
Once you’re finished with the Launch Wizard, SiteGround will send you an email with your Admin URL (the URL to login to your WordPress site) as well as the username and password.

Go ahead, login to your new website!

4. Install SSL
Before you go any further, make sure you install SSL on your artist website. It only takes a couple minutes, is free, and adds a “lock” icon in the browser when viewing your entire website.
With SSL:

Without SSL:

Step 1: Login to your SiteGround account and go to your cPanel → Security → Let’s Encrypt SSL. Next, activate “Let’s Encrypt SSL” on your domain name. You don’t need the wildcard SSL.

Step 2: Login to your WordPress dashboard and go to SG Optimizer → Environment Optimization → Enable HTTPS → Confirm. SiteGround will automatically do the rest!


5. Choose An Artist WordPress Theme
Astra Themes are great because you can import everything in 1 click.
All their themes are mobile responsive and load fast. They have a Free Artist Theme and Premium Artist Theme, but they have more than 100 different themes. Even if a theme is designed for a specific industry, you can easily change the content to make it any type of website. For example, this Photography Theme can definitely be used as an artist website.
All themes labeled as “Agency” require an Astra Agency Plan. The rest are free.
Step 1: Install The Astra Starter Sites Plugin (Plugins → Add New → Astra Starter Sites).

Step 2: Install & Activate The Astra Theme (Prompted After Installing The Plugin).

Step 3: Select Elementor As Your Builder: there are additional themes listed in the other page builders, but Elementor is the most user-friendly. This just depends on which theme you want.

Step 4: Find A Theme You Like.

Step 5: Import The Theme To Your Website.


Step 6: Refresh Your Website And It Will Look Exactly Like The Theme
Your website should now look exactly like the theme you imported and is ready to be customized. Make sure you are happy with your WordPress theme – this is a commitment!

Other Places To Get Artist WordPress Themes
I highly recommend using a theme from Astra, otherwise be very careful where you get your theme. Make sure it’s mobile responsive, loads fast, and is from a reliable developer who won’t abandoned it (which will cause issues down the road). The rest of this tutorial is specific to designing websites with Astra themes – these instructions will not work for the themes below!
- Free artist themes (found in WordPress → Appearance → Themes → Add New)
- ThemeForest artist themes
- StudioPress
- I also created a list of WordPress themes for artists
6. Block Your Website From Google Until You Launch
Go to Settings → Reading → Search Engine Visibility → Discourage Search Engines From Visiting Website. This prevents your website from showing in Google while you’re in the middle of designing your artist website. Once it’s complete and you’re ready to go live, simply deselect this and it will start showing in Google. You really shouldn’t need a “coming soon” page.

7. Name Your Website
Name your website under Settings → General. This should usually be your name. Leave the tagline blank and do not change WordPress Address or Site Address (this will break your site).

8. Customize Your Theme
You can customize many elements of your artist website under Appearance → Astra Options. Upload your logo and customize fonts, colors, the header, and footer. Keep in mind these options are primarily for styling your artist website (logo, fonts, colors, layouts). Changing the actual content (eg. navigation menu, pages, and content) is done in the other following sections.

Upload Logo + Favicon – the recommended dimensions for your logo and favicon are below. While WordPress lets you to upload and resize larger images with better quality, avoid using huge images as they can slow down your website. This is explained more in the speed section.
- Recommend logo dimensions: around 220×61 pixels
- Recommend favicon dimensions: exactly 16×16 pixels
Customize Fonts & Colors – change the font size, weight, and line height of your headings and paragraph text. Change the color of your text, links, theme, and even add a background image.

Customize The Header, Footer, Layouts – the header settings let you change the button in your navigation menu and it’s layout on desktop + mobile. Footer lets you change the bottom of your website. The layout settings let you change the layout of both your website and the blog.

9. Create Your Pages
You can add, edit, customize, and delete pages under Pages → All Pages.
Your theme comes with pre-built pages which you can use if you like. Otherwise, delete the ones you’re not using and add the ones you want. In this section, we are only creating your pages (not the content on them) so we can add them to your navigation menu in the next step.

Learn How To Create Pages With Elementor
If you want to start adding content to pages, it’s time to learn how to use Elementor’s page builder. It’s actually quite easy: simply find the widgets you want to use on the left of the page (eg. heading, image, image gallery (portfolio), then drag them to main section on the page.
10. Create Your Navigation Menu
Now that you created your pages, you can add them to your navigation menu under Appearance → Menus. Simply drag and drop the pages you want into your navigation menu. Dropdown menus can be created by dragging and dropping pages with an indent to the left.

Astra’s Header options (from step 8) also have additional settings for your navigation menu.

11. Create Your Portfolio
Assuming you have already created a page for your portfolio in step 9, you can now edit it under Pages → All Pages → hover over your portfolio page → click “Edit with Elementor.” Anytime you want to design or change the content on a page, you will edit it with Elementor.

To add a gallery, search “Gallery” in Elementor’s widget, and select the gallery you want (I will be using the basic gallery in this example). From here, you can upload the images you want in your portfolio, reorder them, select their size, columns, and whether you want a lightbox effect.

Here’s a tutorial on customizing your gallery:
Here’s a simple 3 column gallery:

Here’s 2 column gallery with a sidebar, filters, and info on each image:

Import Pre-Designed Portfolios With Elementor Templates
If you want more portfolio designs beyond Elementor’s widgets, they have tons of portfolio templates if you click the Folder option → Blocks → Portfolio. Some are free, others require an Elementor Pro account which includes 50+ Elementor widgets and 300+ templates for pages.


Things To Keep In Mind While Creating Your Gallery
- Before uploading any image, give it a descriptive file name
- Avoid uploading oversized images which can slow down your site
- If you select 1024×1024 for your gallery, that’s what your images should be
- If you don’t like Elementor’s galleries, there a tons of portfolio plugins out there
12. Create Your Other Pages
To create more pages, create a page in Pages → All Pages, design it using Elementor widgets, blocks, or page templates, then add it to your navigation menu under Appearance → Menus.
Keep in mind you have many options when designing your pages. You can use the pre-designed pages that come with your Astra theme, import page templates from Elementor (using the folder option), or create pages from scratch using individual Elementor widgets and blocks.
Here’s an example of pages an artist would have:

Editing them is as easy as point, click, and edit.

Contact Page (And Adding A Contact Form) – when editing the contact page in Elementor, you can edit the Google Map by clicking on it and adding your own address or change the zoom level and size. By default, the Free Artist Theme does not come with a contact form. If you want to add one, you will need to install a free contact form plugin under Plugins → Add New → search for WPForms which is the plugin I recommend. Install and activate it, then you will see it as an option in the Elementor widgets. You can now drag & drop contact forms onto your pages.


Don’t forget, you also have plenty of contact form templates in Elementor!

An example of the about page:

13. Design Your Blog
Just to be clear, you don’t absolutely need a blog.
After my time working with artists, I have learned that their blogs really didn’t do much for them in terms of making money. Unless you write something like “how to paint a sunset” and want to use your own work in the blog so you can get exposure on your own work, or you are doing affiliate marketing (referring people to websites like Amazon and making commissions from the sales), those are the 2 main ways artists can monetize blogs. Don’t get me wrong – some artists have successful blogs and a good following, but blogging takes quite a bit of your time which may be more useful elsewhere. Weigh out the pros and cons – that’s all I’m saying.
Step 1: Set Your Permalink Structure – in WordPress, go to Settings → Permalinks and use select Post Name. This makes sure your posts URLs only include the post name (ideal for SEO).

Step 2: Add A Blog Page – go to Pages → Add New → created a page called “Blog.”
Step 3: Set Your Blog As The Posts Page – in the WordPress Customizer settings, go to Homepage Settings → set your blog page as the Posts Page (the one you created in step 2).

Step 4: Decide If You Want A Sidebar – this is also found in the WordPress Customizer settings (as well as Astra Option). Choose if you want a sidebar on your blog (eg. right sidebar).

Step 5: Design Your Sidebar – add widgets to your sidebar under Appearance → Widgets (these are what you will use to add content to the sidebar). It can be anything from a headshot with an introduction (like mine) to popular posts, a search bar, or even a gallery of your work.

Step 6: Add A Few Categories – add a few blog categories under Posts → Categories. These should be broad categories about topics you plan to write about (2-3 is a good start). When creating blog posts, you will have an option to file posts under a category (only file it under 1).

An example of what the blog looks like:

14. Write Your First Blog Post
Create your first blog post under Posts → Add New.
Give it a title, add multimedia, and start writing! My on-page SEO checklist show you how to rank your blog posts higher in Google and includes every single step I do when writing a post.
Quality Over Quantity
You can probably imagine how long it took to write this tutorial (about a week of creating the content and years of research). My best advice is to blog with a purpose and learn SEO. I make money when people sign up for SiteGround’s hosting in the beginning of this tutorial, but I also provide a ton of value. What are you trying to accomplish with your blog? What keywords will you target? How will you make money? These are all things to think about when writing posts.

15. Customize Your Mobile Website
All Astra Themes are already mobile responsive.
But if you want to change something specific on your mobile website, click the responsive mode option when editing a page with Elementor. Just like you would edit a page on desktop with Elementor, the responsive mode lets you edit your mobile artist website the same way.

16. Install Essential WordPress Plugins
WordPress plugins add additional functionality to your WordPress site.
These are some tried and true plugins I recommend for all artists.
To install a plugin, go to Plugins → Add New, search for the plugin, then install/activate it. Most plugins still need to be configure; UpdraftPlus lets you take a backup in 1-click and iThemes has a 1-click security button. Other plugins like Yoast SEO and SG Optimizer need to be configured.
- Elementor Pro: 50+ extra Elementor widgets and 300+ page templates.
- UpdraftPlus: backup your website with 1 click to Dropbox or Google Drive.
- WPForms: create, customize, and add contact forms to your pages.
- iThemes Security: 1-click button to improve your website’s security.
- Yoast SEO: most popular SEO plugin which I have an extensive tutorial for.
- ShortPixel: losslessly compress images to load faster.
- SG Optimizer: speed optimization plugin for SiteGround customers.
- Anti-Spam: prevents spam on blog comments + contact forms.
17. Delete Unwanted Pages + Templates
When you install a theme, all the demo content is imported to your website.
Unused pages and posts should be deleted to make sure they’re not indexed in Google. You can either delete them (in your Pages & Posts tabs) or save them as drafts so they’re not published.
18. Control How Your Website Appears In Google
You will need to have the Yoast SEO plugin installed for this step.
Once Yoast is installed and activated, edit your homepage (not with Elementor but the standard “Edit” button). Next, scroll down to the Yoast SEO section and you should see an option to customize how your snippet appears in Google for your desktop and mobile results.
- SEO title: the top (blue) link that appears in Google (around 55 characters)
- Meta Description: the longer description below the SEO title (around 155 characters)
By default, Yoast inserts snippet variables (templates for your SEO titles + meta descriptions) but writing these yourself is always better. Both have character limits; make sure Yoast’s character limit bar is green (shown in image below) to avoid Google cutting off your snippet.

19. Make Your Website Format Nicely On Facebook + Twitter
You will need the Yoast SEO plugin installed to do this.
When editing a page, scroll down to In the Yoast SEO section and you’ll also see a “Social” tab.
This lets you upload custom images to the page so it formats nicely on Facebook and Twitter. Since each social network calls for specific image dimensions, this means you need to create custom images using those dimensions: it could be a painting of yours or even your headshot.
- Facebook: 1200×630 pixels
- Twitter: 1024×512 pixels

To test how the page looks when it’s shared, copy + paste the URL to Facebook and Twitter.
Without a custom image:

With a custom image:

20. Setup Google Analytics + Search Console
Google Analytics tells you about your website traffic while Google Search Console actually helps improve your website’s SEO. They’re free and very easy to setup (you want them both)! Google Search Console tells you any mobile, security, and sitemap errors too – very helpful.
How To Install Google Analytics
- Sign up for a free Google Analytics account
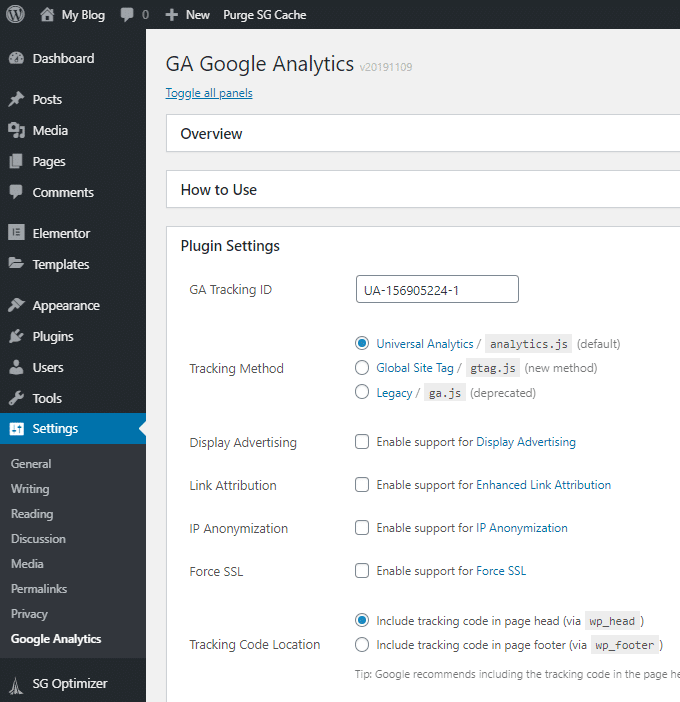
- Grab your UA code shown below (eg. UA-000000-2)
- Install a Google Analytics Plugin (I recommend that one)
- Paste your UA code into the plugin under Settings → Google Analytics (see below)
- Wait a few days for Google Analytics to track data, then login to GA to view the data


How To Install Google Search Console
- Sign up for a free Google Search Console account
- You will be see verification instructions which include a TXT record
- Copy/paste the TXT record into your DNS settings.
- In SiteGround, this is My Accounts → cPanel → Advanced DNS Editor
- Paste the record here, then verify your site with Search Console
- It will take a few days for Google to show data in the reports
- Check for mobile, security, and other errors on your website

Yoast’s SEO plugin creates a sitemap which you should submit to Google Search Console:

21. Optimize For Google (SEO)
SEO for artists usually involves one of these 3 goals:
Rank For Your Artist Name
- Buy a domain name with your name in it
- Finish your website (a completed website shows Google you’re legit)
- Include your name in the homepage Yoast SEO title + meta description (step 8)
- Try to include some text on your homepage so Google has more info than images
- Get links to your website (ask galleries, press releases, list it on your social profiles)
Rank For Your Artwork In Google
- Find keywords describing your art (try Google Autocomplete)
- Google the keyword to see what content is top in Google
- Avoid competing with strong content and authority websites
- Create a unique page for each keyword (eg. hummingbird paintings)
- Include a wide selection of hummingbird paintings on the page
- Use your keyword in the page title, URL, and Yoast title + description`
- Include some text on the page (reviews, pricing, shipping information, etc)
- Consider listing your art on websites that are already in the top results (eg. Etsy)
In this example, “hummingbird paintings” would be a very competitive keyword (Etsy and Fine Art America already have an enormous selection of hummingbird paintings). So why would Google rank yours above theirs? If a keyword is too competitive, choose a more specific keyword like “hummingbird acrylic painting.” Specific keywords are usually easier to rank for.

Rank For Your Artwork In Google Images
- Find a keyword describing a specific image in Google Image Autocomplete
- Choose very specific keyword (eg. hummingbird acrylic painting)
- Give the image a descriptive file name before uploading it
- The file name should describe the image and ideally include the keyword
- Post the image on your website or social networks (like this one on Instagram)
22. Make Your Website Load Faster
Slow WordPress websites are very common. With a few extra (and easy) steps, you can make sure your artist WordPress website continues to load fast on both desktop and mobile devices.

Activate Cloudflare’s CDN In SiteGround – in your SiteGround account, go to My Accounts → cPanel → Cloudflare → Activate Free. This activates Cloudflare’s free CDN (content delivery network) which reduces the geographical distance between your server and visitors. In other words, it basically “mirrors” your artist website on over 200+ data centers around the world.

Configure The SG Optimizer Plugin – when you installed WordPress through SiteGround, it automatically installs the SG Optimizer plugin which has a few additional settings to tweak. In WordPress, go to SG Optimizer → Frontend Optimization → enable everything on this page.
Keep PHP Version Updated – in SG Optimizer’s Environment Optimization, go to PHP Version → select Managed PHP. Now, when SiteGround releases new PHP versions (which make your website faster and more secure), they will update your website’s PHP version automatically.
Upload Images With Correct Dimensions – avoid uploading large images to your website, otherwise they will load slow and you’ll see serve scaled image errors in GTmetrix. For example, if your Elementor portfolio says to upload 1024x1024px images, you will use those dimensions.
Keep WordPress Software Updated – it is very important to keep WordPress core, themes, and plugins updated. When updates come out, you will find them in WordPress under Dashboard → Updates. As long as you’re using reliable plugins like the ones I listed in step 16, you shouldn’t have to worry about anything going wrong. But it’s still a good idea to take a backup beforehand (use UpdraftPlus). I like to backup my site and make updates once a week.
Avoid Installing Slow Plugins – down the line, you may want to add additional plugins to extend your website’s functionality. Be careful which plugins you install; many of them can slow down your website. You want to make sure you’re using reliable, lightweight plugins that have been tried and tested with solid reviews. Here’s a list of slow WordPress plugins to avoid.
Keep An Eye On Your GTmetrix Report – GTmetrix is a great speed testing tool that shows your load time, number of requests, and whether certain images + plugins are slowing down your site. Keep an eye on your report and aim for a load time of <3s. If you ever need help optimizing your site to load faster, our team offers WordPress speed optimization services.
23. Launch Your Website
When you’re ready to launch, make sure you site is indexed your site under Settings → Reading → disable “discourage search engines from indexing this site.” It can take a few days (or even a couple weeks) for your artist site to start appearing in Google, and often over a month to rank #1 for your name. Blogging and listing your new website in your social media profiles can help.
24. Get A Custom Artist Website Design
If you want a truly unique design for your artist website, our team designs beautiful, fast loading, mobile-friendly websites in WordPress. Get in touch with us to request a quote.

I hope this was really helpful! If you have any questions or if I left something out, leave me a comment and I’ll get back to you as soon as I can. Thanks so much for reading this long tutorial!
Cheers,
Tom


