
Most people have Yoast, but few use it correctly.
This tutorial breaks Yoast down into 3 key steps: configuring the Yoast settings, researching long-tail focus keywords, and on-page SEO (beyond green lights). I will also show you a few other ways to improve SEO related to Yoast like adding publish dates to increase CTRs, submitting your Yoast XML sitemap to Search Console, fixing broken links, and adding schema.
Before reading this guide, install the Hide SEO bloat plugin which removes Yoast ads and update Yoast to the latest version. Finally, if you like this guide, be sure to check out my WordPress speed guide which has 450+ comments and helps improve your GTmetrix report.
Leave a comment if you have questions – I’m always listening!


Important Things To Know Before Using Yoast
People waste too much time trying to get green lights and not enough time on keyword research (or making their content better than whoever’s in the top results). Before you start, read these tips to avoid wasting your time which is seriously a big issue when people use Yoast.
- Don’t obsess over green lights (use my on-page SEO checklist instead).
- Don’t blindly select keywords – look for a long-tail (3+ word) phrase in Google Autocomplete, then Google it to see whether top results cover the topic extensively.
- Don’t stuff keywords in your text (or image alt text) to get green lights, that’s spammy!
- The most important places to use your focus keyword is in the page title, URL, SEO title, meta description, and once in the first couple sentences of the content body. That’s it!
- Yoast (and all SEO plugins) do very little for on-page SEO – most of it is advice. Spend more time on content and start focusing on making your content as helpful as possible.
1. General
Dashboard

Don’t click the button to enable Yoast indexables – there have been many complaints on their blog about this feature and it can really mess up your site. Keep an eye on their blog for updates.
Features

Below is a screenshot of each Yoast feature.
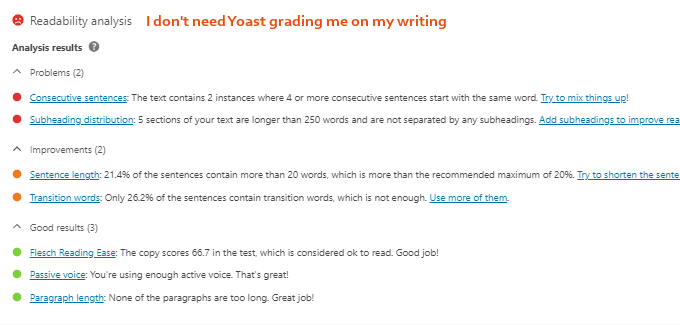
I disabled a few of them… I don’t use the Readability Analysis since I don’t need Yoast grading my content (eg. whether my sentences are too long). I use internal links naturally in my content and don’t need Yoast’s Text Link Counter reminding me to add them. I don’t need Ryte to constantly check whether my site is indexed in search engines (it obviously is), and I never use Yoast’s Admin Dropdown Menu. See what features you like, enable them, and disable the rest.


Webmaster Tools
Sign up for Google Search Console (most important) and use the HTML verification method to copy/paste your verification code. Do the same thing for Bing/Yandex/Baidu. Search Console is incredibly helpful. I recommend using it to find technical errors and monitor rankings and CTRs.

Verify Webmaster Tools
- Sign up for Google Search Console
- Select the HTML tag verification method
- Copy the code and paste into the Google Search Console field
- Delete everything outside of the quotations (including the quotations)
- Save changes in Yoast
- Click “Verify” in Google Search Console
- Repeat for Bing / Yandex (Russia’s largest search engine)
- I do not use Baidu Webmaster Tools since it’s confusing as I don’t read Chinese, and you need a Chinese phone number, but you can read this tutorial if you want to try
Submit Your Yoast XML Sitemap To Google
- In Yoast, go to General → Features → XML Sitemaps
- Click the question mark icon by the XML Sitemaps option
- Click your XML Sitemap link
- Copy the last past of the URL: /sitemap_index.xml
- Login to Google Search Console
- On the left side of the dashboard, go to Sitemaps
- Paste the last part of your sitemap URL into Google Search Console
- Click “submit”
- Repeat for Bing + Yandex

2. Search Appearance
General

Title Separator – when you’re using snippet variables, this is the dash (or other special character) usually between your page/post title and site name. Example: Page Title – Site Name.
Snippet Variables – templates used for SEO titles + meta descriptions only IF you forget to write them, which you should never forget to do. So as long as you’re writing these manually, they don’t matter. You should take the time to write them so they sound nicer than a template.

Manually written snippets are always better than default snippet variables.
The title of this post you’re reading is 150+ characters long (well over the 60 character limit for SEO titles). If I relied on Yoast to create my SEO title using snippet variables, it would be longer than 60 characters and get cut off by Google, making my snippet look horrible. Instead, I wrote this myself so it reads nicely: The Ideal Yoast WordPress SEO Plugin Settings (2020 Updated).
Homepage – the homepage usually targets a broad keyword about your main product/service (eg. Chicago Wedding Photographer). Use this in your homepage SEO title + meta description.

Content Types

Show Posts In Search Results – control whether posts/pages are indexed in search engines. You obviously want pages and posts, but you usually don’t want tag, format, portfolio, and other pages to be shown in search results. These pages can often be thin or duplicate content which can cause warnings in Google Search Console. Category pages can be indexed if you have a decent amount of posts under each category and design them to look nice, optimize them, etc.
Show SEO Settings – this is the SEO analysis tool that gives you on-page SEO recommendations. You definitely want this for pages, posts, and possibly blog category pages.
Media

Taxonomies

Archives

Breadcrumbs

Breadcrumbs – navigation text that appears at the top of your content:

They help users and search engines learn your site structure. To enable breadcrumbs, add this code to Editor → Index.php by pasting it under get_header();
get_header(); ?>
<div id="primary">
<?php if ( function_exists('yoast_breadcrumb') ) {
yoast_breadcrumb('<p id="breadcrumbs">','</p>');
} ?>
<div id="content" role="main">
RSS

3. Social
Fill out your social media profiles.
But the key thing is to enable each social network’s meta data under the Facebook and Twitter tab. This enables Facebook Open Graph and Twitter Cards which lets you upload properly sized images to each page/post to make the content look much nicer when shared on social media.
Accounts

Facebook

Facebook App ID – if you created a Facebook app, find your app ID and enter it here. Here’s a tutorial on how to create a Facebook app and what it does.
Twitter

Pinterest

You will need to complete a few additional steps to verify your site with Pinterest.
Social Media Optimization – once meta data is enabled for each social network, edit a page or post, scroll down to the Yoast section, and click the Social tab. Here you can upload custom social media images to make the content’s image format properly when the page is shared on social media. Yes, this means you will need to create 2 separate graphics for each page and post.
- Facebook Image: 1200 x 630px
- Twitter Image: 1024 x 512px
Upload a custom graphic for Facebook and Twitter:

Now your content looks much nicer:

Controlling Facebook Ad Text With Yoast – if you’re boosting posts, Facebook won’t let you change the ad text. So before sharing your post on Facebook, give it the title you want using Yoast’s “Facebook Title” field (which can be different from the SEO title + meta description). If your Yoast Facebook title isn’t working right away, trying clearing your website’s cache. I have found it can sometimes take several days for it to update with new Facebook title and image.

4. Tools

Bulk Editor – edit SEO titles and meta descriptions in bulk (without having to go through each individual page/post). Making sure these ready nicely can significantly increase click-through rates by making your snippets more appealing to click on. Don’t forget to include that post’s focus keyword in both places. SNIPPETS ARE LITERALLY THE FOREFRONT OF YOUR SEO!

File Editor – edit robots.txt and .htaccess files.
Import And Export – import my recommended Yoast SEO settings or export your own Yoast settings to use on other websites you manage. If you’re currently using another WordPress SEO Plugin, use the “Import From Other SEO Plugins” tab to migrate it’s SEO data to Yoast.
5. Yoast SEO Premium (Not Worth The Money)
Yoast SEO Premium is $89/year – I seriously only bought it because I write WordPress SEO tutorials for a living. Otherwise, I probably wouldn’t have it… setting multiple focus keywords isn’t useful, there are plenty of free redirect plugins, and internal link suggestions + content insights really don’t help me at all. Here’s an explanation of some of the highlighted features.

Optimize For Multiple Keywords – there is a specific strategy for this. Secondary keywords are often included as partial matches which means the SEO analysis checklist is virtually useless since Yoast rarely detects these, and therefore your lights will usually be red for secondary keywords. Targeting secondary keywords is more about crafting a nice SEO title + meta description to include individual words from both phrases rather than stuffing both keywords.

Preview Of Your Page – as long as you’re uploading custom images in Yoast’s “social sharing option” so your image formats properly Facebook and Twitter (step 3), you don’t need this. But if you like seeing how it looks directly in Yoast to make sure it looks good, that’s all this does.

No Outdated Content – Yoast tells you if you haven’t updated a piece of content for 6+ months.
Link Suggestions – shows related content on your website/blog to use internal links to. I use internal links naturally when I think another article would be helpful, but I don’t help with this.

Content Insights – again, Yoast is focusing too much on keyword usage and nothing about content quality or user experience. Another keyword usage feature that is not very helpful.

Redirect Manager – the Redirection Plugin plugin is free or you can create redirects in .htaccess. Yoast’s redirect manager automatically adds a redirect if you ever change a permalink while other plugins don’t. That’s the only benefit, otherwise free redirect plugins will do the job.

Premium Support – I have never used their support, but I heard they just refer you to articles.
Ad-Free – the Hide SEO Bloat plugin is free and removes Yoast ads.
6. AMP
Accelerated mobile pages (AMP) are a Google project that make mobile pages load faster and adds an “AMP” sign to your mobile snippets. While this sounds good, you should usually avoid AMP. Take a look at Kinsta’s study on how mobile conversions dropped 59% after adding AMP. After reading that article, I decided to disable AMP on my own website (and I’m glad I did). The design isn’t nearly as nice and it’s a pain in the ass. Save yourself the trouble – I would avoid it.

AMP Instructions
- Install the AMP Plugin by Automattic
- Install the Glue For Yoast SEO AMP Plugin if using Yoast
- Add /amp/ to any page on your website to see how it looks and make sure it works
- Go to Yoast’s Settings → AMP to change your design and enable custom post types
- Wait for Google to recrawl your site and add the AMP sign in mobile search results
- Visit the Accelerated Mobile Pages section in Google Search Console to see errors
7. Import My Yoast Settings
To use my Yoast settings, download the zip file and upload it under SEO → Tools → Import And Export → Import. This configures the settings, it does not delete focus keywords or meta data.
Download My Yoast Settings (Updated 3/9/2018)
Things You Still Need To Do:
- General → Webmaster Tools (verify your site with Google/Bing/Yandex)
- Search Appearance → General (check if you have duplicate sitenames by hovering over your homepage’s browser tab, and if so, leave Force Rewrite Titles as enabled)
- Search Appearance → General (fill out your homepage SEO title + meta description, and specify whether you’re a person or company)
- Search Appearance → Content Types (choose which content you want shown in search results, and add publish dates to snippets on time-sensitive posts)
- Search Appearance → Taxonomies (choose which content you want in search results)
- Search Appearance → Breadcrumbs (add your website name as the “Anchor Text For Homepage” and follow Yoast’s tutorial to add breadcrumbs)
- Search Console → Settings (authenticate Yoast with Google Search Console, wait a few days for the data to populate, then fix crawl errors (visit section). See my Google Search Console tutorial for even more tips on optimizing your website with Search Console)
- Social → Enter URLs of your social profiles, upload your logo in the Facebook tab, enable Facebook Insights, and verify your site with Pinterest
- Add AMP Pages (visit section)
8. Focus Keywords
Research a keyword’s monthly searches and competition is super important.
- Find long-tail (specific) keywords in Autocomplete + Keyword Explorer
- Write down all relevant phrases so you have a robust keyword list
- Avoid keywords where strong content/websites are in the top results
- Target keywords where search results contain weak/irrelevant content
- Google each keyword using MozBar to learn each one’s estimated competition
- Check OSE for your DA (domain authority), then Google your keyword using MozBar and check the top results to see what their DA is. Compete within your own DA range and if yours is low, target even more specific keywords which are less competitive.
- You should be left with high opportunity keywords where you can get on page 1
Google Autocomplete
Go to google.com and start typing in a keyword to have Google complete the phrase (remember, you’re looking for long-tail phrases usually with 3+ words since those are much less competitive). You can also use an underscore character _ anywhere in the phrase and Google will fill in the blank. You will need to END on the underscore character for that method.

To see even more keywords in the dropdown, use plurals or different word ordering.

Each service (and location) should be targeted on separate pages on your website.

For competitive blog post topics, always select a very specific (long-tail) keyword.

You can do the same thing for YouTube video keywords.

How I found my keyword for this tutorial (which helped me optimize my content).


Moz Keyword Explorer (Better Than Keyword Planner)
To make sure you don’t miss any keywords from Google Autocomplete, use Moz Keyword Explorer which is similar to Google Keyword Planner only better (and free). Start with a broad phrase, run the tool, then under Group Keywords select “yes, with low lexical similarity.” This prevents you from having to scroll through similar keyword variations over and over again.

Semify Web Grader (Competitor Keywords)
To see a full keyword list for competitor websites, run them through Semify Web Grader…

MozBar (Keyword Competition)
Now you should have a robust keyword list. The final step is to install the MozBar Google Chrome Extension and Google each keyword. The higher the PA (page authority) and DA (domain authority), the more competitive the keyword. Try to select keywords within your own DA/PA range. You can increase these by creating awesome content to get links. The best keywords are those that if you Google, weak (or irrelevant) content exists in the top results.

9. On-Page SEO With Yoast
The first step to optimizing content is researching focus keywords – make sure you do step 8 first. Then you can start creating content (or optimizing existing content) for those keywords.
What Yoast should say…
WARNING: injecting keywords in your content/snippets makes them look spammy! Have you thought about writing an SEO title + meta description to increase CTRs? Every result in Google will be using the keyword – why would anyone click your link? Yes, you should use your keyword in the page title, SEO title, and meta description… but don’t inject keywords just to get green lights in Yoast. Forget about keyword density and keywords in subheadings… start thinking about adding a helpful TOC to long posts, videos, infographics, rich snippets, social sharing images, and beefing up content to make it better (more detailed) than everyone else’s.
Basic Rules Of Yoast:
The green light obsession – if you’re copying/pasting focus keywords throughout your content to make Yoast happy, stop it right now. This article you’re reading is well optimized (it’s super useful and organized) and half my bullets are red. Stop obsessing over green lights and start obsessing over your content. Add an infographic and video to a page and see what happens.
You can only set 1 focus keyword – Yoast premium allows up to 5, but if you don’t have success with 1 keyword then don’t try 2. However it’s not that hard (just make sure the secondary keyword is very similar to your primary) and sprinkle partial matches throughout the content. Generally, each unique keyword should have it’s own page with content reflecting that phrase. Each of your services will have it’s own page – sometimes multiple pages. I have separates pages for WordPress SEO Services, WordPress SEO Consulting, WordPress SEO Audit, and others.
Yoast doesn’t always detect keywords – sometimes it won’t pick up on synonyms or partial matches. If my focus keyword is SEO Consultant and I use SEO Consulting in the content, Yoast may not count this keyword. But I can assume keyword density is higher than Yoast says.
Find a balance between keywords and using a nice page title, SEO title, and meta description – there’s a fine line between writing a headline that sounds good, and writing a headline so it includes your keyword. Find the right balance. Crafting a headline that people will actually click on is a huge part of content optimization.
Yoast only detects keywords in the main content body and search engine snippet – not the sidebars, not the footer, just those two areas. This is also good since search engines analyze content in blocks and your content body/search engine snippets are the important areas.
Focus keyword for homepage – your homepage should usually target your primary keyword. If you have a widgetized homepage you won’t have Yoast’s SEO analysis checklist (since you’re using widgets). But that’s OK, just use the same on-page SEO strategies as the other pages.
You usually do want to target a focus keyword for these pages…
- Homepage
- Product/service pages
- Location pages
- Blog posts (non-promotional keywords)
You usually don’t want to target a focus keyword for these pages…
- Contact page
- Team pages (unless their names are being searched for)
- Testimonials
- Work/portfolio
- Main blog page
Now create a page, set your focus keyword, write some content, and see my suggestions:

Focus Keyword – use Google Autocomplete to find long-tail (specific) phrases, then Google the keyword and analyze the search results with MozBar’s Chrome Extension. Look for keywords with weak content in the top results and avoid competing with authority websites.
Never Target The Same Keyword On 2 Pages – if you’re going to spend time creating 2 pages targeting the same keyword, you might as well spend all that time on 1 page and make the content awesome. I would rather have 1 amazing piece of content than 2 mediocre articles.
Page Title – include your keyword here. If it’s a blog post make sure you write a kick-ass headline preferably with your focus keyword in the beginning of the title. Posts usually have a longer, more descriptive title, page titles are usually shorter and just list a product/service.
URL – shorten URLs to not include stop words (and put emphasis on your focus keyword) UNLESS this makes the URL ready funny. I shortened mine to /yoast-wordpress-seo-settings/
SEO Title – these are the blue links in search results and are the FIRST thing people see. They should be 50-60 characters (length bar in Yoast should be green). If it’s a page, don’t just use “Chicago Wedding Photographer – Tom Dupuis.” Use a modifier to spice up your headline so more people click on it… “Award Winning Chicago Wedding Photographer – Tom Dupuis.” SEO titles for posts can be similar to the title, but adjust it to read nicely in those 50-60 characters.
Meta Description – 150-160 character description of your content, primarily used to increase CTR and get people clicking your link, but should also include your focus keyword.
Image Alt Text – do not stuff keywords here, just describe the image! As long as you’re writing descriptive file names before uploading, you can use the Automatic Image Alt Attributes plugin to automatically use the file name as the alt text, so you don’t have to do this manually.
Keyword Density – Yoast exaggerates the importance of keyword density when it’s actually not very important. Use it once in the first couple sentences, then forget about it.
Keyword In Subheading (H2) – you don’t need to use your keyword here – it looks spammy.
Internal / External Links – use a few links on your page. Google likes this and as long as you’re actually linking to helpful resources (I’m not talking about Wikipedia), then visitors will also find this helpful. Internal links are good because they keep people on your site and are a natural way to build links, but you will need a good amount of content for this. External links are good because they’re like citing sources for the article, which Google likes. Both are good.
Post Long Content – short, crappy content doesn’t rank. Long content that covers the topic extensively (especially content that includes a video or infographic), will. Google measures “average time on page” so your primary goal is to increase the “dwell time” of your visitor. Yoast recommends 300+ words, but try 3,000 words (or more) and you will see way better results.

Rich Snippets – these enhance your snippets with review stars, videos, and information about products, events, recipes, and other types of data. This isn’t part of Yoast but it obviously helps your SEO and click-through rates. I use the premium WP Rich Snippets plugin (here’s my review of it) which has way more options and looks better than free plugins like All In One Schema.org. If you would like to add rich snippets to your WordPress site, follow that tutorial.

Image Speed Optimization – I have a full tutorial for image optimization. Run a page through GTmetrix to see all unoptimized images on the page. Large images need to be resized to fit the correct dimensions. If your content body is 680(w) you should be using images that are resized to 680(w). Use a plugin like Imagify for lossless compression. Images with the “specify image dimensions” error means you need to specify a width + height in the image’s HTML or CSS:
<img src=”/wp-content/uploads/2013/10/Why-Is-WordPress-So-Slow.jpg” alt=”Why Is WordPress So Slow” width=”680” height=”380” />

Targeting Multiple Keywords – I touched on this in the Yoast SEO Premium section, but here’s an example. You’ll want to craft your SEO title/meta description to include elements of both…
Primary Keyword: SEO-Friendly WordPress Themes
Secondary Keyword: SEO-Optimized WordPress Themes
Page Title / SEO Title: 25+ SEO-Friendly WordPress Themes For Everyone
Meta Description: Browse over 25+ SEO-Friendly WordPress Themes which have mobile responsive and HTML5 design, all of which are SEO optimized via the Genesis Framework.
Now sprinkle your secondary keyword (or a partial match of it) in your content. Your permalink should usually just include your primary keyword: /seo-friendly-wordpress-themes/. You do not need to purchase Yoast SEO Premium to target secondary keywords – just use tools like Google Autocomplete to find a secondary keyword, then sprinkle it.
12. Anatomy Of A Perfectly Optimized Page
I borrowed this from Backlinko which emphasizes why content optimization is more than “green lights.” It’s more about creating damn good content using infographics, videos, and creating “the ultimate guide” with a table of contents (like this post). Stop worrying so much about green lights, get off the “text and photos” route and start doing something different.

I also created a version for WordPress (a little outdated but still good)…

13. Remove Yoast Advertisements
The Hide SEO Bloat plugin removes all advertisements in Yoast, making it easier to configure the Yoast settings. Simply install it and it will automatically remove all Yoast ads, which are a lot.

Frequently Asked Questions
🚦 What are the 3 main steps to Yoast?
Configuring the settings, researching focus keywords, and content optimization are the 3 main steps to using Yoast's SEO plugin. Setting up Google Search Console is important too.
🚦 How do I choose focus keywords?
Google Autocomplete is a great tool for finding keywords, especially when using the fill-in-the-blank method from this guide. MozBar and Keywords Everywhere Chrome Extension helps you learn each keyword's competition - which is a critical part to keyword research.
🚦 How important are green lights?
They're not. The 5 most important places to use your keyword are in the page title, permalink, SEO title, meta description, and a couple times in the content body. Nearly all other ranking factors have nothing to do with Yoast, regardless of what other people say.
🚦 What other on-page SEO factors are there besides green lights?
FAQ rich snippets (like the ones you're reading now), adding an HTML table of contents to long posts, optimizing site speed, carefully crafting SEO titles + meta descriptions, and in-depth content are all major factors that can improve both rankings + click-through rates.
🚦 How did I get these emojis in search results?
They're called FAQ rich snippets and I have a tutorial for that. You simply install the Structured Content plugin and add FAQs (with the emoji of your choice) to pages/posts.
Whaddaya Think?
Hit me up in the comments if you have questions :)
See Also:
How I Got 100% Scores In GTmetrix
Cheers,
Tom


