So you want to start a blog.
But you don’t want to read another guide recommending slow page builders, hosting, and plugins (i.e. Bluehost + Elementor).
You know that most successful bloggers aren’t using these (they just want commissions) and that to pass core web vitals, you need to build your blog with speed in mind from the ground up.
This is an advanced guide to starting a blog. Instead of shared hosting, we’ll use Cloudways Vultr High Frequency. Instead of Elementor, we’ll use Astra Starter Templates with Gutenberg. Instead of GoDaddy or NameCheap’s DNS, we’ll use Cloudflare. And instead of Yoast, Rank Math. The only costs are domain, hosting, and optional upgrades (Astra, Rank Math, and WP Rocket). Yes, I’m an affiliate for these, but they are much better/faster than other alternatives.
These simple changes will result in a faster, more SEO-friendly blog. Sure, it will require a few extra steps. But it will pay off long-term to get started on the right foot rather than having to switch themes or get locked into a 3 year hosting contract after you realize the service is bad.
The tools you use to build your blog have a huge impact on speed, SEO, and design. It’s much easier to do it correctly from the start.

Why I Started This Blog
I needed money to move out of my parent’s house!
Actually, I’m being 100% honest. God bless my parents, but they always had money problems and I saw the toll it took on almost every aspect of their lives. I always thought, this will change.
Passive income drew me to blogging and affiliate marketing. The unlimited potential to get more traffic, sales, and readers got me hooked.
But like many, I got discouraged after countless nights of plugging away without results. I decided to do one last “blogging binge” and if that didn’t work, I was seriously going to quit. You know those stories about songwriters locking themselves in a room until the album is finished?
Fast forward 1 month later.
I wake up one morning in July, 2017 to a large spike in my Google Analytics. It looked like Dogecoin in it’s best days. That same week, I packed my stuff and moved to Denver, Colorado.
Fast forward to present day and this blog has made me well over half a million dollars. It gets 3,000 visitors/day, and loads in about 1 second (I’m a speed nerd). If you haven’t noticed, I teach people about WordPress (speed, SEO, and affiliate marketing). All things I’ll cover in this guide.

- Buy a domain from NameCheap
- Sign up for cloud hosting
- Launch a server
- Make your server faster
- Connect your domain and add SSL
- Change DNS to Cloudflare
- Login to your WordPress dashboard
- Import a pre-designed Astra Starter Template
- Design your blog
- Install WP Rocket
- Install Rank Math
- Research keywords for blog posts
- Add keywords
- Write catchy SEO titles
- Add schema
- Add a table of contents
- Give your post a banner image
- Monetize your blog with affiliate links
- Add a GDPR notice
- Improve your security
- Install Search Console + Analytics
- Optimize for core web vitals
- Build your email list from the start
- Create and embed YouTube videos
- Get help from WordPress Facebook Groups
- Tools: the full list of tools used in this tutorial
1. Buy a domain from NameCheap
NameCheap is a great place to get your domain name. It’s arguably cheaper than GoDaddy, especially if you’re cheap like me and use Honey. They also offer free domain privacy for life.
Some hosts (i.e. Bluehost) offer free domain names, but their hosting isn’t great. Other hosts (i.e. SiteGround) offer domain names but it’s more expensive than NameCheap and GoDaddy. NameCheap and GoDaddy are both good places to get your domain, but not hosting. We’ll sign up for domain and hosting separately because the best domain registrars aren’t the best hosts.
What should your domain be?
- Choose a memorable domain
- Don’t choose domains because of keywords
- Try wordoid.com to get ideas for your domain name
- .coms are most popular (no need buy unneeded extensions)

2. Sign up for cloud hosting
Cloudways Vultr High Frequency is what I recommend for hosting.
Vultr HF is likely the single most popular hosting plan in the WordPress Hosting Facebook Group (a great place to get unbiased feedback from non-affiliates). I use it and you can click through my blog to see how fast it loads. In nearly every GTmetrix test, my TTFB is <150ms.
Ain’t nobody got time for slow TTFBs when trying to pass core web vitals. SiteGround went downhill and their TTFB is slow, Hostinger writes fake reviews, and GoDaddy, Bluehost + EIG brands were never good. Since core web vitals, there’s been a large shift in people moving to Cloudways DigitalOcean and now Vultr HF (since it was just released on 8/20/2020). This shift can be seen in recent Facebook polls, migration results, and threads if you take the time to look.
If you want to test them yourself, here are 3 demo sites on different Cloudways servers. Each use the same Astra Starter Template, plugins, and configuration in the Cloudways dashboard. They also offer free 3-day trials, free migrations, and helpful support which makes it easy to try.
- DigitalOcean: cwdoserver.com
- DigitalOcean Premium: cwdopserver.com
- Vultr High Frequency: cwvltrhfserver.com
Why Cloudways?
- Rated #1 host in 15+ Facebook polls
- TTFB should consistently be under 200ms
- They continuously update their speed technology
- Multiple caching levels (Redis, memcached, Varnish)
- Support is great as reflected in their Trustpilot reviews
- Free SSL, staging, bot protection, cron job management
- Monthly pricing with no long-term contracts or high renewals
- Their community manager is very helpful if you have questions
- They have a Cloudways Users Facebook Group to ask questions
- New servers added regularly (DO Premium + Vultr High Frequency)
- If you’re still not confident in using them, read my full Cloudways review
Cloudways is consistently rated the #1 host in Facebook polls (click thumbnails to enlarge).


Step 1: Sign up for Vultr High Frequency.

Step 2: Fill out your info, check your email, and activate your Cloudways account.

3. Launch a server
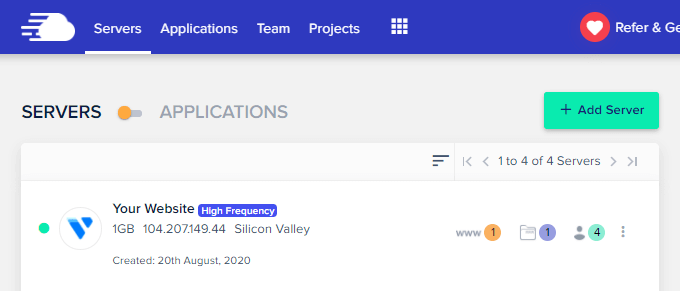
Step 1: After you sign up for Cloudways, you’re prompted to launch a server.

Step 2: Name your app/server, then choose a server. 1GB Vultr HF should be plenty for new blogs. I would only scale to 2GB+ if you’re planning on running resource-hungry plugins (i.e. WooCommerce, Elementor) or if your traffic + CPU usage increases which you can monitor in Cloudways. Select the data center closest to your users. When you’re done, click Launch Now.

Step 3: Wait for the server to be created (est. 2 minutes).
4. Make your server faster
Step 1: Increase memory limit to 256MB (Servers → Settings & Packages).

Step 2: Use PHP 8.0, MariaDB 10.4, and install Redis (Servers → Settings & Packages).

Step 3: Activate Redis and disable Varnish (Servers → Manage Services).

5. Connect your domain and add SSL
Step 1: Add your domain to Cloudways (Applications → Domain Management).

Step 2: Update your DNS records in NameCheap (Dashboard → Domain List → Manage → Advanced DNS → Add New Record. The A Record value is the Public IP found in “Access Details” in Cloudways. The CNAME is your domain name. Use the same formatting as below.

Step 3: Add free Let’s Encrypt SSL (Applications → SSL Certificate) and enable auto renewal.

6. Change DNS to Cloudflare
NameCheap’s DNS is slow and I don’t recommend using it.
For even faster speeds, we’ll be moving your DNS from NameCheap to Cloudflare since their DNS is faster. Otherwise, a slow DNS can cause latency and slow down your WordPress blog.
Step 1: Sign up for a free Cloudflare account, add your site, and run the scan prompted by Cloudflare. You will eventually come to a page where Cloudflare assigns you 2 nameservers.

Step 2: Add Cloudflare nameservers to NameCheap. Go to Dashboard → Domain List → Manage → Nameservers → Custom DNS. Add the two nameservers Cloudflare provided you.

8. Login to your WordPress dashboard
Step 1: Find your WordPress login details in Cloudways (Applications → Access Details). This will be something like: yourdomainname.com/wp-admin/. You’ll also find a link to your website.

Step 2: Login and explore your WordPress dashboard.

7. Import a pre-designed Astra Starter Template
Astra Starter Templates make starting a blog easy.
They’re beautiful, mobile responsive, and 1-click import. They usually have many themes for each industry and are one of the fastest WordPress themes. GeneratePress and Oxygen Builder are also lightweight, but I find Astra themes to look nicer and are easier to work with.

Why Astra?
- 1-click import
- Awesome designs
- Mobile responsive
- Load fast (especially Gutenberg)
- Reliable developers (Brainstorm Force)

Step 1: In WordPress, go to Plugins → Add New → search and install Starter Templates.

Step 2: Go to Appearance → Starter Templates. On the top right, filter by Block Editor. This ensures you’re using Gutenberg’s block editor which is faster than most page builders. Both WP Rocket and I built our site in Gutenberg. Elementor’s Hello theme is fast, but most Elementor themes aren’t and you will need to optimize it (same with Divi). They add extra JavaScript, CSS, and div wrappers to your site which hurts core web vitals. But choose the one you want. Most Astra themes are free while others are premium. I’ll be using the Travel Blog theme in this guide.

Step 3: When you’re ready, import the template by clicking Import Complete Site. Astra will download the template (content, plugins, widgets, and WordPress customizer settings) to your own blog. If you want to change templates after you’ve already imported one, follow the same steps to import the complete site, only you’ll see an option to “delete previously imported site.”


Step 4: Refresh your website and it will look exactly like the template.

Congratulations! You now have a speed optimized blog equipped with a Vultr HF server, SSL, Cloudflare DNS, and Astra + Gutenberg.
9. Design your blog
I’m not going to cover design (much) because:
- It’s somewhat easy to learn by yourself.
- There are plenty of YouTube tutorials on Astra and Gutenberg.
- Many of you are already capable of design (or are using something other than Astra).
You can change most things about your blog’s design under Appearance → Astra Options.

Things You Can Do In Astra Options:
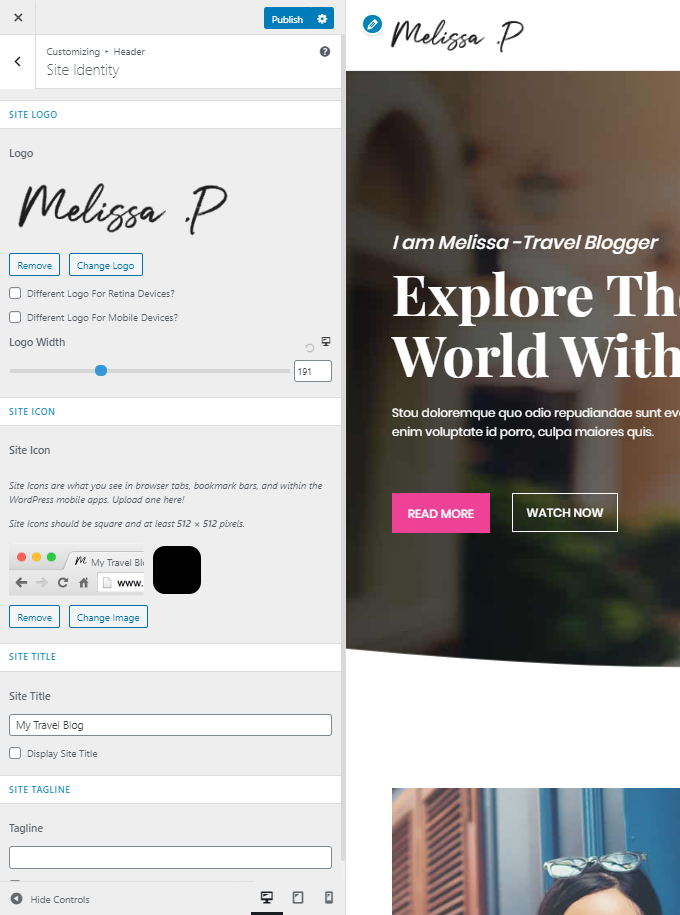
- Name your blog
- Upload your logo
- Upload a favicon (16x16px site icon)
- Change footer layout + copyright area
- Change font family, size, weight, line height
- Change navigation menu layout on desktop/mobile
- Change layout of pages/posts (full width, sidebar, etc)
- Customize the sidebar (if you have one) and it’s width
- Change color of text, theme, link, link hover, header, background
- Customize information on your blog (author, publish dates, category, etc)
You’ll also want to learn Gutenberg.

10. Install WP Rocket
Speed optimization isn’t complete without a good cache plugin.
Cloudways has their own Breeze plugin, but WP Rocket has more features (speed optimizations) and should result in better core web vital scores. Feel free to try both if you like.
WP Rocket is rated the #1 cache plugin in most polls (click thumbnails to enlarge).


Step 1: Get 10% off WP Rocket by subscribing to their newsletter on their coupons page.

Step 2: Install WP Rocket and configure the settings.

11. Install Rank Math
Rank Math is quickly overtaking Yoast as the top-rated SEO plugin.
It’s more lightweight (less lines of code) with less ads and more SEO features than Yoast and most other SEO plugins (it’s also awesome for adding schema). The free version comes with nearly everything in Yoast Premium, but they do have a pro version. Most people only get the pro version if they need to add multiple schema types, otherwise the free version will work fine.
Rank Math is the #1 SEO plugin in most recent Facebook polls (click thumbnails to enlarge).


Step 1: Install Rank Math, create a profile, and connect your site. Run the Advanced setup wizard to setup key settings or migrate from another SEO plugin. Otherwise, go to the settings.
![]()
Step 2: Configure the settings (click thumbnails to enlarge). These depend on whether you’re using Rank Math free vs. pro. They also depend on which modules you’re using. For example, I don’t use WooCommerce or AMP so those modules are disabled. And I personally don’t use the link counter, SEO Analysis, or role manager, so those are disabled too. Learn the features and figure out which modules work best for you. Below are suggested settings for the free version.
Key Things To Do In Rank Math
- Configure modules
- Strip category base (/category/)
- Setup Google Search Console + other Webmaster Tools
- Index pages/posts, then noindex thin/unhelpful content (i.e. tags)
- Set a default OpenGraph thumbnail (12oo x 630 pixels) for Facebook
- Noindex misc pages in most cases (date archives, archive subpages, etc)
- Configure default SEO titles, meta descriptions, and schema for pages/posts
- Enable “bulk editing” so you can bulk edit your SEO titles and improve CTRs
- Only index category pages if you design them and have lots of posts in categories
- Configure the sitemap and submit to Google Search Console + other Webmaster Tools

12. Research keywords for blog posts
Google Autocomplete is a great place to find keywords for blog posts.
Tools like Keywords Everywhere (paid) show a keyword’s monthly searches, CPC, and estimated competition. However, you should always Google the keyword and look at the top results to visually see the competition. Are authority websites dominating the top results? Is their content strong (in-depth, lots of comments, and links)? Do their authors keep it current?
The best keywords have a blend of profitability, monthly searches, and low competition. When you find one, the main goal should be to create better content than whoever’s in the top results.


13. Add keywords
Once you have a keyword (topic) to write about, use that keyword in the blog post:
- Post title
- Permalink (shortened)
- SEO title (ideally in front)
- A few times in the content body, once in the first few sentences
That’s it! SEO plugins will tell you to add your keyword to subheadings, image alt text, meta descriptions, and increase keyword density. You usually don’t need to do this for many reasons:
- Keyword stuffing penalties
- It makes your content sound unnatural
- It doesn’t always make sense to use the exact keyword
- Sometimes, your images don’t exactly describe the keyword
- SEO plugins sometimes only detect exact matches when partial matches are good too
- Google often doesn’t use meta descriptions and uses excerpts from your content instead

14. Write catchy SEO titles
Google your keyword, look at everyone else’s SEO title, then write yours differently. While it’s usually best to use your keyword in front, sometimes a “catchier” SEO title can be written with your keyword sprinkled throughout the text. Numbers and power words usually perform well.
![]()

15. Add schema
In WordPress blogs, schema is often used with reviews, FAQs, and recipes (although there are many other supported data types). As an affiliate blog, I personally use reviews/FAQs the most.

Rank Math supports most schema types, adds the markup properly, and is easy. Otherwise, I recommend Schema Pro or Google Data Highlighter. Other schema plugins don’t always add the markup properly (and may be outdated) which can cause schema errors in Search Console.
Add Schema Using Rank Math
- Edit a post
- Scroll down to the Schema section
- Choose your schema type
- Fill out the required information
- Check for schema errors in Search Console
![]()
Google has cracked down on FAQ schema. Just like featured snippets, they should be objective (not just your opinion) and a highly relevant question. Answer The Public is a great tool for this.
16. Add a table of contents
Here’s why you should a table of contents to posts:
- It can be used in list featured snippets.
- Easy for users to find what they’re looking for.
- Anchors lets people link and jump to specific sections on the post.
- Encourages you to write organized, in-depth content (length is strength).

There are a couple good TOC plugins (i.e. Lucky and Gutenberg Blocks). Or you can design colored backgrounds in CSS and create your TOC manually for each post using HTML code.
<ul>
   <li><a href="/permalink/#item-one">Item One</a></li>
   <li><a href="/permalink/#item-two">Item Two</a></li>
   <li><a href="/permalink/#item-three">Item Three</a></li>
</ul>

<h3 id="item-one">Item One</h3>
<h3 id="item-two">Item Two</h3>
<h3 id="item-three">Item Three</h3>
17. Give your post a banner image
The same banner image can be cropped/resized to be used in multiple places (I use Canva):
- Main graphic – usually at top of a post
- Featured image – on your main blog page
- Twitter og:image – 1024x512px in Rank Math
- Facebook og:image – 1200x630px in Rank Math
- Featured snippet – sometimes used in Google’s search results


18. Monetize your blog with affiliate links
So how do I make $150,000/year with affiliate marketing?
Just look at this post. I try to give you tons of value but also use affiliate links to Cloudways, NameCheap, Astra Starter Templates, Rank Math Pro, WP Rocket, and a few others. It’s why “how to start a blog” tutorials are so popular (and competitive). There’s so many things to offer.
Step 1: Sign up and get approved. You usually need a decent amount of traffic (or a history of sales) before getting approved. If you have a large following somewhere else (i.e. YouTube), you may be able to convince affiliates to approve you. Otherwise, you need to generate traffic first.
Step 2: Get your affiliate links. Login to your affiliate dashboard and grab your affiliate links. With most individual affiliate programs, they assign you an affiliate ID which you can add to any URL on their website to turn it into an affiliate link. In affiliate marketplaces like ShareASale, they preassign affiliate links but also have a custom link generator. Use these to add deep links.


Step 3: Install an affiliate link management plugin (I use Thirsty Affiliates) and add your affiliate links here. This lets you organize, track, cloak, nofollow, and easily add affiliate links to the blog.

Step 4: Configure the Thirsty Affiliate plugin settings.
- Choose a link prefix (I use /go/)
- Enable statistics in the “Modules” setting
- Use nofollow + sponsored (recommended by Google)
- Consider Thirsty Affiliates Pro if you want automatic keyword linking

Step 5: Add affiliate links to posts. If you’re using the classic editor like me, use the Thirsty Affiliates button to add affiliate links. When you do it this way, all the attributes you configured in the settings (cloaking, nofollow, sponsored, etc) are automatically added to the affiliate link.

Step 6: Use your affiliate dashboard to track sales, statistics, and get to know your affiliate dashboard because it can be very helpful (especially when trying to increase conversion rates).

Adding affiliate links is easy, but the lessons you’ll learn from my stories will shed more light than any book or course will teach you.
Write content with affiliates in mind.
Even if you haven’t gotten approved for a program yet, you can still prepare. Take my blog for example. I promoted Rank Math even when they didn’t have an affiliate program. When they added one and approved me, it took less than an hour to replace normal links with affiliate links. Same thing with Oxygen Builder. I naturally mention them because they’re a fast builder. They don’t have an affiliate program yet, but I bet they might in the future. And if they do, I’ll be ready.
Amazon: the elephant in the room.
Amazon’s low commissions (4-10%) are probably the biggest drawback. What scares me even more is how powerful they are. They reduced commission rates in the past, so what makes you think they won’t do it again? Do they really need their affiliates? Why would someone come to your blog instead of going directly to Amazon? Sure, there are successful Amazon affiliates (a common strategy I see is YouTubers reviewing video equipment). But I like to promote growth companies since they tend to treat affiliates better. There were just too many red flags for me.
The wild, wild hosting industry.
Ahh, hosting. So many scumbags in this industry. Hosts will do anything to get new customers, and affiliates will do anything to make those high commissions. If you’re entering this industry, I just encourage you to be truthful. Recommend the host you actually use. Don’t run a hosting speed test with caching/CDN turned on with one host, and not the others. Point out cons, and please don’t be another “how to start a blog” Bluehost affiliate. There’s already enough of them. The industry is ultra competitive and I know there’s no way I’m going to rank for keywords like “how to start a blog” or “SiteGround reviews.” You’re going to have to be more clever than that.
Don’t put your eggs in one basket.
IMO, SiteGround went downhill in 2020. Since I try to be truthful, I mentioned issues I had with them on my blog (and to them, but they didn’t care). Ironically, one was how they cancelled Asian affiliate accounts. When they saw my complaints, they cancelled my affiliate account and before I knew it, we parted ways. They were 80%+ of my affiliate income at the time. Thankfully, I anticipated SiteGround would do this and I had partnered with Cloudways around the same time. I changed all my content/recommendations from SiteGround to Cloudways, sales stayed the same (they eventually increased), and all is good to this day. But what if Amazon did this to me? What if I only had a couple affiliates to choose from? I have seen so many Amazon affiliates (specifically) get crushed when accounts get cancelled, commissions get reduced, or Amazon writes their own articles to outrank their affiliates. Don’t lay your eggs in one basket my friends. Part of the reason I like hosting is because nearly every company wants you to be their affiliate.
Read the fine details in affiliate programs.
- What’s the cookie period?
- Do you have to climb tiers?
- Do they offer sub-affiliate sales?
- Do they offer recurring commissions?
- Do they assign you an affiliate coupon code?
- What can you do in their affiliate dashboard?
Where to find affiliates.
Many affiliates run their own program which you can usually find a link to in the footer of their website. Others are part of large affiliate marketplaces like ShareASale, Impact, or CJ Affiliate.
How I increased conversions from 2% to 7%.
Social proof and coupon codes! For social proof, this was adding Facebook polls, migration results (Tweets and Facebook posts when people moved to Cloudways), and conversations of people recommending Cloudways. For coupon codes, Cloudways gave me the code: OMM25. Whenever someone uses that code, even if they don’t click my affiliate link, it credits me a sale. This is great for YouTube (it replaces directing people to affiliate links in the video description).
Is it really passive income?
Kind of. A couple times, I didn’t work on my blog for several months and still maintained my affiliate income. But as time went on, my content started to get outdated, sales dropped, and I needed to get back to work. Things can change in your industry, with affiliates, technology, etc. You need to write new content and keep your existing content updated. Especially in the beginning when you’re starting off with no content, it can be a lot of work without a paycheck.
Write an affiliate disclaimer.
You’re legally obligated to tell people if you’re an affiliate. Write an affiliate disclaimer page, write a short affiliate disclaimer in the post, or use (aff link) whenever you use an affiliate link.
Affiliate Disclaimer – I’m an affiliate for Cloudways, NameCheap, WP Rocket, and other tools in this tutorial. This means I get a commission from the sale at no expense to you. I did my best to select the best, fastest tools. I also donate a good chunk of this blog’s affiliate income to GoFundMe campaigns and your support is much appreciated.
How long does it take to get sales?
It can take several months to get your first sale and several years to make enough money to sustain a living. Other than spending more time on content, the biggest tips I can give is to target long-tail, profitable keywords, (but not too competitive) and promote high ticket items. Run the numbers and figure out how many sales you need to make each day to make a living.
Here’s the equation:
My commissions are $xxx per sale and I have xxx daily readers. If xxx of the readers click affiliate links, and xxx convert, I’ll make $xxx/day.
Here’s roughly what it looks like for my blog: My commissions are $150 per sale and I have 3,000 daily readers. If 43 of the readers click affiliate links and 3 convert, I’ll make $450/day.
19. Add a GDPR notice
GDPR compliance is mandatory.
Use this cookie notice plugin to let users know your website uses cookies and provide a link to your privacy policy page. In addition, you should use contact forms (and blog comments) with consent checkboxes and anonymize IPs in Google Analytics. Kinsta has a nice GDPR checklist.

20. Improve your security
If you’ve followed steps 4-6 in this guide, you should already be using SSL, Cloudflare, and the latest PHP version. Three more easy tweaks can make your WordPress blog even more secure.
- Limit Login Attempts – Limit Login Attempts Reloaded is a solid plugin for this. It also prevents too many failed login attempts from hogging server resources (and comes a log).
- Disable XML-RPC – xmlrpc.php allows the WordPress mobile app to communicate with WordPress, but it also presents security vulnerabilities. Since you most likely won’t use it, you can disable it with Disable XML-RPC (or do it manually). Perfmatters also does this.
- Rename WP-Admin – use WPS Hide Login to rename the WordPress admin/login URLs to a custom URL. By default, attackers go here to attempt logins. Moving them also prevents failed attempts from hogging resources. You can also do this with Perfmatters.

21. Install Search Console + Analytics
In the Rank Math section, you should have installed Search Console (sign up and add the verification code to Rank Math → General Settings → Webmaster Tools → Search Console).
![]()
To add Google Analytics, I recommend Jeff Starr’s GA Google Analytics plugin. It lets you anonymize IPs (for GDPR) and use a smaller tracking code size (analytics.js is 18.4 KB while gtag.js v4 is 51.5 KB according to Perfmatters). Once you’re done setting it up, enable the Google Tracking add-on in WP Rocket to host your Google Analytics tracking code locally.


![]()
22. Optimize for core web vitals
On your journey, keep an eye on your mobile core web vitals report in Search Console.

As you add more plugins, images, and third-party code, they will inevitably hurt core web vitals. Using this guide, you’ve already built a blog on a fast infrastructure. Now it’s time to keep it fast. Lighthouse (preferred) and PageSpeed Insights show you specific recommendations to optimize your blog. These recommendations should improve both core web vitals and Lighthouse scores:
Optimize your LCP element.
Your LCP (largest contentful paint) element is usually an image or background image. For me, it’s the purple background image that loads across my entire site. Optimize this as best you can (use correct dimensions, specify dimensions, compress it, use the right image file type, exclude it from lazy load if it appears above the fold, and consider using an image CDN). Remember to optimize your logo, favicon, sidebar, footer, and other images that load across your entire blog.

Avoid layout shifts.
Your CLS (cumulative layout shift) score should ideally be “0.” Use Google’s Layout Shift Debugger to find layout shifts. Specify dimensions of images, videos, iframes. If you use AdSense, reserve space for it by specifying ad dimensions in the div code. Use font-display:swap by adding the necessary code to your font’s CSS (or use the Swap Google Fonts Display plugin). Test settings in your cache plugin, specifically optimizing CSS delivery and asynchronous CSS. When using animations, use transform: scale() instead of changing the height/width attributes, and use transform: translate() to move elements around instead of using top, right, bottom, left.
Host fonts, analytics, Avatars, and GTM locally.
Serve fonts locally instead of fonts.gstatic.com and minimize the number of font families, weights, and icons. OMGF and WP Rocket’s Google Tracking add-on can help host files locally. For hosting Avatars locally, use the WP User Avatar plugin to upload a locally hosted avatar.
Optimize CSS + JavaScript with Autoptimize.
Autoptimize often does a better job at optimizing CSS + JavaScript files than cache plugin. In the Autoptimize settings, optimize CSS and JavaScript code, then aggregate CSS and JS files.
Defer JavaScript with Async JavaScript.
If you have render-blocking resources, try installing Async JavaScript and clicking “apply defer.”
Optimize images with ShortPixel.
ShortPixel optimizes images with compression, WebP, stripping EXIF data, and scaling options.
Unload unused assets.
Asset CleanUp and Perfmatters let you disable unused CSS and JavaScript from pages/posts where they don’t need to load. Asset CleanUp also has a pro version which lets you disable custom CSS. I use Perfmatters since the UI/UX is better. Both can also help with bloat removal.
Optimize third-party code.
Third-party code can be from Google Analytics, AdSense, Tag Manager, Maps, and even social sharing buttons/widgets. You can find your blog’s third-party code in Lighthouse. Besides not using too much third-party code, you can host files locally, lazy load videos, replace YouTube iframes with preview images, and delay third-party JavaScript in WP Rocket or Flying Scripts.
Preload, prefetch, and preconnect.
Browser resource hints should always be tested to make sure they have a positive impact on load time. Try preloading your LCP element and fonts, prefetch domains of third-party code, and preconnect your CDN URL and third-party fonts (fonts.gstatic.com) if you’re using them.
Avoid slow plugins.
See my list of common slow plugins, use Query Monitor to find slow plugins on your blog, and the WP Hive Chrome Extension to find slow plugins while searching the WordPress repository.
Configure Cloudflare settings.
We previously moved to Cloudflare’s DNS in step 6, but you can also use page rules, automatic platform optimization, Brotli, and hotlink protection to make your WordPress blog even faster.
23. Build your email list from the start
Don’t wait to build your email list.
MailChimp is free up to 2,000 contacts. Using the MailChimp plugin, you can connect your account, create sign up forms, and start collecting emails in no time. Subscribers are usually your most loyal followers who will read new posts, share content, and complete call to actions.

24. Create and embed YouTube videos
YouTube and blogs work together so nicely.
You create videos, optimize them for YouTube keywords, and embed the video on your blog. Embedding the video improves the quality of your blog’s content tremendously, and the engagement it gets on your blog helps the video rank higher in YouTube. Double whammy.
I also find the competition in YouTube to be less competitive than Google, but videos can get outdated quickly. If you’re interested in YouTube, be sure to check out my YouTube SEO guide.

25. Get help from WordPress Facebook Groups
I’ve seen a lot of spammy Facebook groups, but these ones are actually super helpful and can give you lots of support. I added asterisks next to the Groups I personally find the most helpful.
- SEO Signals Lab*
- Cloudways Users*
- Divi Theme Users
- Oxygen User Group
- Elementor Community
- WordPress Hosting*
- WordPress Speed Up
- Blogging For New Bloggers*
- WordPress For Non-Techies By WP Crafter
26. Tools: the full list of tools used in this tutorial
I use all them except for LuckyWP Table Of Contents, OMGF, and Asset CleanUp.
- Cloudways – hosting
- NameCheap – domain.
- Cloudflare – DNS/CDN.
- Astra – starter templates.
- Gutenberg – block editor.
- WP Rocket – optimization plugin.
- Rank Math – SEO + schema plugin.
- Google Autocomplete – find keywords.
- Keywords Everywhere – see keyword competition.
- LuckyWP Table Of Contents – TOC plugin.
- Canva – for creating high quality graphics.
- ShareASale – marketplace with tons of affiliates.
- Thirsty Affiliates – affiliate link management plugin.
- Cookie Notice & Compliance – cookie notice/GDPR plugin.
- Google Search Console + Analytics – metrics, SEO, speed, more.
- GA Google Analytics – plugin to add and optimize the tracking code.
- OMGF – host fonts and GTM locally to prevent third-party requests.
- Autoptimize – often does a better job at optimizing CSS + JavaScript.
- Async JavaScript – defer JavaScript to eliminate render-blocking resources.
- ShortPixel – image optimization plugin (compression, WebP, EXIF data, etc).
- MailChimp – collect emails using MC4WP: Mailchimp for WordPress plugin.
- Perfmatters + Asset CleanUp – remove unused JavaScript, CSS, bloat removal.
- Ninja Tables – not mentioned, but the plugin I use for adding tables in blog posts.
- Disable Gutenberg – because I still find it easier to write posts in the classic editor.
If you liked this, you’ll also like my WordPress SEO Guide. Hope you enjoyed this one :)
Cheers,
Tom


