 Image optimization doesn’t end in Photoshop.
Above the fold images should be preloaded and excluded from lazy load (improving LCP).
Background images aren’t lazy loaded by default since page builders load them from CSS. Instead, you’ll have to add a lazy-bg helper class to them which is found in a number of plugins.
Image CDNs optimize them “on the fly” while plugins add bloat and can increase memory usage. Some CDNs also do a much better job than others (including resizing them for mobile).
So even if you were to resize/compress images before uploading them to WordPress, it only addresses 2/7 image recommendations found in PageSpeed Insights. There’s a lot more to it! This tutorial also compares popular image optimization services like Cloudflare Mirage/Polish, BunnyCDN’s Bunny Optimizer, QUIC.cloud, ShortPixel + Adaptive Images, Optimole, and others.
Image optimization doesn’t end in Photoshop.
Above the fold images should be preloaded and excluded from lazy load (improving LCP).
Background images aren’t lazy loaded by default since page builders load them from CSS. Instead, you’ll have to add a lazy-bg helper class to them which is found in a number of plugins.
Image CDNs optimize them “on the fly” while plugins add bloat and can increase memory usage. Some CDNs also do a much better job than others (including resizing them for mobile).
So even if you were to resize/compress images before uploading them to WordPress, it only addresses 2/7 image recommendations found in PageSpeed Insights. There’s a lot more to it! This tutorial also compares popular image optimization services like Cloudflare Mirage/Polish, BunnyCDN’s Bunny Optimizer, QUIC.cloud, ShortPixel + Adaptive Images, Optimole, and others.
- Choose an image optimization service
- Resize images to correct dimensions
- Resize images for mobile
- Compress them at 85%
- Serve them in WebP or convert them manually
- Preload above the fold images
- Exclude above the fold images from lazy load
- Lazy load background images (or exclude them)
- Specify dimensions
- Set cache expiration to 1 year
- Disable hotlinking
- Use local YouTube thumbnails
- Use local avatars
- Remove EXIF data
- Lower the quality on slow connections

1. Choose An Image Optimization Service
Cache plugins, image optimization plugins, and image CDNs all do different things. Using a good “setup” is extremely important to make sure it includes all possible image optimizations. Cache plugin – I recommend FlyingPress because it’s easy to preload above the fold images while excluding them from lazy load, it includes a lazy-bg helper class to lazy load background images, and hosts YouTube placeholders locally. Like most cache plugins, it also adds missing image dimensions. They offer FlyingCDN which uses BunnyCDN and has a large network, fast Tbps, and performs well on cdnperf.com. FlyingCDN includes Bunny Optimizer, an image CDN that takes care of compression, WebP, and mobile resizing. WP Rocket makes you jump through hoops and SiteGround Optimizer (along with SiteGround CDN) lack several key features as well. Image CDNs – generally better than image optimization plugins because:- Less plugins
- No backup bloat
- Images are resized for mobile
- They don’t increase memory usage
- FlyingPress + FlyingCDN
- FlyingPress + Cloudflare Pro (which has Mirage, Polish, APO)
- FlyingPress + Cloudflare Enterprise on Rocket.net (what I use)
- LiteSpeed Cache + QUIC, but still lacks image optimization features
- For WP Rocket, look into Bunny Optimizer or Cloudflare Pro + Optimole or Perfmatters
| WP Rocket + RocketCDN | SG Optimizer + SG CDN | FlyingPress + FlyingCDN | LiteSpeed Cache + QUIC | Cloudflare Mirage + Polish | |
|---|---|---|---|---|---|
| Compression | x | ✓ | ✓ | ✓ | ✓ |
| WebP | x | ✓ | ✓ | ✓ | ✓ |
| Specify dimensions | ✓ | x | ✓ | ✓ | x |
| Lazy load backgrounds | Inline | x | lazy-bg class | x | ✓ |
| Preload above the fold images while excluding from lazy load | x | x | ✓ | x | ✓ |
| Mobile resizing | x | x | ✓ | x | ✓ |
| Local YouTube placeholders | x | x | ✓ | x | x |
| CDN | StackPath | SiteGround | BunnyCDN | QUIC.cloud | Cloudflare |
| CDN PoPs | 73 | 176 | 112 | 81 | 285 |
| Price | $59/yr + $7.99/mo | $7.49/mo | $60/yr + $.03/GB | $.02 – .08/GB | $20/mo |
2. Resize Images To Correct Dimensions
Create an “image dimensions cheat sheet” which looks something like this:- Logo: 242 x 107
- Favicon: 16 x 16
- Sidebar images: 414(w)
- Carousel images: 115(h)
- Slider images: 1000 x 500
- Featured images: 250 x 250
- Background images: 1920 x 1080
- Fullwidth blog post images: 765(w)
- Twitter OG image 1024 x 512
- Facebook OG image: 1200 x 630

3. Resize Images For Mobile
Since image optimization plugins don’t resize images for mobile, use an image CDN that supports it (like Cloudflare’s image resizing or Bunny Optimizer). Or use ShortPixel Adaptive Images. A lot of people complain about poor LCP on mobile – mobile image resizing can help.
4. Compress Them at 85%
Lighthouse tests images at 85%, so that’s the ideal compression level. Especially if you’re using an image optimization, you should resize/compress images before uploading them. Otherwise, the plugin has to do a lot of work which puts stress on your server.
5. Serve Them In WebP Or Convert Them Manually
WebP images can be less than half the size of PNGs. Just by converting the image at the top of this post, it went from about 38kBs to 10kBs. But while WebP images are totally worth it, image CDNs don’t always serve them in WebP if the “savings” aren’t high enough. That said, here are some things I’ve learned when using WebP. Test WebP Images – open your website in Chrome Dev Tools and go to the Network tab. Use Ctrl + R (Windows) or ⌘ + R (Mac). You will see all images loaded on the page and their “type.”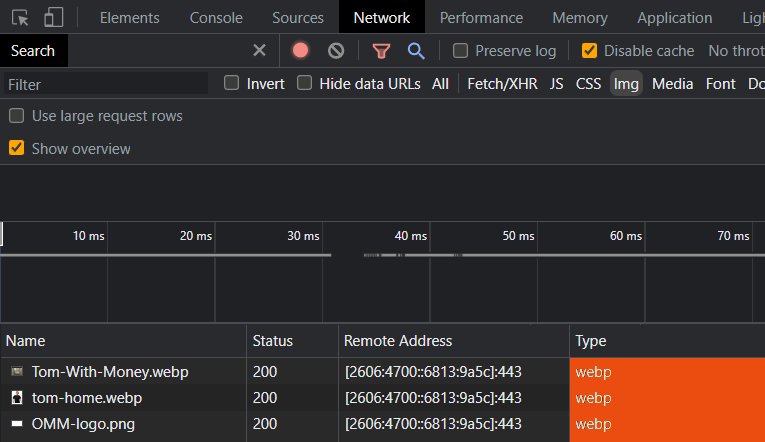
6. Preload Above The Fold Images
While above the fold images should be preloaded, they’re usually different on each page. And when PageSpeed tells you to preload your LCP element, it’s probably the image that’s different.

7. Exclude Above The Fold Images From Lazy Load
Just like above the fold images should be preloaded, they should also be excluded from lazy load. Otherwise, it creates delay since lazy loading images that are seen first is counterintuitive. Again, the easiest way is to preload critical images setting in Perfmatters or FlyingPress. WP Rocket can exclude a specific number of images from lazy load, but it’s an 8-step process which involves installing a helper plugin, editing the number in a text editor, and uploading the plugin. While you can manually exclude sitewide images like your logo/sidebar images, manually excluding your (unique) LCP images can be tedious, and setting a number is more effective.
8. Lazy Load Background Images (Or Exclude Them)
The easiest way to do this is CSS background images in Perfmatters. Some cache and image optimization plugins also have helper classes to lazy load background images (lazy-bg) or exclude them from lazy load (skip-lazy). You can check the documentation. FlyingPress has lazy-bg, Elementor has lazyload, SG Optimizer has skip-lazy, and Optimole does this with CSS selectors, or by adding the no-lazy image class in the plugin settings, then adding it to your images. There are even plugins specifically to lazy load Divi background images. And if neither your plugins or page builder support the classes, you can try adding your own CSS class. In WP Rocket, you’ll need to add class names to the exclude list.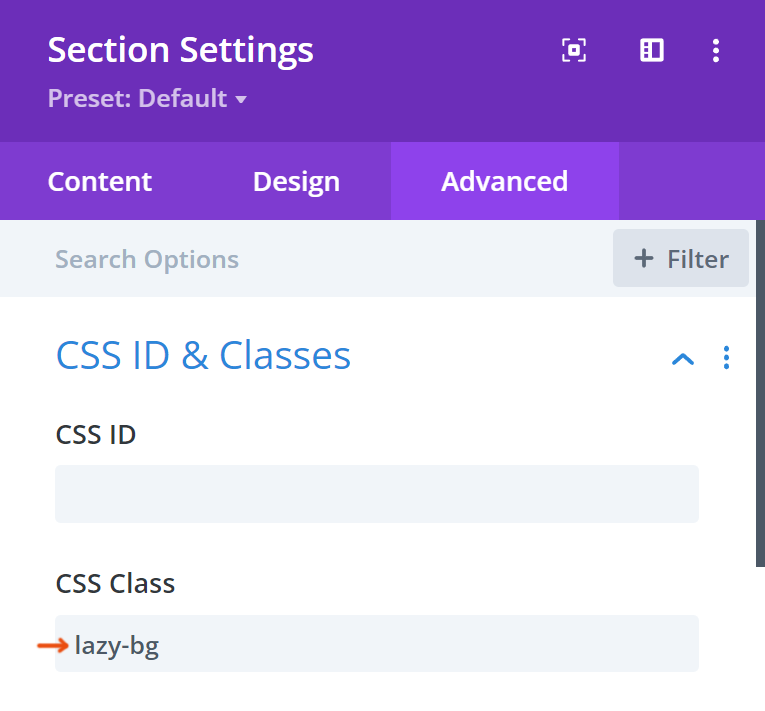
9. Specify Dimensions
Most cache plugins (and Perfmatters) add missing image dimensions. If you still see explicit width + height errors in PageSpeed, edit the image’s HTML and add the dimensions manually. Images without specified dimensions cause layout shifts (same with ads and dynamic content).
<img src="example.png" width="680" height="680" />10. Set Cache Expiration To 1 Year
Since images don’t change often, Google suggests setting browser TTL to 1 year (31536000s). You can do this in Cloudflare, but if PageSpeed still tells you to serve static assets with an efficient cache policy, you probably need to login to your hosting account, find some kind of “cache expiration” setting, then increase it to 1 year. If you don’t see a setting, ask your host.
11. Disable Hotlinking
Disabling hotlink stops people from copying your images and pasting them on their website. While this sounds harmless, that image is still hosted on your server which is doing the work. Even if you don’t care if people use your images, you should at least make them download it and upload to their own website. It could save your server resources and potentially, money. You can do this in Cloudflare, or most hosting dashboards have a setting.
12. Use Local YouTube Thumbnails
When embedding videos, you may see external requests to i.ytimg.com in your PageSpeed report. FlyingPress is the only plugin I know that can host YouTube placeholder images locally.
13. Use Local Avatars
If you have lots of blog comments, they create external requests to gravatar.com. Try using a local avatar plugin or delay your comments section. On a side note, native comments (CSS) is more lightweight than third-party comment plugins. LiteSpeed Cache can also cache Gravatars.14. Remove EXIF Data
While it only helps a little, EXIF data (like time a photo was taken) can be removed.15. Lower The Quality On Slow Connections
When visitors are on a slow connection, the quality of your images will be reduced. Several plugins and CDNs do this, like Optimole and Cloudflare Mirage. But, it won’t improve scores.

Frequently Asked Questions
How do I optimize images for WordPress?
Good image optimization involves a blend of image CDNs (or image optimization plugins) with some features done by your cache plugin. Between the 3, be sure to address image compression, next-gen formats, mobile resizing, backgrounds, and above the fold images.
How to compress images in WordPress?
While image compression can be done with plugins, image CDNs are preferred because they don't add bloat or increase memory usage. Instead, they optimize images on the fly. Since Lighthouse tests images at 85%, that's the recommended compression level to use.
What’s the best free image optimization plugin?
Optimole and ShortPixel are two top-rated image optimization plugins and tend to have more features than Imagify and similar plugins, such as lazy loading background images.
Which CDN should I use to optimize images?
Cloudflare with Mirage + Polish and BunnyCDN's Bunny Optimizer do an excellent job optimizing images (including for mobile) while serving them from a large, fast network.
How to preload LCP images in WordPress?
The easiest way to preload LCP images is the preload critical images setting found in FlyingPress and Perfmatters. Just set the number of images that usually load above the fold, then they will automatically be preloaded and excluded from lazy load for better LCP.
How to optimize images for mobile?
Most image CDNs resize images for mobile, such as Cloudflare's image resizing or Bunny Optimizer. FlyingCDN (from the FlyingPress cache plugin) also serves responsive images.
How to serve images in WebP?
Most image CDNs/plugins serve images in WebP, or use a dedicated WebP plugin such as WebP Converter For Media or WebP Express. You can also use a free online WebP converter to manually convert important images, like those that load above the fold (for better LCP).
How to optimize background images?
Since background images are loaded from CSS, you'll need to manually lazy load them (often with a lazy-bg class) while excluding above the fold backgrounds from lazy load (using a skip-lazy class). Perfmatters has a lazy load setting for CSS background images.
Is Photoshop enough to optimize images?
While Photoshop can resize/compress images and save them in WebP, it doesn't address other optimizations related to lazy load, preload, and mobile resizing. No, it's not enough.
How to optimize images without WordPress plugins?
Image CDNs are the most effective way to optimize images without needing WordPress plugins. Most of them address compression, WebP, mobile resizing, and other features.
How to host external images locally?
Avatars (in comments) and YouTube thumbnails can be hosted locally using local avatar plugins, then FlyingPress which has a setting for self-hosting YouTube placeholder images.


