
If you’ve been on SiteGround long enough, chances are you’ve run into CPU issues.
SiteGround usually blames high CPU usage on plugins, Heartbeat, bot attacks, and anything but their hosting. Even if your website is optimized to use less resources (with Cloudflare, SiteGround’s Optimizer + Security plugins, etc), there’s a high chance you still won’t be able to fix it. From here, SiteGround will take down your website and hold it hostage until you upgrade.
Why are SiteGround’s CPU limits worse than other hosts? What I do know is there have been several accusations of SiteGround running bots against their own customer websites. It’s also been shown time after time that if you leave SiteGround, CPU issues usually go away instantly.

I wrote an in-depth guide on reducing CPU usage and still wasn’t able to fix it, even after upgrading to their cloud hosting. SiteGround’s support is usually unwilling to help unless you upgrade. You should also know that SiteGround’s community manager and associates are admins for several WordPress Facebook Groups and remove posts (or ban people) who talk about their CPU limits/TTFB. They’re an enemy of free speech and also threaten to sue people.
What Are SiteGround’s CPU Limits?
SiteGround’s CPU limits are found on their features page in the “server resources” section. Your server, database, and email are all limited to specific amounts. If you exceed them, SiteGround will send you an email warning you of excessive usage, then can take down your website for the remainder of the monthly period. You can upgrade or wait for it to reset while your site is down.

| StartUp | GrowBig | GoGeek | |
|---|---|---|---|
| Simultaneous Server Processes | 10 | 20 | 30 |
| Simultaneous Connections From Single IP | 10 | 15 | 20 |
| CPU Seconds | 1000/hour, 10000/day, 300000/month | 2000/hour, 20000/day, 600000/month | 4000/hour, 40000/day, 800000/month |
| Average Execution Time Per Day | 2 seconds | 2 seconds | 4 seconds |
| Shared Service CPU Usage | No more than 20% for a period more than 10 seconds | No more than 20% for a period more than 10 seconds | No more than 20% for a period more than 10 seconds |
| Server Memory Per Process | 768 MB | 768 MB | 768 MB |
- Use Dynamic Caching + Memcached
- Disable Preheat Cache
- Disable Heartbeat
- Clean Your Database
- Upgrade To Ultrafast PHP
- Replace WP-Cron With A Real Cron Job
- Use SiteGround’s Security Plugin
- Offload Bandwidth To Cloudflare
- Block Bad Bots
- Activate Hotlink Protection
- Activate Crawler Hints
- Use BunnyCDN With Geo-Replication
- Eliminate High CPU Plugins
- Disable SG Site Scanner
- Leaving SiteGround Mysteriously Fixes CPU Limits
1. Use Dynamic Caching + Memcached
While I’m not a fan of SiteGround Optimizer since it does a poor job of addressing core web vitals, I’ll assume most of you are using it. I would personally use SiteGround Optimizer strictly for caching and FlyingPress for everything else. Or at least SiteGround Optimizer + Perfmatters.
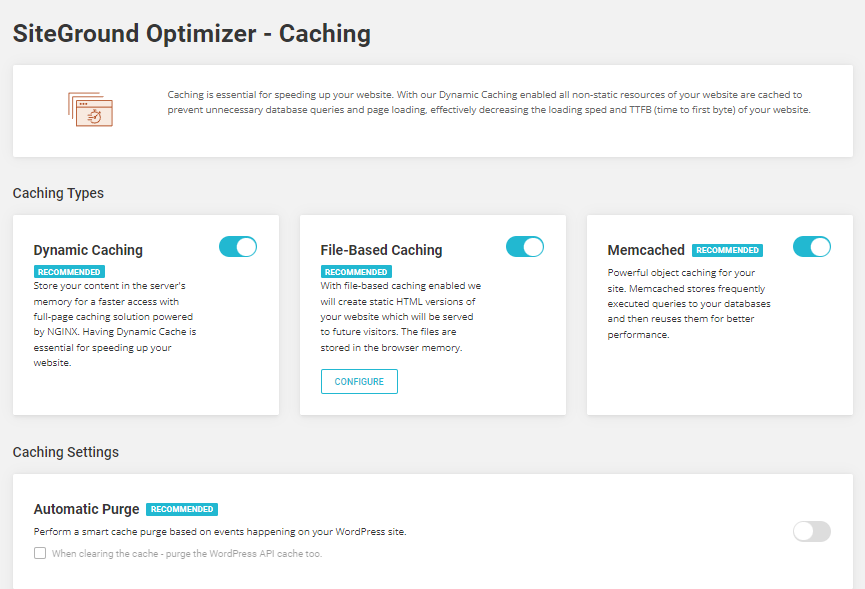
Dynamic caching and memcached can be activated in SiteGround Optimizer’s caching settings (you will need to activate memcached in Site Tools before activating it in SiteGround Optimizer).
I would disable automatic purge since the entire cache will be cleared when certain changes are made to your website (especially if you’re in the middle of making lots of updates/changes).
2. Disable Preheat Cache
Next, disable “preheat cache” in the file-based caching settings. Preheating the cache can cause CPU spikes (just like WP Rocket’s preloading also increases CPU usage). Since there are no settings to control which sitemap URLs are preloaded or change the preload interval, it’s a choice of enabling or disabling this. Which means if you’re getting CPU spikes, keep it disabled.

3. Disable Heartbeat
In SiteGround Optimizer’s Environment settings, disable WordPress Heartbeat.
This should be left as the default settings (disabled for admin pages, 120s for posts/pages, disabled in frontend). You usually don’t need Heartbeat in the admin/frontend, but want to keep it in the post editor since this lets you keep autosaves and other features you may want.

4. Clean Your Database
You can also schedule ongoing database cleanups in SiteGround Optimizer’s Environment settings. This removes junk from your database like spam, trash, transients, and post revisions.

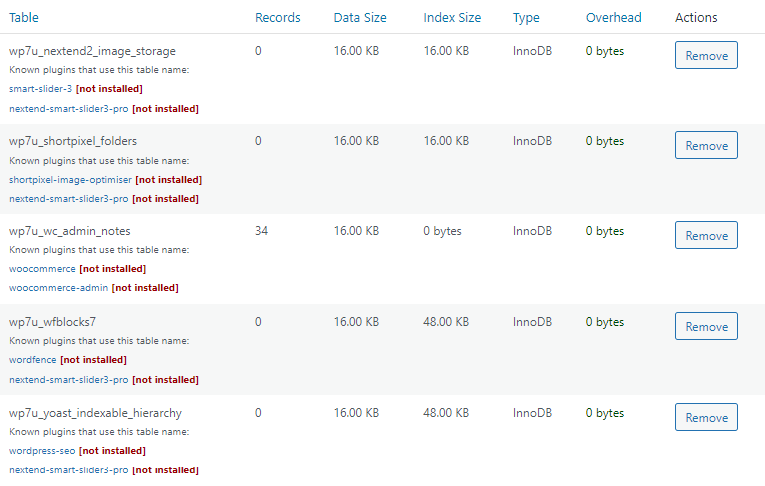
To go a step further, install WP-Optimize which lets you remove tables left by old plugins which are marked as “not installed.” You may also notice certain plugins/modules add overhead. For example, activating all Rank Math modules (or keeping all Wordfence features enabled) will add lots of database bloat. That’s why you should deactivate all modules you don’t absolutely need.
5. Upgrade To Ultrafast PHP
Ultrafast PHP is available on GrowBig+ and can be activated in Site Tools → Devs → PHP Manager. SiteGround claims it can improve memory usage by 15% and TTFB up to 50%, but take their claims with a grain of salt. Obviously higher PHP versions are faster no matter which host you use and unless I’m missing something, there’s nothing special about “Ultrafast PHP.”
It’s just a marketing gimmick.

6. Replace WP-Cron With A Real Cron Job
WP-Cron is a common cause for high CPU usage since it’s called on every pageview.
Just like you would ideally control preloading and how the cache is cleared, you also want to control WP-Cron by disabling it and replacing it with a real cron job.
Open your wp-config.php file and disable WordPress cron by adding the code before the line: /* That’s all, stop editing! Happy blogging. */
define('DISABLE_WP_CRON', true);Login to Site Tools → Devs → Cron Jobs. Create a cron job using the code to execute twice per hour. As SiteGround says, “replace /home/customer/www/yourdomain.com/public_html with the actual path to your WordPress application’s core file.” This should help reduce CPU usage.
cd /home/customer/www/yourdomain.com/public_html; wp cron event run --due-now >/dev/null 2>&1
As Gijo says, the cron job should be around 10 minutes, but SiteGround only allows 2x/hour.

7. Use SiteGround’s Security Plugin
SiteGround’s Security plugin protects your site while reducing CPU usage with features like:
- Moving the login URL (stops unwanted requests from bots/attackers).
- Limit login attempts (also stops unwanted requests from bots/attackers).
- Disable XML-RPC (usually not needed unless you publish content from mobile).
SiteGround also has a tutorial on it.

8. Offload Bandwidth To Cloudflare
Cloudflare is your best friend for reducing CPU usage because:
- It offloads bandwidth and puts less stress on your origin server.
- Free features like bot/hotlink protection stop unwanted requests.
- WAF (paid feature) can prevent quite a few attacks on your website.
- Crawler hints let search engines time crawling to avoid wasteful resources.
If you plan on activating Cloudflare through SiteGround, your website will automatically be configured to use WWW. I would not do this unless your site already has WWW in the domain since it can cause issues with redirects, Google rankings, etc. If you want to keep your domain non-WWW, you’ll sign up for Cloudflare directly through the website and change nameservers.

Next, go to your Cloudflare DNS settings and proxy your traffic through their CDN.

Check your Cloudflare Analytics in a few days and you should be saving a good amount of bandwidth. You should also take note of how much bandwidth is being cached vs. uncached.

9. Block Bad Bots
Bad bots consume resources when they hit your site.
Turn on Cloudflare’s bot fight mode under Security → Bots. Or you could use a plugin like Blackhole for Bad Bots, but I recommend Cloudflare.

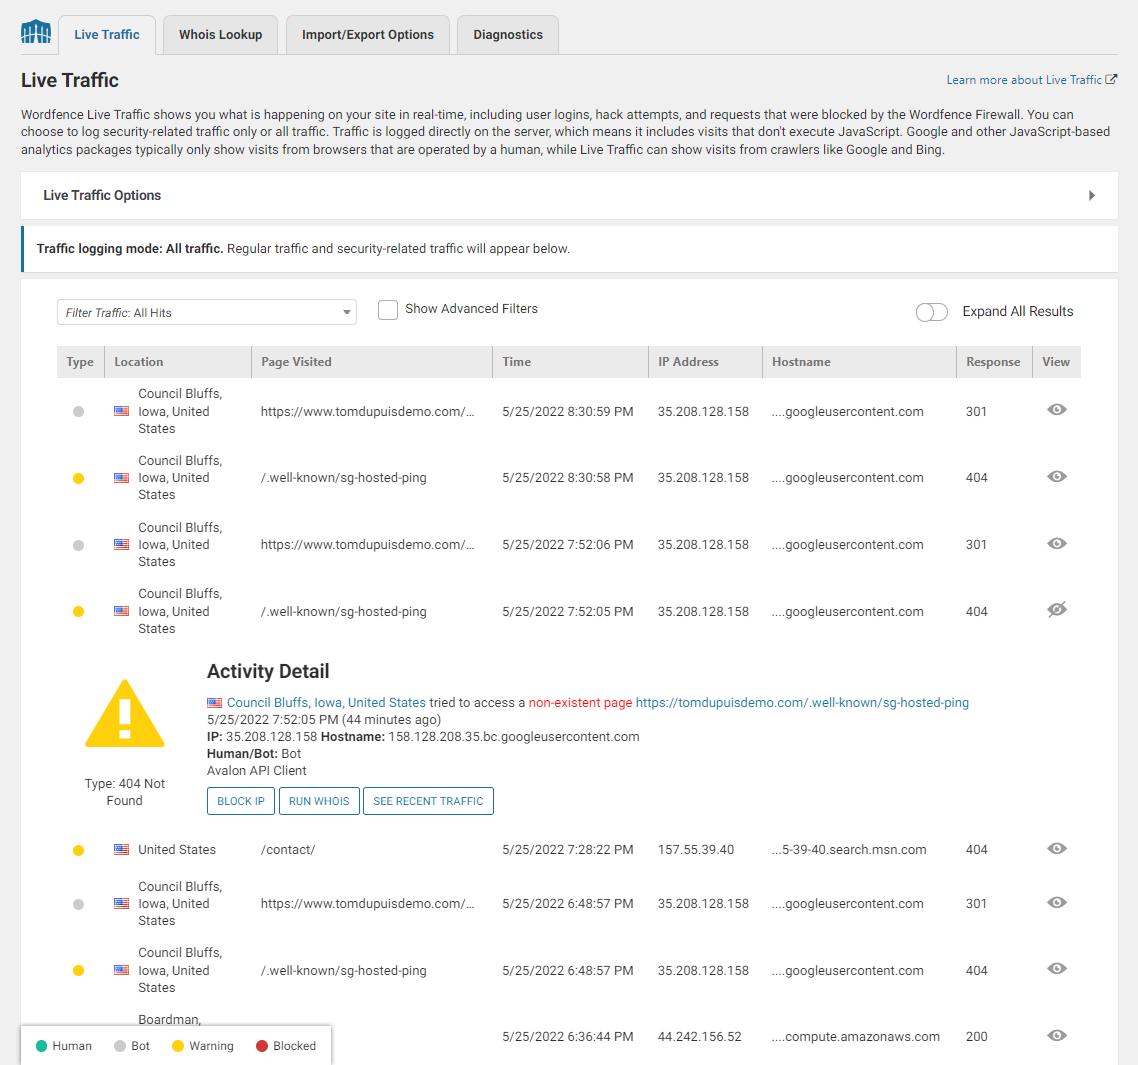
To go a step further, install Wordfence (temporarily) and open your live traffic report to see all bots hitting your site in real-time. Be on the lookout for /.well-known/sg-hosted-ping. I can’t tell you exactly what this is, all I know is it’s a bot from SiteGround coming from the hostname googleusercontent.com and that some pages this was hitting were resulting in 404s warnings.
It was also the most frequent bot by far:
You can also block the following bots if you’re not using their services:
- AhrefsBot
- SemrushBot
- compute.amazonaws.com
This can be done using your 5 free Cloudflare firewall rules:

When you’re done using Wordfence, I would uninstall it since the data it collects can increase CPU usage. Also use WP-Optimize to remove it’s database tables since it creates a lot of tables:

10. Activate Hotlink Protection
Hotlink protection saves resources by stopping people from copying/pasting your images on their website when the image is hosted on your server. It’s found in Cloudflare’s Scrape Shield settings. If you enabled hotlink protection in Site Tools, it won’t work with NGINX direct delivery.

I always had a big problem with people copying my images:

11. Activate Crawler Hints
Crawler hints let crawlers use more precise timing and avoid wasteful crawls (read the description below). You can enable crawler hints in Cloudflare under Caching → Configuration.

12. Use BunnyCDN With Geo-Replication
SiteGround’s CDN is free but only has 12 PoPs and you have to use their DNS to use it (which was blocked by Google for 4 days). I personally wouldn’t trust it, but up to you.
If you’re already using Cloudflare, do you really need BunnyCDN?
Gijo says yes and I also use the Cloudflare + BunnyCDN combination on my site. Yes, BunnyCDN and geo-replication both cost money, but they’re both relatively cheap if you check the pricing.
The main reason is a better cache hit ratio and how BunnyCDN’s geo-replication permanently stores your website files on their storage zones, resulting in less requests to the origin server. It’s better than RocketCDN (StackPath) and is consistently performant/reliable on cdnperf.com.


I have a full BunnyCDN guide but it’s easy.
Once you sign up and create a pull zone, install the BunnyCDN plugin and connect your pull zone name. Enable perma-cache in your BunnyCDN settings and go to Storage → Add Storage Zone. Name your storage zone, select your main storage region, then click “Enable Geo-Replication.” You’ll be prompted to select the regions where you want your files to be replicated.

13. Eliminate High CPU Plugins
You can find high CPU plugins using:
- Query Monitor
- WP Hive Chrome Extension
- My list of of 75+ slow plugins
Some plugins increase memory usage while others add extra CSS/JavaScript to the frontend which you can see in the coverage tab of Chrome Dev Tools. While neither are good, you want to look for plugins impacting memory usage (since that’s what you originally came here for, right)?

Any plugin running ongoing background tasks is usually going to be your biggest culprit. For example, statistic plugins have to collect data (same with Wordfence and some SEO plugin modules). Backup plugins should be scheduled to run during low-traffic hours. Make sense?
| Plugin | Category | Memory Impact | PageSpeed Impact |
|---|---|---|---|
| Analytify | Analytics | X | ✓ |
| Backup Buddy | Backup | X | ✓ |
| iThemes Security | Security | X | ✓ |
| Broken Link Checker | SEO | X | ✓ |
| Jetpack | Security | X | X |
| Query Monitor | Analytics | X | ✓ |
| NextGEN Gallery | Gallery | X | X |
| Site Kit by Google | Analytics | X | ✓ |
| Wordfence | Security | X | ✓ |
| wpDiscuz | Comments | X | X |
| WPML | Translate | X | X |
| Yoast SEO | SEO | X | ✓ |
14. Disable SG Site Scanner
The last thing you need is SiteGround scanning your website. If you purchased SiteGround’s SG Site Scanner at checkout, disable it and stop paying for it.

15. Leaving SiteGround Mysteriously Fixes CPU Limits
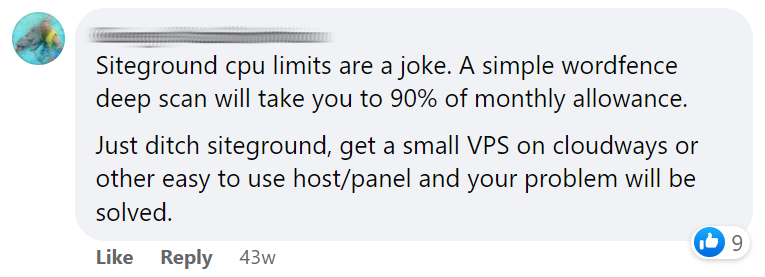
Leaving SiteGround not only instantly fixed my own CPU issues, but other people’s too:


Everything in this tutorial is supposed to reduce CPU usage, but SiteGround’s are often not fixable. I had to upgrade my SiteGround plan to 8x what I was paying to get rid of CPU limits. Upgrading to GoGeek might help, but avoid their cloud hosting at all costs (it’s horrible and you’ll likely need to upgrade more than $100/month to fix CPU issues). Not worth your money.
Rocket.net has way more resources than SiteGround ($25/month for 32 CPU cores + 128GB RAM + NVMe storage + Redis) and doesn’t limit PHP workers since less than 10% of traffic usually hits your origin thanks to Cloudflare Enterprise and full page caching. LiteSpeed hosts like NameHero are good, and Cloudways Vultr HF is also a big step up.
Was using Cloudways:


Now switching to Rocket.net:

Cheers,
Tom


Has SiteGround gotten any better in your opinion now almost 3 years later? Or should I move to a different hosting company and who would you recommend? A quick Google search suggests IONOS, but comparison websites say they suck and SiteGround is better. I was on DomainsPricedRight, but found them to be worse and slower then SiteGround, I understand technology and companies change, but I’d like to stay with a hosting provider that is good for more then a year.
Thank you very much for any advice.
Other than their CDN v2 which I still don’t think would beat Cloudflare APO, SiteGround hasn’t gotten much better. Haven’t tried IONOS but generally for shared hosting, I would check out something like NameHero, ChemiCloud, or FastComet.
SiteGround basically develops their own products and talks about how great they are when they’re clearly inferior when comparing SG Optimizer vs. LiteSpeed Cache, SiteGround’s CDN vs. Cloudflare w/ APO, etc. I think any of the above 3 shared hosts would outperform SiteGround. VPS/managed cloud hosting would be even faster which is where Rocket.net, Scala, etc come in. Control panels like RunCloud are good too. I would take any of these over SG.
Can I ask if the monthly allowed CPU usage quota was reached then what effects does it have on websites? Specifically search engine rankings and visibility in SERPS?
If your reach the quota they will take down your website. Definitely not good for SEO; your site’s rankings could drop or even disappear since your content may be removed from Google’s index (depending on how long the site is offline for).
Thanks Tom, had my site go from 4000-5000 uniques per day to 800 yesterday and 500 today. Indexed pages going from page 1 and even hundreds in #1 position. I believe the likely cause is Siteground’s quota being reached (site had no other changes made) but I never saw my site ‘offline’ in any way. Any suggestions for a fix if this is the case?
Have they sent you an email warning and were you monitoring uptimes in a tool like Uptime Robot?
I listed suggestions in this tutorial along with a couple Facebook conversations about it. But the general consensus is to leave SiteGround. I had to rewrite all my SiteGround reviews to reflect all the bad things they have done this year, left them myself (for Cloudways), and they took the liberty of canceling my affiliate account since they didn’t like me telling the truth.
got the 90% usage warning and tried to reduce CPU usage earlier in the month. Moved hosting overnight and migration has found some malicious files. Still working on it but site has come back since moving hosting provider. Thanks again for the solid article and advice.
Good, glad your site is back and hope you can quickly repair the files. Welcome :)
Very thorough and useful checklist. Going to work through your suggestions and see if it helps as I’m currently being warned of 90% CPU usage….
I just added a screenshot at the bottom of the post with a few more recommendations, hope it helps.