
In this guide, we’re configuring LiteSpeed Cache.
If you’re starting from one of the preset settings, I suggest the “Advanced” preset. You’ll still have to do several things like set up object cache, QUIC.cloud (or Cloudflare), and test CSS/JS settings while checking your site for issues in an incognito window. You should also be familiar with Tuning settings to exclude problematic files if a setting breaks your site. Verify all settings and test your site often in PageSpeed Insights, but Chrome Dev Tools is definitely more detailed.
For best results, use Perfmatters on top of LiteSpeed Cache which includes several other optimizations including disabling plugins on specific pages to reduce CSS/JS, preloading LCP images (and other resources), and hosting Google Analytics locally. You can also try using it for lazy loading which may give you better results than LSC, just be sure to avoid duplicate settings.
For even better results, use Flying Pages to make your navigation faster and leave instant click off in LSC. Combine these 3 plugins (and a good LiteSpeed host) and your site should fly.
- ON – enable (may still require testing).
- OFF – disable.
- TEST – commonly breaks sites (test in incognito window).
- DEPENDS – on/off depends on something else, like another setting.
- CONSUMES RESOURCES – can increase server resource usage.
For LiteSpeed hosting, I recommend ChemiCloud or MechanicWeb for shared hosting. For a VPS, Scala Hosting, MechanicWeb, or Vultr HF on xCloud. I don’t recommend Hostinger because I have higher standards and you should too. It’s the #1 factor of TTFB, wp-admin speed, and all use faster CPUs with NVMe SSDs.
*If you run into issues, please make use of LiteSpeed’s documentation, plugin support, and Facebook group. You can obviously leave me a comment too and I’ll do my best to answer it.
1. Dashboard
View the status of various settings including QUIC.cloud usage, quota, and measure load times.

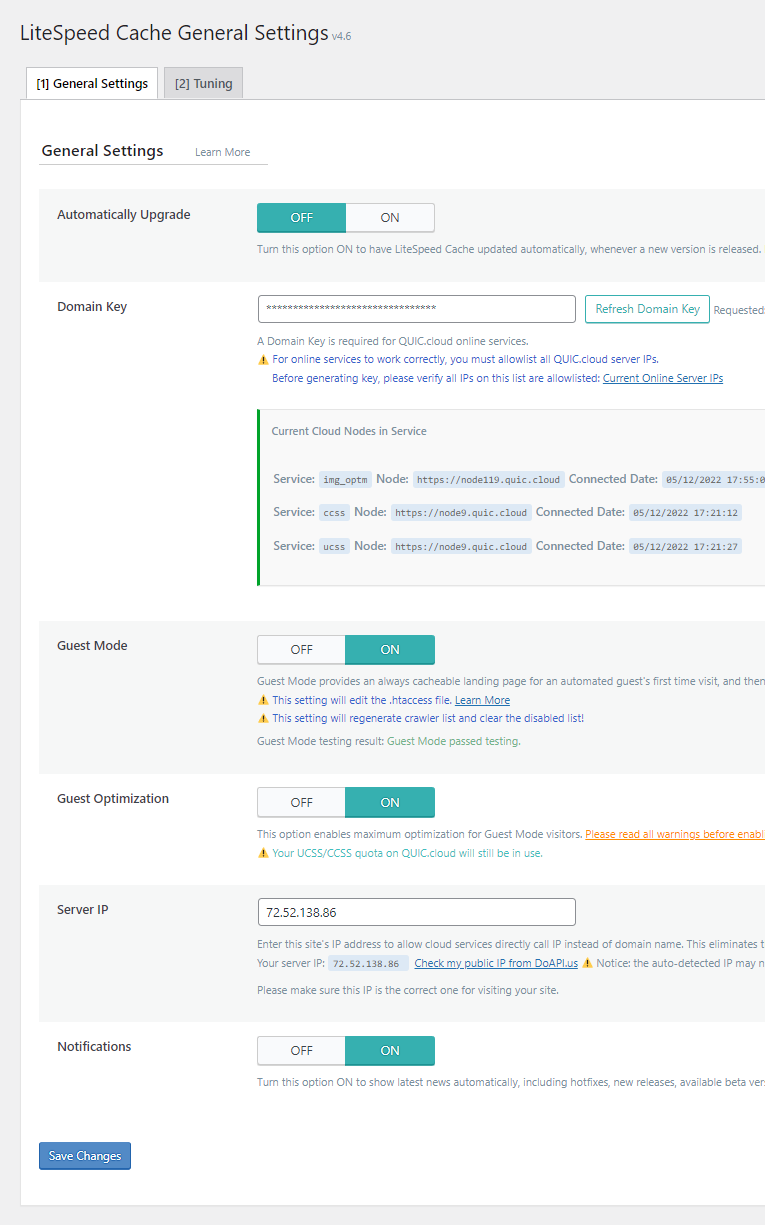
2. General
- Automatically Upgrade: Off – it’s safer to update plugins manually.
- Domain Key: request a domain key (required when using QUIC.cloud).
- Guest Mode: On – significantly improves load time for first time visitors and PageSpeed scores. Not compatible with Cloudflare APO and consumes resources. Check for issues (always in an incognito window) and exclude any problematic files in the Tuning settings.
- Guest Optimization: On – only use if Guest Mode is also on. Page/image optimizations will be aggressive for first time visitors which can further improve load times and scores.
- Server IP: find this in your cPanel account → General Information → Shared IP address since using the “Check my public IP from DoAPI.us” may not detect the correct IP address.

- Notifications: On – or off if you don’t want notifications from the plugin like new releases.
3. Presets
Configure preset settings to save time.

If you’re starting from the Advanced preset (recommended), here’s your checklist:
- General → request domain key and add server IP.
- Cache → disable cache logged-in users + cache commenters.
- Object → set up object cache or ask your host to do this for you.
- Advanced → disable instant click and use Flying Pages instead.
- CDN → set up QUIC.cloud and configure settings in QUIC.cloud dashboard (switch to standard plan and under CDN Config, enable these 4 settings: QUIC backend, block author scan, block browser XML-RPC, and hotlink protection).
- Image Optimization Settings → enable optimize losslessly.
- Page Optimization → Tuning – CSS → exclude common UCSS files. Enable CSS combine and generate UCSS (if site breaks, exclude other CSS files (Chrome Dev Tools → Network → copy all CSS files → paste into CSS excludes → remove 1 by 1 while testing site). Or try whitelisting CSS selectors. If your site still breaks, disable UCSS and enable load CSS asynchronously + inline CSS async lib. Test site again.
- Page Optimization → JS deferred / delayed excludes → exclude common JS delay files. Next, go to JS settings → load JS deferred → test delayed. If it breaks site, exclude other JS files or try deferred.
- HTML settings → add prefetch/preconnect hints to applicable third-party domains (only if they can’t be hosted locally). Add applicable classes or IDs to HTML lazy load selectors and disable remove noscript tags.
- Lazy Load → all OFF if using Perfmatters, all ON if not.
- VPI → all OFF if using Perfmatters, all ON if not.
- Localization → enable localize resources and add applicable third-party domains. To host fonts locally, install OMGF → save and optimize → preload above the fold fonts → see errors in Chrome Dev Tools → Console → Warnings.
- Tuning → there may be other files you need to exclude to get settings working.
- Database → DB Optimization Settings → set revisions max number (e.g. 10) then clean you database in Manage → clean all.
- Crawler → configure to improve performance, but not recommended for shared hosting since it consumes resources (but you can try it with conservative settings).
- Toolbox → Heartbeat → turn all 3 settings on then set the numbers to 0, 0, 120.
- Perfmatters → configure it in this section.
- Purge: Toolbox > purge all. In QUIC.cloud, go to CDN → purge all CDN cache.
- Test → test your site in Chrome Dev Tools (Console → Warnings). Also check for layout issues and monitor resource usage (e.g. CPU/RAM) in your hosting account.
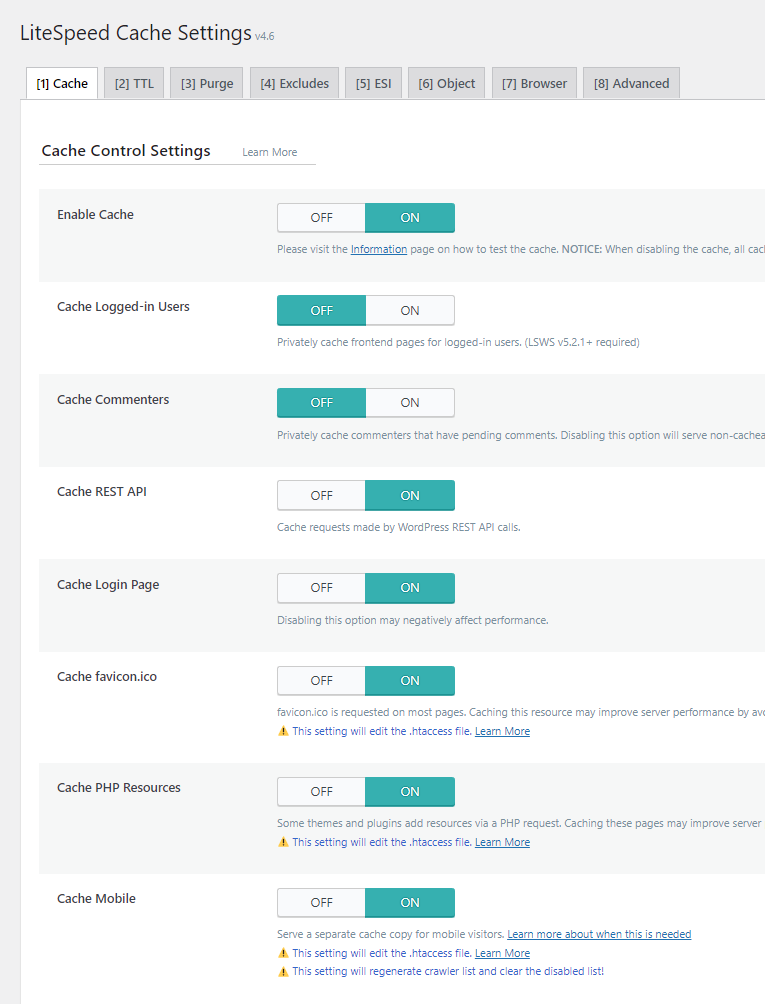
4. Cache
Cache
- Enable Cache: On – test your site in uptrends.com and look for x-litespeed-cache hit.
- Cache Logged-in Users: Off – only enable if you run a membership website (or similar) and have users logging in that need their own cache, otherwise it consumes resources.
- Cache Commenters: Off – creates a separate cache for people who leave a comment which is still pending, but also consumes resources if your blog gets lots of comments.
- Cache Rest API: On – used in many themes, plugins, and the WordPress Block Editor.
- Cache Login Page: On – saves server resources since the login page is a common target. Don’t change the login URL since LiteSpeed + QUIC.cloud optimize the default login page.
- Cache favicon.ico: On – caches favicon (the small logo image shown in the browser tab).
- Cache PHP Resources: On – caches static PHP files (i.e. CSS + JS) loaded by your theme. Only disable if you have dynamic CSS + JavaScript loaded in PHP, which you likely don’t.
- Cache Mobile: On – required when using Guest Mode, Guest Optimization, and other settings (UCSS, CCSS, AMP), or when using mobile-specific content. Consumes resources.
- Cache URIs: not necessary for most websites since the “cache logged-in users” setting handles private cached URIs, and no pages on your site generally need to be force cached.
- Drop Query String: marketing campaigns and tracking URLs often contain query strings where caching is ignored. The default list is usually fine, but if you have others, add them.
TTL
- Cache TTL – defaults are usually fine. Cache TTL is the time LiteSpeed Cache keeps a cached file before it expires and a new one is created. A shorter TTL can be used if you update your site frequently to guarantee users will see the new cached version, but will consume resources. A longer TTL saves resources, but the cache isn’t refreshed as often.

Purge
- Purge All On Upgrade: On – purges cache when WordPress core/themes/plugins are upgraded to make sure your site displays properly. LiteSpeed says to leave this on as well.
- Auto Purge Rules For Publish/Update: default settings are OK. Whenever you publish a post, your blogroll and other content may need to update, so they should also be purged.
- Serve Stale: Off – when turned on, the most recently purged (stale) copy of the page is served if the new cached version isn’t generated yet (enabling this consumes resources).
- Scheduled Purge URLs: no need to add URLs here unless you need pages purged at a specific time (during low traffic), in which case you would also set scheduled purge time.
- Purge All Hooks: default settings are fine. When specific hooks are run, it will purge all. LiteSpeed says adding comment_post may be good to purge all when a comment is made.

Excludes
Nothing to do here unless you have a dynamic site, logged-in users, or a frequently changing site where caching may lead to outdated information. In which case, add that information here.
ESI
- Enable ESI: Off – allows you to control how specific parts of dynamic pages are cached whether it’s publicly, privately, with a custom TTL, etc. Complicates things and LiteSpeed says it’s easier for servers to return full pages. If off, you don’t need to change settings for admin bar, comment form, Nonces, or Vary Group. You can watch the video to learn more.
Object
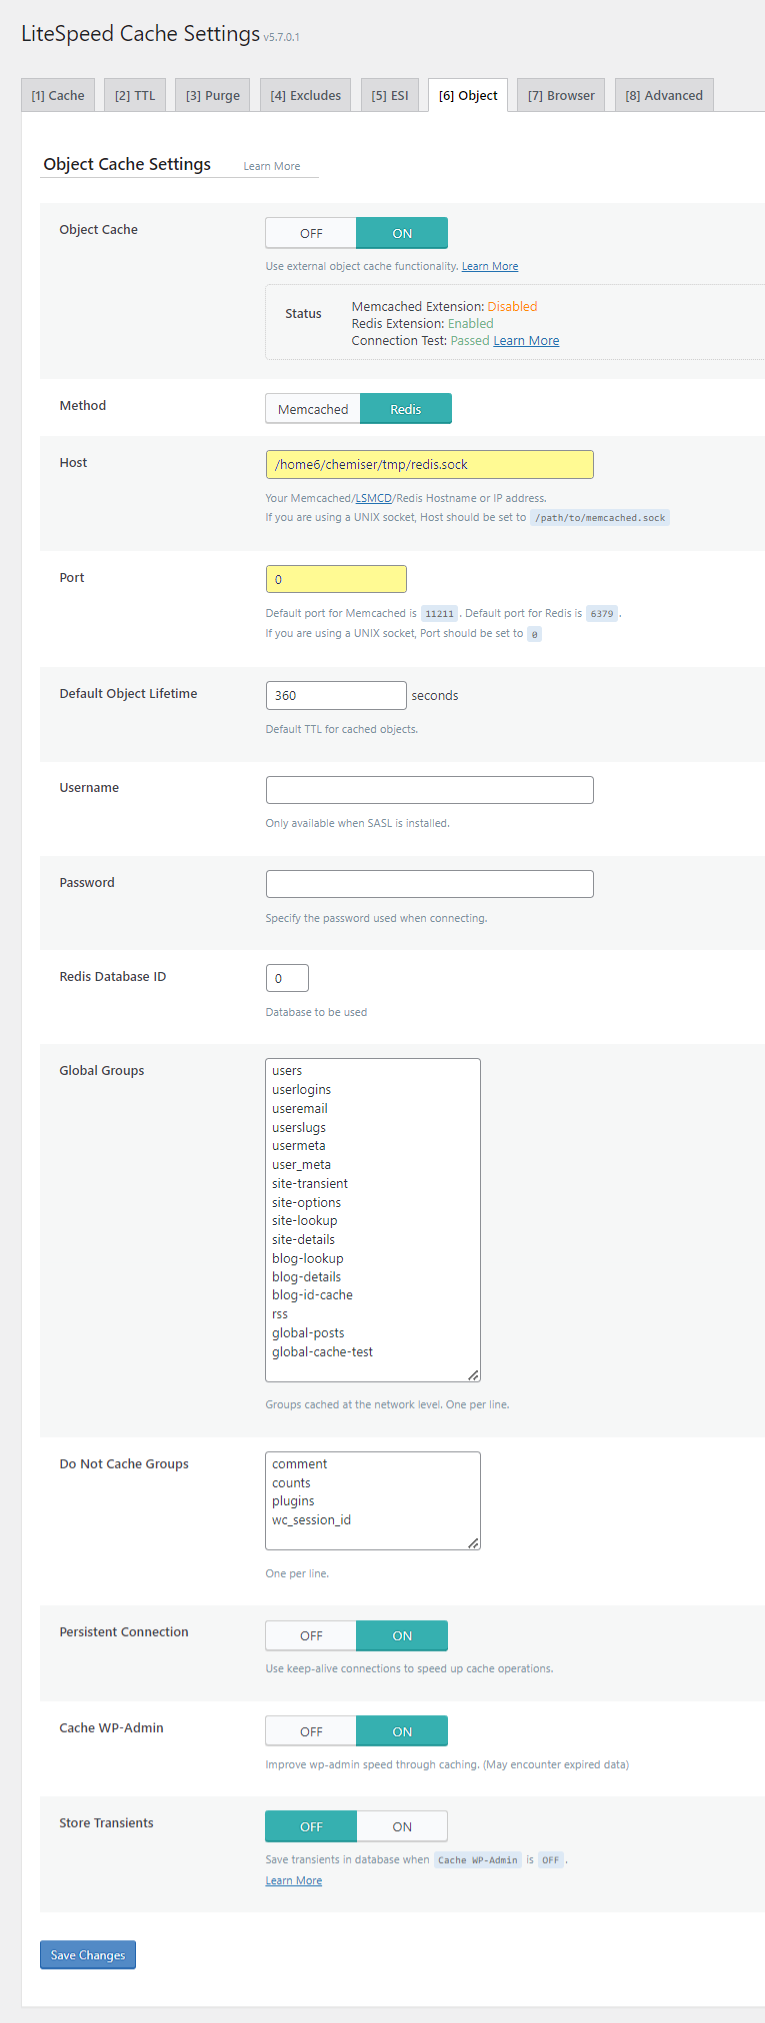
Speeds up wp-admin (usually, but test it) with other performance benefits. Redis is generally more powerful than Memcached especially for complex, WooCommerce, and dynamic sites (although those types of sites should be using Object Cache Pro for maximum performance). View your host’s instructions which should tell you whether they support Redis/Memcached, where to enable it, port #, and where to find the socket path. For example, see ChemiCloud’s.


Step 1: Enable Redis or Memcached in your control panel. In cPanel, it’s under Redis Object Cache, LiteSpeed Redis Cache Manager, or Select PHP Version → Extensions → enable Redis.

Step 2: Note the port number (0) and socket path (/home6/chemiser/tmp/redis.sock).

Step 3: In LiteSpeed Cache, enable Object Cache and set the method to Redis. Add the port number, then socket path to the host field. Save changes and you should pass the connection test. If it’s not available or you’re having trouble, contact your host who should do this for you.
- Object Cache: On – database caching speeds up the admin and improves performance.
- Method: Redis – more powerful than Memcached but only supported by certain hosts, while others support Memcached (or none). Activate it in your hosting account, then here.
- Host: check hosting account – should be listed as “socket path” in your hosting account.
- Port: check hosting account – or try the default ports (Memcached: 11211, Redis: 6379).
- Default Object Cache Lifetime: 360s is fine.
- Username/Password: leave as-is (not needed).
- Redis Database ID: use when installing Redis on multiple sites – if 1 host account is used to add Redis on multiple sites, each site will have its own Redis Database ID (0-100).
- Global Groups: leave as-is (groups that should be cached at network level).
- Do Not Cache Groups: leave unless you want to add groups excluded in object cache.
- Persistent Connection: On – connection is kept alive to make object cache even faster.
- Cache WP-Admin: On – speeds up admin (keep on unless you’re seeing outdated data).
- Store Transients: Off – if cache wp-admin is off, enabling this keeps server status notices.
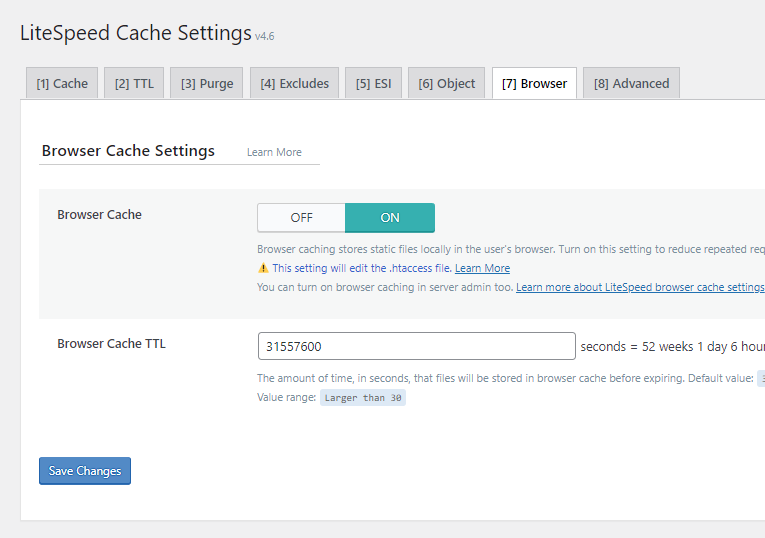
Browser
- Browser Cache: On – should always be on.
- Browser Cache TTL: 31557600 – 1 year (~31557600 seconds) is recommended by Google to “serve static assets with an efficient cache policy” and tells browsers how long cache is stored. WooCommerce or dynamic websites probably want to set this to 43800 (1 month).
Advanced
- Login Cookie: leave as-is (only needed if you have multiple WordPress installs and need the cache to distinguish who is logged into which WordPress site, not used for a multisite).
- Improve HTTP/HTTPS Compatibility: Off – only enable if you’re using both HTTP and HTTPS and are noticing issues with the cache. You can also try forcing SSL to solve issues.
- Instant Click: Off – when users hover over a link, the page downloads in the background so by the time they click it, the page loads instantly (consumes resources). I recommend Flying Pages instead which does the same thing, but also preloads pages in the viewport (making your navigation much faster) and includes rules to reduce the load on your server.

5. CDN
QUIC.cloud is specifically designed for LiteSpeed and is a highly performant CDN on CDN Performance Tracker. It’s also needed for certain LiteSpeed Cache features to work, like image optimization and critical CSS. It’s $.02 – $.08/GB (depending on which regions you select). And while they have a free plan, it only uses 6 PoPs (points of presence), so you really should use the standard plan which uses all 82+ PoPs and includes DDoS protection. But we’ll get to that soon.
![]()

How To Setup QUIC.Cloud
Step 1: In the General settings, be sure you requested a domain key and added your Server IP.

Step 2: Go to CDN → QUIC.cloud CDN Setup → Begin QUIC.cloud CDN Setup. Click “Refresh CDN Setup Status” and you will get 2 nameservers (e.g. kevin.quicns.net and jon.quicns.org). QUIC’s DNS provides better performance when using LiteSpeed with more accurate geo-routing.

Step 3: In your domain registrar, change your nameservers to QUIC’s. Screenshot is for ChemiCloud (Domains → Manage Domain → Nameservers → Use Custom Nameservers).

Step 4: Sign up for QUIC.cloud by finding the link in your LiteSpeed Cache settings or go to QUIC.cloud. Click your domain → CDN → CDN config → enable these 4 settings. Leave the rest as default which is fine for most sites, or feel free to tweak them if you know what you’re doing.
- QUIC backend – speeds up wp-admin by letting QUIC connect to your server via HTTP/3.
- Block Author Scan – blocks the scanning of authors on your site which can be exploited for username enumeration attacks. Don’t block this if you rely on author archives for SEO.
- Block Browser XML-RPC – saves server resources and improves security, but don’t block this if you use Jetpack, the WordPress mobile app, or external services that use XML-RPC.
- Hotlink Protection – prevents websites from copying your images and using bandwidth.


Step 5: In the CDN tab, change from the free to standard plan and purchase credits (small sites can start at $10, but refill it before it runs out). You also get free credits every month if you use a host who uses LiteSpeed Enterprise (e.g. ChemiCloud, NameHero) but not with OpenLiteSpeed.

How To Setup Cloudflare With LiteSpeed Cache
If you want to see if Cloudflare gives you better results than QUIC.cloud, you can use APO ($5/month) or Super Page Cache For Cloudflare plugin (free) which also uses dynamic caching.
When using Cloudflare APO, the following settings should be disabled in LiteSpeed Cache: Guest Mode, cache mobile, WebP replacement, JS/CSS minify, JS/CSS combine. Then you will use the Cloudflare plugin to set up APO as explained in this APO tutorial.
Super Page Cache For Cloudflare Instructions
Step 1: Change your DNS to Cloudflare which performs well on dnsperf.com. Add your website to Cloudflare, they will scan records, then provide you with 2 nameservers. In ChemiCloud, you will change these (Domains → Manage Domains → Nameservers → Use Custom Nameservers).

Step 2: Install the Super Page Cache For Cloudflare plugin. Add your Cloudflare email, global API key, domain, and enable page caching. According to the developer (iSaumya), follow these next steps. If you have additional questions, I recommend asking iSaumya in a support thread.
- Disable LiteSpeed’s page caching and guest mode + guest optimization.
- “Only use LiteSpeed Cache for static file optimization.” However, I believe you can still configure it normally except for the caching/CDN settings (including using it for object cache, crawler, database optimization, Heartbeat, and image/page optimization settings).
- Do not enter your Cloudflare API details in LiteSpeed Cache (it’s handled by this plugin).
- Do not use the official Cloudflare plugin and make sure APO is disabled in CF dashboard.
- Enable fallback cache in Super Page Cache, then disable page caching in LiteSpeed Cache.

Step 3: Configure settings in your Cloudflare dashboard (I recommend the following):
- SSL/TLS Recommender (SSL/TLS → Overview).
- Always Use HTTPS (SSL/TLS → Edge Certificates).
- HTTP Strict Transport Security (SSL/TLS → Edge Certificates).
- WAF Rules (Security) to block unwanted requests.
- Brotli (Speed → Optimization → Content Optimization).
- Early Hints (Speed → Optimization → Content Optimization).
- Crawler Hints (Caching → Configuration).
- Hotlink Protection (Scrape Shield).
- Purge Cloudflare’s Cache (after you’re done configuring settings).
Step 4: Use SpeedVital’s TTFB test to measure TTFB in 40 locations. You’ll want to test your website 3 times to ensure resources are cached and your CDN is using the closest data center.

CDN Settings
- QUIC.cloud CDN – On – on if using QUIC.cloud, off if using Cloudflare.
- Use CDN Mapping – Off – QUIC.cloud’s CDN and Cloudflare don’t use CDN mapping, so this would usually be off. The only time you should use it is if you’re using a CDN that uses a CDN URL like BunnyCDN. In this case, add the CDN URL and select the files to be served.
- HTML Attribute To Replace – leave as-is since the CDN mapping setting is turned off.
- Original URLs – leave as-is unless it’s a multisite with different domains + subdomains.
- Included Directories – just the wp-content and wp-includes directories should be fine.
- Exclude Path – leave as-is unless you want to exclude specific directories from above.
- Cloudflare API – only needed if you’re using Cloudflare’s CDN instead of QUIC.cloud CDN.
6. Image Optimization
Configure these settings, then send an optimization request.
- Auto Request Cron: On – sends a request to optimize newly uploaded images.
- Auto Pull Cron: On – if the previous setting is turned on, this should be on too.
- Optimize Original Images: On – see LiteSpeed’s example, but likely turn this on.
- Remove Original Backups: Off – don’t remove unless you’re happy with the quality.
- Optimize Losslessly: On – I prefer lossless compression but you can try this yourself.
- Preserve EXIF/XMP Data: Off – removing EXIF data helps reduce your image sizes.
- Create WebP Versions: On – create WebP images with smaller file sizes. Once the optimization is done, check Chrome Dev Tools to see if WebP images are being served. Read these common WebP fixes if you run into problems or search their support forum.

- Image WebP Replacement: On – enable this if you have the previous option enabled.
- WebP Attribute To Replace: specify the element attributes to be replaced by WebP.
- WebP For Extra srcset: On – makes sure images in custom code are served as WebP.
- WordPress Image Quality Control: 85 – PSI tests images at 85% so that’s what I use.

7. Page Optimization
Prevent Broken Layouts By Excluding Common Files
If you use Elementor, Divi, Astra, GeneratePress, or a variety of other services, you’ll want to exclude certain files to prevent your site from breaking when using UCSS and delaying JavaScript. View common UCSS exclusions and add any applicable services under Tunings – CSS → UCSS File Excludes and Inline. Do the same for common JS delay exclusions and add those under Tunings → JS Delayed Includes. Do this before continuing to ensure better compatibility while lowering the risk of your site breaking. For example, if you use the Astra theme, exclude Astra + Astra Mobile Menu from UCSS:

What To Do If Your Layout Is Still Broken
If you still have issues when using minify/combine, use the Tuning section to exclude problematic files. Or if UCSS is the problem, view instructions to whitelist CSS selectors.
Watch For FOUC
Some CSS settings may cause FOUC (flash of unstyled content) and layout shifts that negatively impact core web vitals. They’re often related to minify, combine, UCSS, and load CSS asynchronously settings. Test each one individually while checking your site.

CSS Settings
- CSS Minify: On – removes unnecessary characters from CSS.
- CSS Combine: Test – required for UCSS but commonly breaks sites. In this case, you’ll need to find problematic CSS files and exclude them under Tuning – CSS → CSS Excludes.
- Generate UCSS: Test – removes unused CSS, but commonly breaks sites. In this case, you may need to exclude other files from UCSS. If that doesn’t work, try leaving this off and enable load CSS asynchronously instead. QUIC.cloud is required for UCSS and CCSS.
- UCSS Inline: Depends – if you care more about PageSpeed scores over speed for real users, turn this on. Leave this off to load UCSS in a separate file which is faster for users.
- CSS Combine External and Inline: Test – on when combine CSS is on (prevents errors).
- Load CSS Asynchronously: Depends – only enable if UCSS isn’t working. This generates critical CSS automatically. If you get FOUC, wait for CCSS rules to generate, then purge all. Keep an eye on your CLS score (in coe web vitals) and note this isn’t compatible with APO).
- CCSS Per URL: Off – disable if previous setting is off, especially when using a page builder.
- Inline CSS Async Lib: Depends – on if load CSS asynchronously is on (prevents FOUC).
- Font Display Optimization: Swap – while fonts are loading, a fallback font is shown. Prevents FOIT and addresses “ensure text remains visible during webfont load” in PSI.

JS Settings
- JS Minify: On – removes unnecessary characters from JavaScript.
- JS Combine: Off – leave off when using HTTP/2 or HTTP/3 servers (I’m sure you are).
- JS Combine External and Inline: Off – only on if JS combine is on, which it shouldn’t be.
- Load JS Deferred: Delay + Test – delay should give you best results but commonly breaks sites, so you’ll need to add common JS delay exclusions in your Tuning settings and exclude other problematic JS files if necessary. Deferred is still good and off is safest.

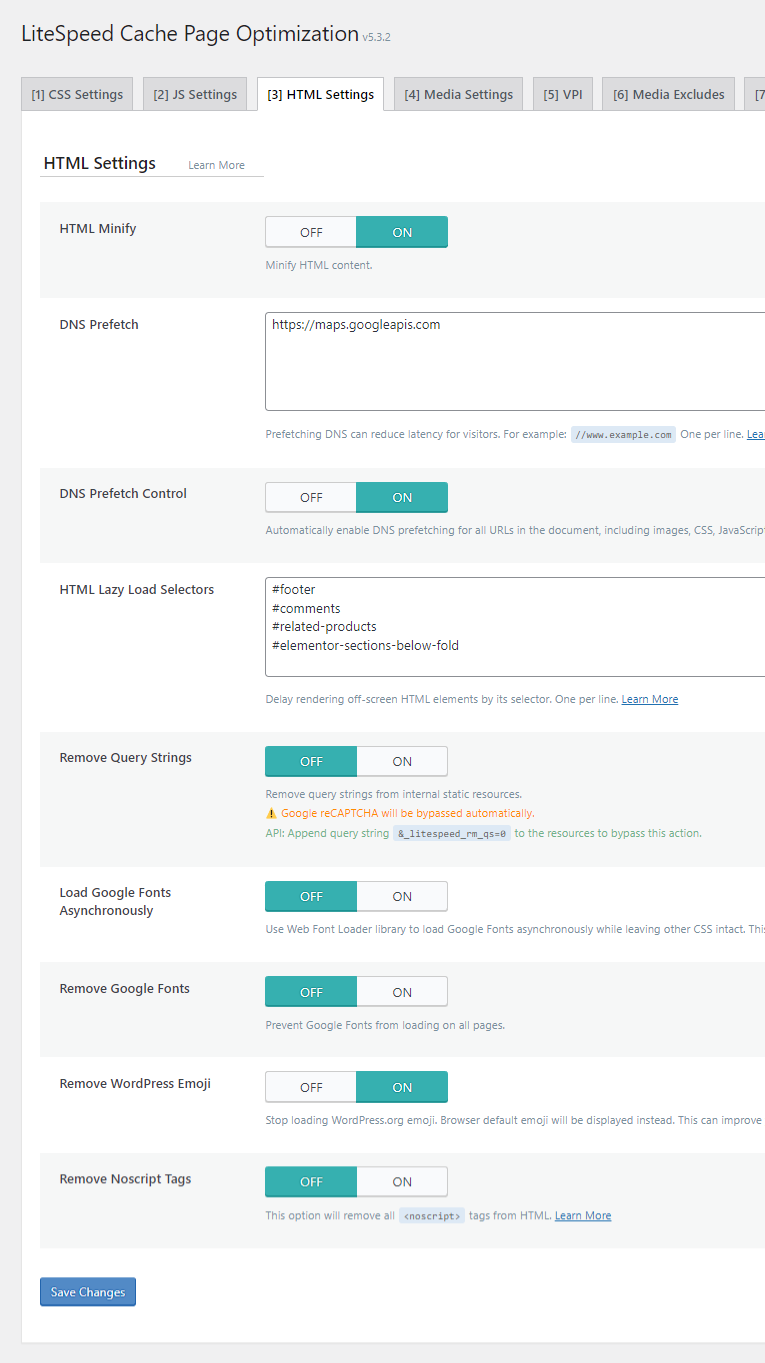
HTML Settings
- HTML Minify: On – removes unnecessary characters from HTML.
- DNS Prefetch: used when a resource is needed soon but not immediately. Open your third-party code report in PSI and look at the domains loading on your site. Most third-party code should be delayed or hosted locally in the Localization settings, but when you have others that can’t, add them here (or see this list of commonly prefetched domains).
- DNS Prefetch Control: On – nothing to do if you added them using the previous setting.
- DNS Preconnect – used when a resource is needed immediately. Usually nothing to do since CDN URLs and third-party fonts are the main ones to preconnect, but QUIC.cloud and Cloudflare don’t use a CDN URL, and fonts (e.g. fonts.gstatic.com) are hosted locally.
- HTML Lazy Load Selectors: similar to lazy loading images only for any below the fold content. Common examples are #comments, #footer, WooCommerce related products, and page builder sections. To do it, view your site → right click the element you want to lazy load → inspect → right click highlighted code → copy → copy selector → paste this into LiteSpeed Cache. FlyingPress has a video on it, although they make it easy since it’s integrated with page builders (1-click toggle) and they use a special CSS class. Hopefully LiteSpeed Cache will make it easier soon but for now, you’ll have to add the CSS selectors.

- HTML Keep Comments: Off – mainly used for debugging HTML comments.
- Remove Query Strings: On – allows static resources with query strings to be cached.
- Load Google Fonts Asynchronously: Off – test carefully and view your GTmetrix Waterfall “fonts” tab to see the difference in your font load times. I like to keep it off.
- Remove Google Fonts: Off – only use if you’re hosting fonts locally and want to make sure any third-party fonts aren’t being loaded on your website, which they shouldn’t be.
- Remove WordPress Emoji: On – emojis aren’t good for load times, so turn this on.
- Remove Noscript Tags: Off – enabling would have a negligible performance gain at the cost of potential JavaScript issues related to analytics tools and SEO, so leave it disabled.
Media Settings
- Lazy Load Images: Depends – can’t lazy load background images while Perfmatters can using CSS background images. It may be better to use that instead if you have lots of them.
- Basic Image Placeholder: use an image placeholder while the images are loading.
- Responsive Placeholder: Depends – on if using basic image placeholder (reduces CLS).
- Responsive Placeholder SVG: specify the SVG to use as the responsive placeholder.
- Responsive Placeholder Color: default gray color LiteSpeed Cache uses should be fine.
- LQIP Cloud Generator: On – the lower quality image (which is generated by QUIC.cloud) will be used as the placeholder before the higher quality image is loaded. Test it yourself.
- LQIP Quality: if the previous setting is enabled, this determines the lower quality image.
- LQIP Minimum Dimensions: 150×150 pixels is fine. This is only for when LQIP cloud generator is turned on, and LQIP will only be used when images are larger than this size.
- Generate LQIP In Background: On – LiteSpeed says turning it off slows down page load.
- Lazy Load Iframes: On – lazy loading videos, maps, and other iframes improves speed.
- Add Missing Sizes: On – adds missing image dimensions to set explicit widths + heights.

VPI
- Viewport Images: On – QUIC.cloud will detect (non-background) images loading above the fold then automatically exclude them from lazy load. Lazy load images must be on.
- Viewport Images Cron: On – they’re generated in the background via cron-based queue.
The preload critical images settings in Perfmatters may do a better job excluding viewport images from lazy load while preloading them. If PageSpeed Insights is still giving you a hard time with LCP images, try enabling this setting in Perfmatters instead.


Media Excludes
While the Viewport Images setting tries to exclude viewport images from lazy load, you can manually exclude them here as well by URL, or class name if you want to bulk exclude images.

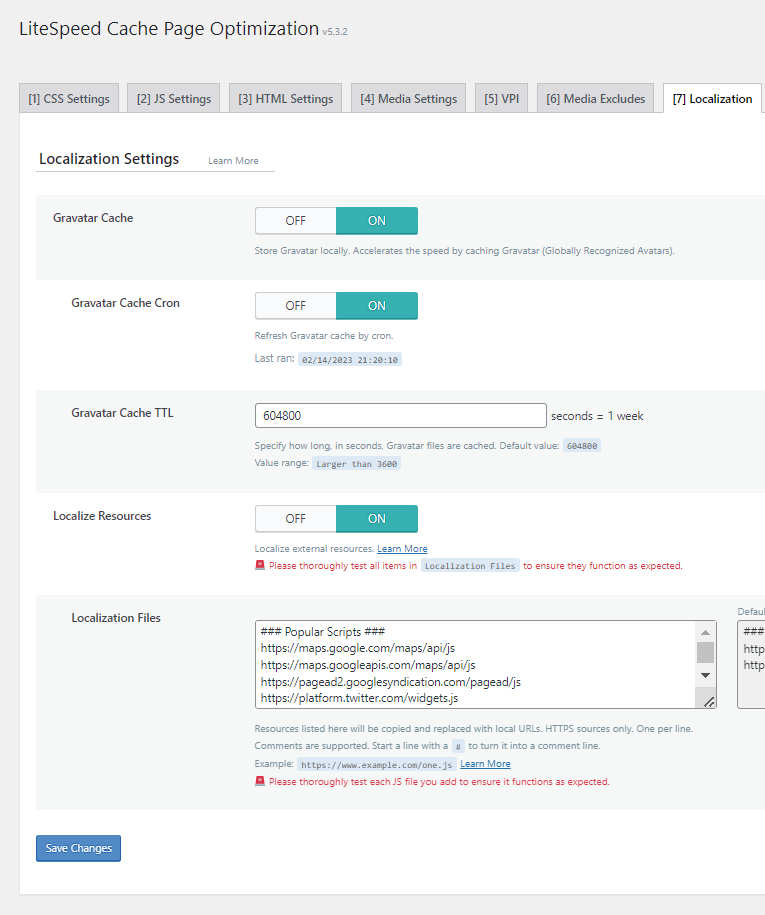
Localization
- Gravatar Cache: On – great when you have lots of comments with Gravatars.
- Gravatar Cache Cron: On – you want it enabled if the previous setting is enabled.
- Gravatar Cache TTL: the default setting of 604800 seconds (1 week) should be fine.
- Localize Resources: On – great feature to localize external JS files. Add them below.
- Localization Files: open your third-party code report to see which JavaScript files are loading, then consider delaying them (Google Analytics, Tag Manager, reCAPTCHA, etc). I copied the list from LSC and added it below (see “popular scripts”). Instead of delaying Google Fonts, host them locally. Delaying ads can also affect revenue. See common issues.
### CDNs ###
https://ajax.aspnetcdn.com
https://ajax.cloudflare.com/
https://ajax.googleapis.com/ajax/
https://cdn.jsdelivr.net/
https://cdnjs.com/
https://cdnjs.cloudflare.com/
https://code.jquery.com/
https://maxcdn.bootstrapcdn.com/
https://netdna.bootstrapcdn.com/
https://oss.maxcdn.com/
https://stackpath.bootstrapcdn.com/

### Popular Scripts ###
https://maps.google.com/maps/api/js
https://maps.googleapis.com/maps/api/js
https://pagead2.googlesyndication.com/pagead/js
https://platform.twitter.com/widgets.js
https://platform-api.sharethis.com/js/
https://s7.addthis.com/js/
https://stats.wp.com/
https://ws.sharethis.com/button/
https://www.google.com/recaptcha/api.js
https://www.google-analytics.com/analytics.js
https://www.googletagmanager.com/gtag/js
https://www.googletagmanager.com/gtm.js
https://www.googletagservices.com/tag/js/gpt.js
https://connect.facebook.net/en_US/fbevents.js
https://connect.facebook.net/signals/config/
Tuning
If enabling a previous setting caused issues like a broken layout, chances are you need to find and exclude problematic files in these settings. Be sure to view the Perfmatters documentation on common exclusions when removing unused CSS (also called UCSS) and delaying JavaScript.

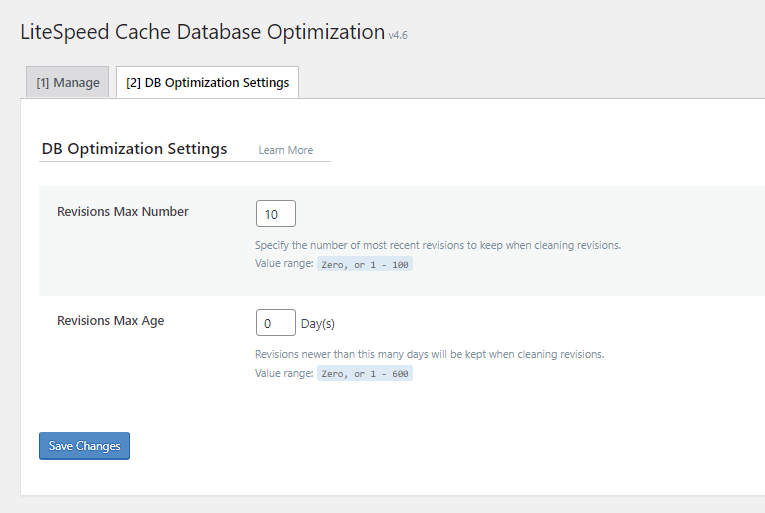
8. Database
In the Manage tab, you probably want to delete everything except post revisions and auto drafts, which are backups of posts that you may need in the future. You can also optimize tables.
DB Optimization Settings
- Revisions Max Number: 10 – gives you some backups while not adding too much bloat. I prefer to be more aggressive with 5, but it’s totally up to you how many revisions to keep.
- Revisions Max Age: 0 – makes sense to me (they will never be deleted). Sometimes I don’t update a post for a very long time, so automatically deleting the backups isn’t a good idea.
9. Crawler
Optimizes performance by preloading and refreshing cached pages, keeping the cache warm. Out of all settings, this probably consumes the most resources, so keep an eye on resource usage in your hosting account or disable crawler completely if you’re experiencing high usage.
LiteSpeed says “we do not recommend crawler usage for shared hosting setups unless the server has enough capacity to handle it!” If you enable it on shared hosting, make sure your hosting plan has a decent amount of CPU cores + RAM and use conservative crawler settings.
These are what I recommend for shared hosting, but I specified whether to increase/lower it to lower resource usage (or when using a more powerful server). If you want an explanation of what each setting does, see crawler documentation.
- Crawler: On – enables it.
- Delay: 300 – increase to reduce server load.
- Run Duration: 200 – lower to reduce server load.
- Interval Between Runs: 1000 – increase to reduce server load.
- Crawl Interval: 86400 – lower to reduce server load. However, you would ideally let the crawler run a couple times, see how long it takes, then add that number here in seconds.
- Threads: 2 – lower to reduce server load.
- Timeout: 30 – lightweight sites can go with 10s, heavier sites can go with 60s.
- Server Load Limit: .5 – lower to reduce server load. Terminates crawler before it uses a specific amount of CPU (0.5 for a 1-core server, 1 for a 2-core server, 2 for a 4-core server).

Role Simulation
Only used to precrawl pages for logged-in users.
Sitemap Settings
- Custom Sitemap: add your sitemap – reduces server load by only crawling important pages in the sitemap. For Rank Math, it’ll be https://yourdomain.com/sitemap_index.xml
- Drop Domain From Sitemap: On – off if multiple domains are in the sitemap (multisite).
- Sitemap Timeout: 200 – how many seconds the crawler will have to scan your sitemap.

10. Toolbox
Most Toolbox settings are self-explanatory (purging, import/export, edit .htaccess, reports, debug, logs, beta test, etc). So I’ll just cover heartbeat settings to control WordPress heartbeat.
Heartbeat
- Frontend Heartbeat Control: On – control heartbeat in the frontend.
- Frontend Heartbeat TTL: 0 – you can usually disable it here, but test it.
- Backend Heartbeat Control: On – control heartbeat in the backend.
- Backend Heartbeat TTL: 0 – you can usually disable it here, but test it.
- Editor Heartbeat: On – controls heartbeat in the post editor.
- Editor Heartbeat TTL: 120 – you probably want things like autosaves, but increase it.

11. Perfmatters
Perfmatters has several optimizations not found in LiteSpeed Cache. To avoid duplicate functionality, only use it for these features.
General – removing emojis and limiting Heartbeat is done by LiteSpeed Cache, so those are disabled. QUIC.cloud protects the wp-login page against brute-force attacks, so don’t move it. All other General settings are new optimizations and you can view explanations of each setting.

Preloading – aside from images, there may be other files you can preload to improve LCP.
- Fonts – copy your font files from a Waterfall chart and test preloading them. This only works when fonts are hosted locally and should only be done if they’re above the fold or are in CSS files. Preloading should reduce blocking time (brown bar in GTmetrix) and LCP.

- Preload critical images – if PageSpeed Insights still tells you to preload LCP images or exclude them from lazy load after enabling LiteSpeed Cache’s Viewport Images settings, you can try disabling those and use this instead. Set the number of images that typically load above the fold (3 is usually a good number). To preload background images not in HTML, add a new preload hint manually, then add the image’s URL, page ID, and priority.

- Preload – if you use Gutenberg, preload wp-block-library to load it early. If you’re not using Gutenberg, disable this file using your script manager which slightly reduces CSS.
- Fetch Priority – view your source code and search for your LCP image(s) to ensure they use the
fetchpriorityattribute, or use the Chrome Dev Tools Network tab. If WordPress isn’t automatically adding fetch priority to the correct images based on their conditions, this lets you fine-tune them which can improve LCP. To use it, add the class name, ID, or filename for the resource you want to add fetch priority (<img>, <link>, and <script> tags are supported). Use “high” in most cases. If you want to target a parent container (<div>, <figure>, <section>), enable Search by Parent Selector for images without unique classes.

- Disable Core Fetch (Test) – if in the previous setting, you notice WordPress adds fetch priority to the wrong LCP element (like a below the fold image), disable core fetch (and Elementor’s Optimize Image Loading) and add fetch priority manually in previous setting.

Lazy Loading – generally more powerful than LiteSpeed Cache’s lazy loading since it has the option to lazy load CSS background images, and the fact that images with fetch priority added by WordPress are automatically excluded from lazy load to automate lazy load exclusions for LCP images. In this case, disable all LiteSpeed Cache’s lazy load settings and use these instead.
Just like we did in HTML Lazy Load Selectors, add the class or ID of your background images to “background selectors.” Alternatively, you can add the perfmatters-lazy-css-bg helper class to background images (screenshot below). Since the preload critical images setting automatically excludes those LCP images from lazy loading, “excluding leading images” can be left off. And if you want to manually exclude URLs and parent selectors from lazy load, you can also do it here. Perfmatters’ lazy elements / LiteSpeed Cache’s HTML lazy load selectors are duplicate features.


Local Google Fonts – check your waterfall chart (e.g. GTmetrix or Chrome Dev Tools) to see if there still fonts loading from third-party domains. If they’re Google Fonts, use the Perfmatters settings below. If they’re from somewhere else, leave all these disabled and use OMGF instead.


Script Manager – disable plugins or CSS/JS files where they’re not used (reduces CSS/JS size). First, enable the script manager, then go to your script manager settings to enable test mode and display dependencies. Test mode lets you test the script manager without it breaking your site by only showing changes to logged in admins (just remember to disable this when you’re done to publish changes). Display dependencies shows you plugins using jQuery (try to avoid).

Next, view any page on your site and in the top menu, go to Perfmatters → Script Manager. Go through your list of plugins/CSS/JS files to see what doesn’t need to load on the page. You have several options on where to disable them. This is often done with page builder/WooCommerce plugins (which are notorious for loading everything). Two examples are disabling your contact form everywhere but the contact page or disabling social sharing plugins everywhere but posts:

12. Recommended LiteSpeed Hosts
Shared Hosting
- ChemiCloud: high performance shared hosting for a fraction of the price of SiteGround (they’re similar to what SiteGround used to be before they went downhill). They use 3.8 GHz CPUs which is significantly faster than most shared hosts who usually use ~2.5 GHz CPUs. The performance difference can be seen directly in wp-admin or test this demo site which has a ~100ms global TTFB in KeyCDN. You get fast PCIe 4.0 NVMe SSDs, cPanel, and (actually helpful) live chat support with a 4.9/5 star rating. I recommend their WordPress Turbo plan with 3 CPU cores + 3GB RAM (scalable to 6 cores + 6GB RAM via their add-on). They’re one of the only shared hosts that scales these and they do 10-200 free migrations.


- MechanicWeb: you probably haven’t heard of them because of their super low paying affiliate program, but they use AMD Ryzen 9950X servers which boost to 5.7 GHz, DDR5 RAM, PCIE 4.0 – 5.0 NVMe SSDs, and cPanel. Helpful live chat that’s based in Bangladesh.
VPS
- xCloud (Vultr High Frequency): if you’re on Cloudways, xCloud and RunCloud both support Vultr High Frequency on OpenLiteSpeed without 2x markups like Cloudways (better performance for a lower price). You also get $300 in free credits when using this Vultr aff link. 2vCPU + 4GB ($24/mo) are good numbers for a lot of websites, then follow xCloud’s guide on adding your Vultr API key. Support seems to be the biggest complaint which is pretty standard when you’re trying to save money by using VPS control panels.
- Scala Hosting: best custom control panel I’ve used (SPanel) which uses less resources than cPanel and supports OpenLiteSpeed and SShield, potentially saving money on 3 licenses. They also use 4 GHz CPUs, NVMe SSDs, and customizable resources (cores, RAM, storage) with a 30-day money-back guarantee. I also like how open to feedback they are, like their feedback on SPanel. And Chris (CEO) is active on Reddit. 5/5 stars on TrustPilot.
- MechanicWeb: if visitors are near Los Angeles (USA) and you want a VPS with the 5.7 GHz AMD Ryzen 9950X server (and faster specs like DDR5 ECC RAM) – this is the host you want.
I don’t recommend Hostinger. They have a history of scams, write fake reviews, and their servers/support are totally unreliable. My site is my baby, and my baby doesn’t like scammers.


Did I Miss Anything?
I’m always looking to improve my tutorials and will listen to any suggestions you have in the comments. Otherwise if you liked my LiteSpeed Cache guide, I would appreciate you sharing it!
Cheers,
Tom


