
Want to create a beautiful restaurant website in WordPress?
We’ll be using Astra’s Ready Websites which are pre-built websites you can import in 1-click using the Astra Starter Sites plugin for WordPress. They have multiple restaurant themes to choose from; some are free, others are premium. I will show you everything from installing WordPress, logging in, importing a WordPress restaurant theme, customizing the theme, incorporating reservations and online orders, and even tips for SEO and speed optimization.
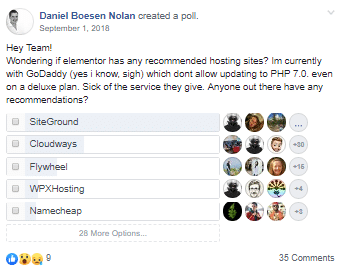
There is a lot of bad advice about creating a restaurant website; bad hosting (eg. Bluehost), complicated WordPress themes, and bloated plugins can all slow you down. That’s why we’ll be using SiteGround’s hosting and Astra Themes which were both rated #1 in numerous Facebook polls taken by WordPress Facebook Groups. A good infrastructure saves you time and money.
In 2019, I purchased a ramen restaurant with my girlfriend (even though I do WordPress design and SEO for a living) mainly to help her. But I’ve seen the ins and outs of what it takes to run a successful restaurant and of course, how to create a restaurant website. This blog gets 3,000 visitors/day and generates $150k+/year with affiliate marketing. The proof is in the pudding.
How To Create A Restaurant Website
- Choose Your Domain & Hosting
- Install WordPress
- Login to Your WordPress Backend
- Make Your Website Secure With SSL
- Import A Restaurant WordPress Theme
- Name Your Restaurant Website
- Decide If You Want Your Site To Appear In Google
- Create Your Navigation Menu
- Design Your Menu Page
- Create A Reservations Page
- Create An Online Ordering Form
- Build Other Pages On Your Website
- Customize Your Restaurant’s Design
- Customize The Mobile Website
- Optimize Your Website For Google
- Make Your Website Format Nicely On Facebook
- Install Essential WordPress Plugins
- Setup Google Analytics + Search Console
- Make Your Website Load Fast In GTmetrix
- Get A Custom Restaurant Design
1. Choose Your Domain & Hosting
SiteGround is who I recommend for domain & hosting.
They’re consistently rated the #1 host in Facebook polls and are worlds better than Bluehost (who most bloggers refer you to) because of their speed, support, and reliability. They’re also not owned by EIG who owns over 60+ different hosting companies and is infamous for slow servers. If you want a fast restaurant website with 99.9% uptimes, I would choose SiteGround.


Choose A Hosting Plan – SiteGround has 3 plans; the main difference is their StartUp plan can only host 1 single website while GrowBig+ can host multiple websites, comes with staging, and more server resources (is faster). Otherwise, StartUp will be fine for most restaurant websites.

Sign Up And Choose Domain Name – during the sign up process, you can choose a domain name or tell them you already have one. Enter your details including server location (the one closest to your restaurant). Most restaurant websites don’t need add-ons which cost money. Be sure to sign up through the WordPress hosting page which makes it easier to setup WordPress.

2. Install WordPress
After you sign up with SiteGround, they will send you a launch wizard through email.

In the launch wizard, choose start a new website, WordPress, and create your login details.

You will then see a confirmation page.

3. Login to Your WordPress Backend
Once you’ve completed SiteGround’s launch wizard, they will send you an email with your WordPress login details and the Admin URL. Use this to login to your WordPress dashboard.


4. Make Your Website Secure With SSL
Adding SSL should be done first thing when starting your restaurant website to make sure all URLs include HTTPS in the browser. This involves 2 simple steps which are explained below.
Without SSL:

With SSL:

First, login into your SiteGround account and head to My Accounts → Go To cPanel → Security → Let’s Encrypt SSL, activate it. This will install a free Let’s Encrypt SSL on your domain name.

Next, login to your WordPress dashboard → SG Optimizer → Environment Optimization → Enable HTTPS. SiteGround will ask if you want them automatically configure your restaurant website for HTTPS which you should do. Wait a minute or two, then refresh your website and you should see HTTPS is now present in your domain name. SiteGround makes it very simple.

5. Import A Restaurant WordPress Theme
Astra’s Ready Websites are what I recommend building your restaurant website in.
All their themes are beautifully designed, mobile responsive, and 1-click import using the Astra Starter Sites plugin. Using a good template from Astra is the difference between a mediocre restaurant website and one that looks like it was designed by a professional website designer.
Step #1: Install and activate the Astra Starter Sites plugin under Plugins → Add New.

Step #2: Install and activate the Astra theme (you’ll see a prompt after the previous step).

Step #3: Choose Elementor as your page builder.

Step #4: Choose a nice restaurant theme for your website. You can find additional restaurant themes under Gutenberg, Beaver Builder, and Brizy (located on the top right of your screen), but this means you will be using a different page builder than Elementor. If possible, choose a restaurant theme that is built in Elementor since it’s typically easier to work with (and faster).

Step #5: Once you find a theme you like, click Import Site. Astra will download the entire pre-built website on your domain name including the content, plugins, WordPress customizer settings, and widgets. When it’s done, refresh your website and you will see the pre-built website has been installed on your domain name. Now the fun part – to start customizing it!


Now your website should look exactly like the theme!

Alternative Restaurant Themes
I highly recommend Astra themes, but if you want to explore restaurant themes from other places, I listed a few WordPress theme stores below. Just be careful; many of them get discontinued, load slow, or can be difficult to customize. The rest of this tutorial is also specific to Astra + Elementor. If you plan on following along, use an Astra theme or at least Elementor.
- Café Pro from StudioPress
- Free restaurant themes (found in WordPress → Appearance → Themes → Add New)
- ThemeForest restaurant themes

6. Name Your Restaurant Website
Name your website (as your restaurant name) in WordPress under Settings → General. The tagline should be blank and do NOT change your WordPress Address or your Site Address.

7. Decide If You Want Your Site Appear To In Google
You don’t want all your theme’s placeholder content showing in Google.
Until you’re completely finished designing your restaurant website, you should prevent it from showing in Google. You can do this in WordPress under Settings → Reading → Discourage search engines from indexing this site. When you’re ready to launch your site, deselect this.

8. Create Your Navigation Menu
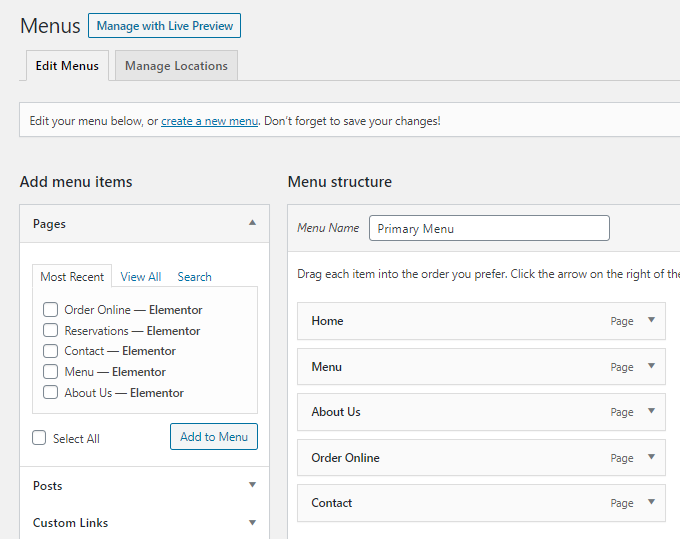
Before creating your navigation menu, you’ll need to add the pages you want on your website under Pages → Add New (you can also use the templates that came with your theme). You don’t need to design all these pages now, just publish them so you can create your navigation menu.

Once you added your pages in the previous step, go to Appearance → Menus. Here, you can drag and drop your pages (from the left) to your navigation menu (to the right). To create a dropdown menu, drag them so they have an indent under the page you want them to fall under.
You can find additional options to customize your navigation menu in the Astra Options (further explained in step #13). You will find these settings in Appearance → Astra Options.

9. Design Your Menu Page
Your restaurant theme already comes with a beautiful menu page.

To edit it, go to Pages → Menu → Edit With Elementor. Now, it’s literally point, click, and edit. Elementor makes it easy to design pages (you can change fonts, colors, logo, and universal options in the Astra Settings). Elementor is based on widgets; you can reorder them, add new widgets, and use pre-built templates (blocks or full pages) to create any type of page you want.

Here’s a tutorial on editing pages with Elementor:

Change The Design Of Your Menu Page
Don’t like the current design of your menu? Elementor has tons of templates you can use for your pages, and menus is one of them. Simply edit your menu page with Elementor, click the folder option, then search for menu. The cake shop, coffee shop, and menu templates can all be used for the menu page. However, many of these templates require an Elementor Pro account.


Here’s just one example of an alternate menu design:

10. Create A Reservations Page
This section shows you how to let people make reservations directly through your website. People can look at a calendar, select a date, and send important details like number of visitors, phone number, and any details you request from them. When filled out, you will get an email.
Step 1: Install The Booking Calendar Plugin
For reservations, I use the Booking Calendar plugin. It’s free, compatible with Elementor, and has lots of settings to design and customize how people make reservations for your restaurant.

Here’s what it looks like:

Step 2: Add A Booking Calendar To The Page
Once you install the plugin, create a page called “Reservations” then edit the page with Elementor. Next, search for the Booking Calendar widget in Elementor, then drag and drop it on the page. Once you update the page, you will be able to see the calendar has been added.

Step 3: Configure Your Booking Calendar Settings
To customize the calendar and form, go to Booking → Settings. There are multiples settings (General, Form, Emails, Sync) which let you customize the styling, calendar length, form fields, the email sent to you after someone completes a reservation, timezone, and much more. To view your current bookings, select the Bookings tab, or check your email for a confirmation.

You can also use the pre-built contact page which already has a simple contact form:

11. Create An Online Ordering Form
You have a couple options for online ordering:
- Create simple online ordering with a contact form
- Create advanced online ordering with WooCommerce
I will be showing you how to create online ordering with a contact form. This is much easier to setup, but if you want a more advanced system I recommend building it with WooCommerce. For contact forms, you will need an advanced contact form plugin with conditional logic. Below are three options to build your restaurant’s online ordering system using a contact form plugin.
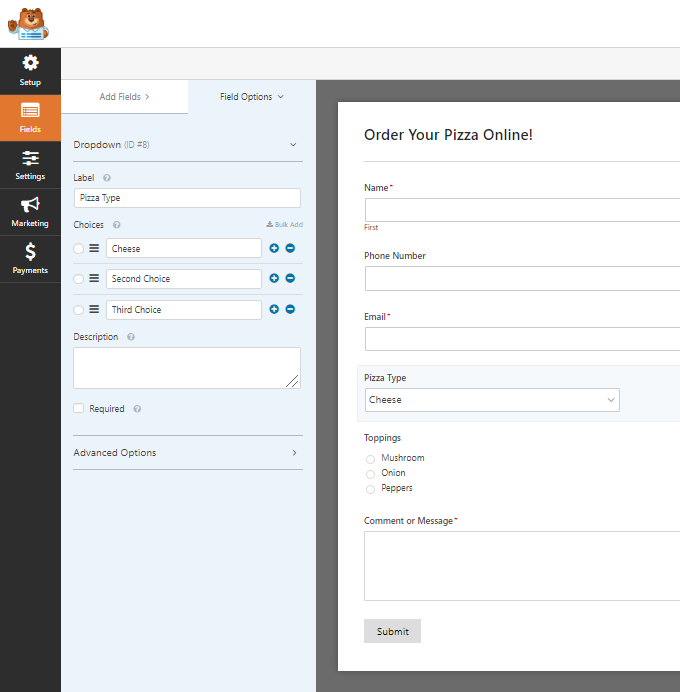
Option 1: WPForms (Premium)
WPForms is limited to simple contact forms and has text fields, dropdowns, multiple choices, checkboxes, numbers, name, email, number slider, and reCAPTCHA. To use premium fields (including the option to collect payments via PayPal or Stripe), you will need the Pro version.

Option 2: Contact Form 7 (Free)
Contact Form 7 is a free contact form plugin where you will need to install both Contact Form 7 and the Conditional Fields plugin. While it’s a free plugin, it doesn’t have great reviews partly because it can slow down your website and there have been many bugs reported on the plugin.
Option 3: Gravity Forms (Premium)
Gravity Forms is a user-friendly plugin to build advanced contact forms and is what I personally used on sites that needed a more robust contact form with many fields to choose from. You can check out the demos. If you’re going with a premium plugin, I recommend using Gravity Forms.
How To Add Your Online Ordering Form To A Page
Once you decide on a contact form plugin, create a page called “Order Online” then edit it with Elementor. In the Elementor widgets box, search the name of the contact form plugin, select the form, then drag and drop it onto the page. To customize the form, go to your Contact Form settings and edit the form. For example, in WPForms you would go WPForms → add a new form → create a simple contact form. Add fields by dragging and dropping them to the form.
12. Build Other Pages On Your Website
Your theme already comes with pre-built pages that are specific to restaurants, or you can use Elementor’s page templates and blocks to create entirely new pages. Just like you created the menu page with Elementor, we will do the same for the other pages on your restaurant website.

13. Customize Your Restaurant’s Design
Now it’s time to change fonts, colors, and the “universal design” of your restaurant website. Most of this can be done under Appearance → Astra Options. These are quick links that lead to the WordPress customizer where you can upload your logo + favicon, change fonts, colors, header and footer, along with many other universal customizations on your restaurant website. All of these are very easy to do, but feel free to leave me a comment if you have any questions.

Upload your logo and favicon:

Change fonts:

Change colors:

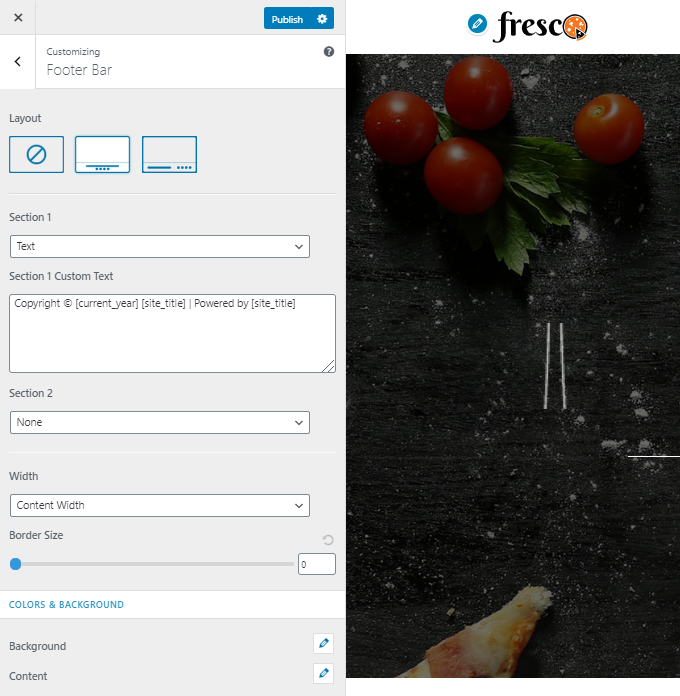
Customize the footer:
Tips On Designing Your Restaurant Website
- Remove the “Powered By” text in the Footer settings
- Don’t upload a huge image for your logo; it will slow down your website
- Select fonts + colors that match your restaurant’s branding and are easy to read
- Customize the button link in your navigation menu under Header → Primary Menu
- To add a blog, create a page called Blog and select it in Homepage Settings → Posts Page
14. Customize The Mobile Website
All Astra Themes are mobile responsive which means your restaurant website will automatically format for phones and tablets. But if you want to change something on your mobile website, you can do that with Elementor. Below are instructions on how to do that.
Go to Pages → Edit with Elementor. In the bottom left of your screen you will see a responsive mode option where you can view the page on desktop, tablet, and mobile. Just like you would edit your desktop page, you will also do the same (point, click, edit) to change the mobile page.

15. Optimize Your Website For Google
Research Your Keywords – chances are your keywords include your food + city name. For example, it might be “Italian Food Cherry Creek” or “Ramen Arvada.” You can use Google Autocomplete to learn the exact keywords people are searching for – that is the first step.

Target Keywords In Your Homepage Snippet – you will need to install and activate Yoast’s SEO plugin to do this. Once activated, edit your homepage in the WordPress Editor (not with Elementor) and scroll down to the Yoast SEO section. You will see the option to edit your Google snippet (SEO title + meta description). You want to include your restaurant name and primary keyword but also make sure both your SEO title + meta description read nicely and don’t go above Google’s character limits (the bar in Yoast should be green). You can optimize all your page’s Google snippets with Yoast, but the homepage is definitely the most important.

Configure Yoast’s SEO Plugin – I have a full tutorial on Yoast but the most important settings are under SEO → General → Features, Search Appearance, and Social. Activate the features you want (I only use the SEO Analysis and XML Sitemap) and fill out your social profiles in the social tab. In Search Appearance, you usually don’t want to show any content in search results except pages/posts. Exclude everything else under Content Types, Taxonomies, and Archives.
Submit Your Yoast XML Sitemap To Google – you will need to setup Google Search Console to do this (step #14). Once you do, find your XML sitemap in Yoast under SEO → Features → XML Sitemaps → Question Mark Icon → See The XML Sitemap. By default, the sitemap URL will be yourwebsite.com/sitemap_index.xml. Copy the text /sitemap_index.xml then login to Google Search Console and go to Sitemaps. Paste the XML sitemap URL here and submit it to Google.

Optimize Your Google My Business Page – Google My Business is nearly 30% of Google’s local search ranking factors. I know this has nothing to do with creating a restaurant website (although you do want to list it in all your online profiles), but I just wanted to make sure you don’t forget about this because of how important it is. See my Google My Business tips here.
16. Make Your Website Format Nicely On Facebook
Making your restaurant website format nicely on Facebook is easy.
Edit your homepage (with the regular WordPress editor, not Elementor), then scroll down to the Yoast SEO section. Click the “Social” tab then click Facebook and Twitter. You will see options to upload custom graphics for each (Facebook is 1200 x 630 pixels, Twitter is 1024 x 512 pixels). Once you upload these graphics, your homepage will format nicely when shared on social media. You can do this for all your pages, but the homepage again, is the most important.
Without uploading custom images:

With uploading custom images:

17. Install Essential WordPress Plugins
Below are some plugins I recommend installing on your restaurant website.
Be careful which plugins you install; too many plugins or even 1 bloated plugin can make your website load slow. I have tested all these plugins and they’re also popular in Facebook Groups.
- Astra Starter Sites – import Astra’s pre-built websites.
- Booking Calendar – online reservations plugin with calendar + form.
- Contact Form 7 – free contact form plugin which can be used with CF7 Conditional Fields plugin to create advanced forms for online ordering.
- Duplicate Page – duplicate pages to use them as templates for new pages.
- Elementor Pro – gain access to more templates, widgets, design features.
- Gravity Forms – premium contact form plugin (great for online ordering).
- iTheme Security – make your site secure with this 1-click security plugin.
- Redirection – redirect old URLs to new ones if you changed permalinks.
- ShortPixel – compress images to load faster (with lossless + lossy option).
- SG Optimizer – SiteGround’s speed plugin which allows you to force HTTPs and enable caching, image optimization, plus minification and combination of files. Also lets you set PHP version to managed (which keeps PHP version updated).
- High CPU Plugins To Avoid – full list of slow plugins to avoid (written by me).
- UpdraftPlus – the plugin I recommend for backing up your restaurant website.
- WordPress SEO Plugins – full list of SEO plugins (written by me).
- WordPress Speed Plugins – full list of speed plugins (written by me).
- WPForms – free contact form plugin pre-installed with most Astra themes.
- Yoast – robust SEO plugin which I have a tutorial for. You can break Yoast down into 3 steps: configuring the settings, keyword research, and on-page SEO.
18. Setup Google Analytics + Search Console
Both Google Analytics and Google Search Console are free, easy to setup, and very useful for optimizing your restaurant website’s Google rankings and getting data about your visitors.
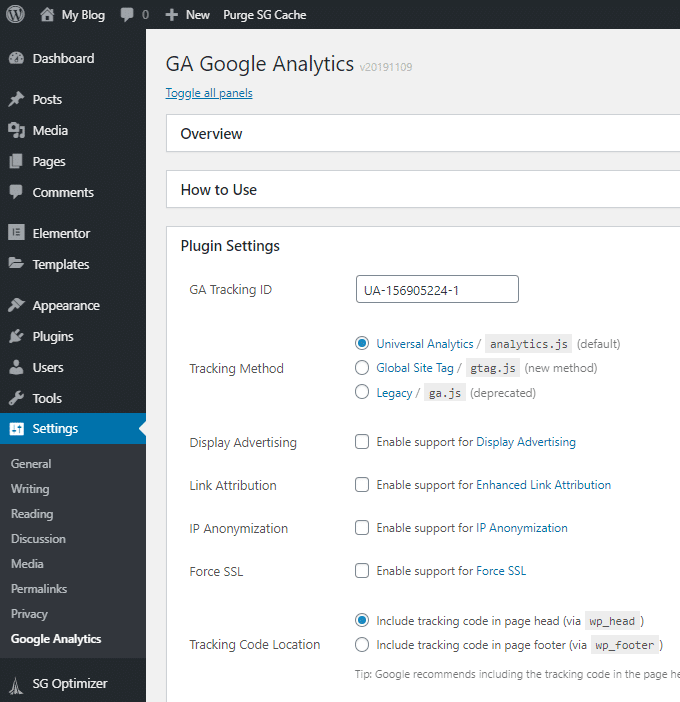
How To Setup Google Analytics – sign up for a free Google Analytics account, add your website (and other details they request), then head to the Admin section of your Google Analytics dashboard where you will find your tracking ID. You will need this for the next step.

Next, install a Google Analytics plugin (I recommend GA Google Analytics) and head to the settings. Paste your tracking ID here. Alternatively, you can copy/paste the actual JavaScript tracking code into your header. Both Google Analytics and Google Search Console need a few days (or even weeks) to collect enough data about your site and populate in your dashboards.
How To Setup Google Search Console – sign up for a free Google Search Console account, add your website in the Domain option, and they will provide you with a TXT record which you will paste into your DNS configuration. For SiteGround, this is under My Accounts → Go To cPanel → Advanced DNS Zone Editor. Once that is done and you verified the account, give it a few days (or weeks) for data to populate. You will be able to check for mobile, security, and sitemap errors (don’t forget to add your Yoast XML sitemap in the Sitemaps section). The Search Results graph tells you what keywords you rank for, their rankings, and click-through rates.


19. Make Your Website Load Fast In GTmetrix
Your restaurant website should already load very fast.
That’s mainly thanks to SiteGround’s fast WordPress hosting and your fast loading Astra theme. But there are definitely other things you can do to keep your WordPress site fast.

- Configure The SG Optimizer Plugin – in your SG Optimizer settings located in WordPress, enable Managed PHP in the environment optimization tab, enable everything in frontend optimization, and enable lazy load in the media tab.
- Add Cloudflare – Cloudflare’s free CDN hosts your website on 200+ data centers around the world, reducing the distance between your server and visitors. To setup Cloudflare, go to SiteGround → My Account → Go To cPanel → Cloudflare, then click Activate free (see image below). The dashboard has many other options to improve both your restaurant’s website speed/security.
- Optimize Images – there are 2 primary ways to optimize images; don’t upload huge images (called serving scaled images in GTmetrix), and compress them using a plugin like ShortPixel. ShortPixel can also remove image’s EXIF data.
- Be Careful With The Plugins You Install – be minimal with plugins and only use those that have been tested and load fast (like the ones I listed in step #17).
- Avoid Third Party Scripts When Possible – when possible, avoid anything that pulls external requests from outside website including Google Fonts, Google Tag Manager, AdSense, Google Maps, embedded YouTube videos (though you can lazy load these), and Facebook + Instagram widgets. They all slow it down!

20. Get A Custom Restaurant Design
Need a more custom restaurant website design?

Our team builds completely custom WordPress websites for restaurants and other industries. If you’re looking for something more than a quick template customization and a truly unique WordPress design, reach out to us and we can schedule a time to talk and give you a quote.
Cheers,
Tom


