
Ready to create your own photography website?
I’ll show you how to build a stunning photography website in WordPress using Astra’s Ready Websites. These are pre-built websites which are 1-click import using the Astra Starter Sites plugin for WordPress. There are plenty of photography themes (I’ll be using the Photographer theme in this example). You just need to choose your theme, import it, and start customizing.
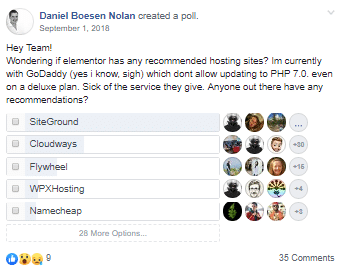
We’ll be using SiteGround’s hosting who was rated #1 in numerous Facebook polls and are worlds better than Bluehost (what most bloggers refer you to because of their affiliate commissions). I’ll cover everything from adding SSL, creating multiple portfolio designs, making your site load fast, and even optimizing your site for Google (SEO). How you create your photography website affects SEO and speed; my mission is to help you do it right the first time.
Here’s what to do:
How To Create A Photography Website
- Choose Domain & Hosting
- Install WordPress
- Login To Your WordPress Dashboard
- Add SSL To Make Your Website HTTPS
- Download A Unique Photography Theme
- Give Your Website A Name
- Customize The Global Design
- Add Your Portfolio
- Optimize Images For SEO + Speed
- Protect Photos With Hotlink Protection
- Create Your Homepage
- Create Your About Page
- Create Your Contact Page
- Customize Your Navigation Menu
- Make Your Website Format For Facebook + Twitter
- Install Important WordPress Plugins
- Setup Analytics + Search Console
- Optimize Your Photography Site For SEO
- Make Your Website Load Fast In GTmetrix
- Create Your Blog
- Get A Custom Photography Website Design
1. Choose Domain & Hosting
SiteGround is who I recommend for both domain + hosting.
They were rated the #1 host in multiple Facebook polls and are much faster than Bluehost who is owned by EIG and infamous for slow servers. SiteGround makes it super easy to setup WordPress and SSL, and they’re fast, reliable, and have great technical support for WordPress.


Step 1: Choose A WordPress Hosting Plan
SiteGround has 3 plans: StartUp, GrowBig, GoGeek. I generally recommend GrowBig since it comes with more storage, server resources (makes your site faster), and you can host multiple websites. It also comes with staging, advanced caching for faster speeds, and a free website transfer. But if you’re hosting 1 single website and don’t need the features, StartUp is good.

Step 2: Sign Up And Choose A Domain Name
When you sign up for a WordPress hosting plan, SiteGround will prompt you to purchase a domain name or use an existing one. Enter your details and sign up. You probably don’t need domain privacy or Site Scanner which both cost additional money and aren’t very beneficial.

2. Install WordPress
After you sign up, you will see SiteGround’s launch wizard.

Select start a new website, WordPress software, and create your WordPress login details.

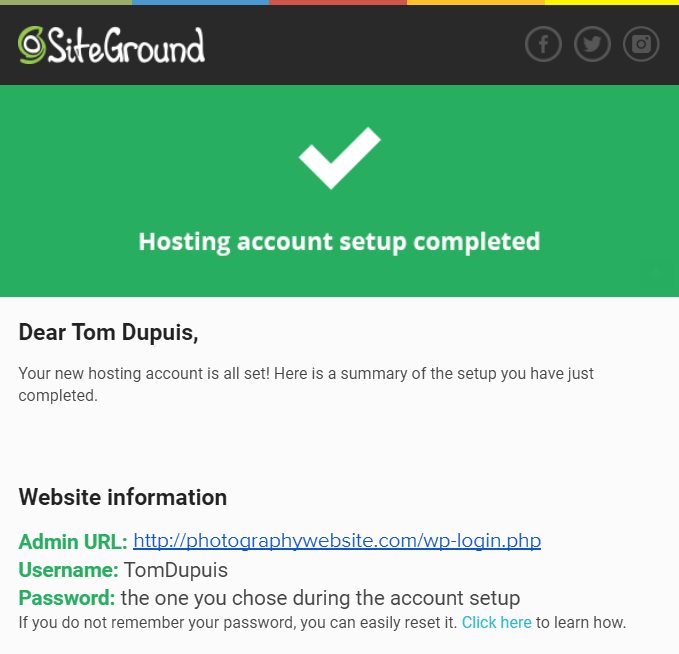
Once the setup process is complete, you will be taken to confirmation page.
3. Login To Your WordPress Dashboard
After you install WordPress through the launch wizard, SiteGround will send you an email with your WordPress login details including your username, password, and Admin URL. You will use these to login to your WordPress dashboard and start creating your new photography website.
Go ahead and login!

4. Add SSL To Make Your Website HTTPS
It’s easier to add SSL (HTTPS) from the beginning. SiteGround (and many other hosting companies) come with a free Let’s Encrypt SSL which can activated in your hosting account.

Activate Let’s Encrypt SSL – the first step to adding Let’s Encrypt SSL is to login to your SiteGround cPanel and head to Security → Let’s Encrypt SSL → then click “Activate Free.”

Enable HTTPS – next, find the SG Optimizer tab on the left of your WordPress dashboard and go to Environment Optimization → Enable HTTPS. SiteGround will automatically configure it.

5. Download A Unique Photography Theme
There are lots of WordPress photography themes out there.
I highly recommend the photography themes from Astra since they look great, are mobile responsive, user-friendly, and are very easy to import. As mentioned earlier, I’ll be using the Photographer theme for this guide, but they have many photography themes to choose from.
Step #1: Install and activate the Astra Starter Sites plugin under Plugins → Add New.

Step #2: Install and activate the Astra theme (you’ll see a prompt after the previous step).

Step #3: Choose your page builder. The Photographer theme uses Gutenberg, however many people prefer Elementor. It just depends on which theme you want and type of interface you prefer when designing pages. Be sure to check out all themes by looking under each builder.

Step #4: Select a photography theme from Astra.

Step #5: Import the photography theme by clicking Import Site. Astra will begin downloading the entire pre-built website onto your domain (including all content, plugins, widgets, and WordPress Customizer settings). This may take a couple minutes to finish the downloading.


Step #6: Refresh your photography website and you will see your theme is installed!

6. Give Your Website A Name
In your WordPress dashboard, name your website under Settings → General.
This is usually your name (eg. Eric Low) or business name (XYZ Photography). Do not change your WordPress Address or Site Address; changing these can break your photography website.

7. Customize The Global Design
Now we’ll customize your website’s global design (logo, fonts, colors, header, footer, etc).
To do this, head to Appearance → Astra Options. These link to the WordPress customizer options where you can do everything from upload a logo to change fonts, colors, and layouts.

Things You Can Do In Astra Options:
- Upload your logo
- Upload your favicon (16x16px icon shown in browser)
- Customize footer layout + copyright area
- Customize fonts (family, size, weight, line height)
- Customize the navigation menu layout
- Change the layout of pages/posts to fullwidth, sidebar
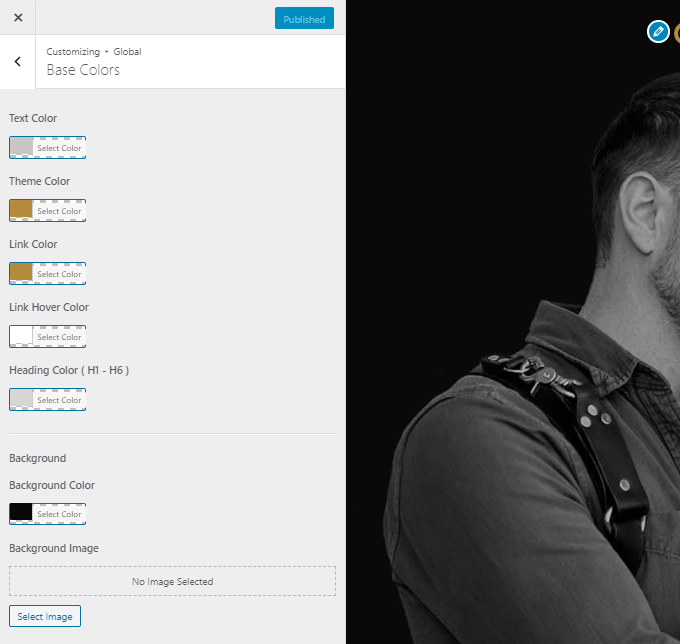
- Change colors (text, theme, link, link hover, header, background)
- Customize blog info (author, publish dates, category)
- Customize the sidebar and width on your blog
Add your logo and site icon (favicon):

Change the fonts:

Change the colors:
Change the footer text, copyright section, social media icons, and more:

8. Add Your Portfolio
Adding your portfolio is easy; you don’t even need a plugin.
Go to Pages → Add New. Add a page title and background image if you want. Next, click the Gutenberg block and search for “Gallery.” Finally, upload the images you want in the portfolio.


You can change the number of columns:

You can add a gallery (or slider, using a plugin) to any page you want.
There are also plenty of free portfolio plugins. Just be careful when choosing one since many portfolio plugins can slow down your website. I recommend using Gutenberg’s gallery if you can (or if you’re using another page builder like Elementor, they have options to add a gallery).
9. Optimize Images For SEO + Speed
You’ll notice my images aren’t always the the highest quality.
That’s because I compress them using the ShortPixel plugin (and a lot of my blog is dedicated to speed optimization). Most photographers don’t want to do this, but you should at least take a few extra steps to make sure images load fast and are optimized with alternative text (for SEO).
Add Alt Text – by default, WordPress does not automatically add alt text to images (this is used to describe images to search engines and improve SEO). I recommend installing the Auto Image Attributes plugin which automatically adds alt text based on the image file name. This means all you have to do is label your images (on your computer) before uploading them to your WordPress site. The plugin will do the rest.
Avoid Uploading Huge Images – your portfolio images, blog images, and other images on your photography website call for specific dimensions. If you upload huge images that don’t fit these dimensions, it will slow down your website and you will see serve scaled image errors in GTmetrix’s speed testing tool. You need to learn the proper dimensions of your images and crop/resize them to the specific image dimensions.
Use SVGs – this format ensures the highest quality and fastest load times for images. You will need to install the SVG Support plugin to use the SVG format on your website.
10. Protect Photos With Hotlink Protection
Hotlinking protection prevents readers from copying/pasting images from your website to theirs. Unlike saving images images and uploading them to another website, hotlinking consumes bandwidth since the image is still hosted on your website. You want to prevent this!
Step 1: Activate Cloudflare – go to your SiteGround cPanel → Cloudflare → Activate Free. This will activate Cloudflare’s free CDN (content delivery network) on your photography website. This has a range of benefits including improved speed and security for your website.

Step 2: Enabled Hotlink Protection In Cloudflare – you will need to login to the actual Cloudflare dashboard for this. Next go to Scrape Shield → Hotlink Protection → Turn On.

11. Create Your Homepage
If you’re using an Astra theme, your homepage is already pre-designed. All you have to do is customize it!
Go to Pages → All Pages, edit your homepage. If you are using the free Astra photography theme, you will be using Gutenberg to edit pages which is pretty much point, click, and edit.

Here’s a tutorial on editing pages with Gutenberg:

12. Create Your About Page
You will edit your About page just like any other page under Pages → About → Edit.
Some photographers choose to include a few images here, but this is the place to share your story. I spent a lot of time on my about page since it keeps people on the site longer (improving engagement/SEO) and sharing my story is important to me. Spend time on your about page!

13. Create Your Contact Page
The main difference on the contact page is the contact form.
To edit the contact form, go to WPForms → All Forms, then edit the contact form. You can customize the fields, notification messages, as well as the email address(es) the form is sent to.

14. Customize Your Navigation Menu
To customize your navigation menu, go to Appearance → Menus.
Keep in mind pages (and blog posts) need to be published for you to add them to your navigation menu. From here, simply drag and drop pages from the left to the navigation menu on the right. Dragging a page under another page (with an indent) creates a dropdown menu.


Astra’s options have additional settings for customizing the design of your navigation menu:

15. Make Your Website Format For Facebook + Twitter
When someone shares your website on Facebook or Twitter, you want it to look nice.
Step 1: Install The Yoast SEO Plugin
Step 2: Edit a page, scroll down to the Yoast SEO section, then click “Social.” You will see options to upload custom images to Facebook (1200x630px) and Twitter (1024x512px). You can use one of your photos, a headshot, or any image to appear when the page is shared.
Step 3: Test the image by copying/pasting the URL to Facebook or Twitter. Looks nice!

16. Install Important WordPress Plugins
Below is a list of recommended WordPress plugins and resources.
Keep in mind some plugins can slow down your photography website. It’s best to only install reliable, highly rated plugins and be minimal with the number of plugins you have on your site.
- Duplicate Page – makes it easier to design pages from existing ones.
- iTheme Security – improves your website’s security with a 1-click button.
- Portfolio Plugins – if you don’t like the gallery that comes with Gutenberg, there are tons of portfolio plugins out there. Be careful – some portfolio plugins will slow down your site, so make it is fast and has good reviews.
- ShortPixel – compressing images makes your website load faster (although most photographers usually don’t want to risk any chance of quality loss).
- SG Optimizer – SiteGround’s caching plugin which also lets you force HTTPS, minify files, combine files, set managed PHP version, optimize images, and other optimizations that makes your photography website load much faster.
- High CPU Plugins To Avoid – list of slow plugins to avoid (written by me).
- UpdraftPlus – easy, lightweight backup plugin so you don’t lose your work.
- WordPress SEO Plugins – list of SEO plugins (curated by me).
- WordPress Speed Plugins – list of speed plugins (curated by me).
- Yoast SEO – customize your Google snippets, make your website format properly on Facebook and Twitter, and create/submit your Yoast XML sitemap Google. You can break Yoast down into 3 main steps: configuring the settings, keyword research, and content optimization. All these are equally important.
17. Setup Analytics + Search Console
How To Setup Google Analytics
Sign up for a free Google Analytics account, add your photography website, then head to the Admin section where you can find your JavaScript tracking code and UA number. Copy/paste your tracking code into your theme’s header, or alternatively, use a Google Analytics plugin to copy/paste the UA number into the plugin. Give it a few days and Google Analytics will start recording data about your site’s visitors, demographic, age, location, traffic sources, and more.
How To Setup Google Search Console
Sign up for a free Google Search Console account, add your website, then you will be provided verification instructions. It includes a TXT record which you will copy/paste into your DNS settings. In SiteGround, this is My Accounts → cPanel → Advanced DNS Editor. Paste the record here, then verify your site with Search Console. It will also take a few days for Google to start recording data about errors (sitemap, mobile, security), links, rankings, and analytics.

18. Optimize Your Photography Site For SEO
Google Maps + local SEO have their own set of local ranking factors.
Research Photography Keywords In Your Cities
The first step to SEO is learning your photography keywords. Go to google.com, start typing a keyword, and look at the Autocomplete results. Generally, the broader the phrase, the more competitive it will be. Your main keyword might be something like “Chicago Wedding Photographer” but you can also target more specific services, like “Chicago Indian Wedding Photographer” or “Chicago Wedding Photographer Under $2000.” You should also research keywords for each of your photography services: headshot, food, and newborn for example.

Once you have a solid list of keywords, Google each keyword and review the top results to see your competition. Avoid competing with large, authority websites with lots of links and great content (or in Google Map listings, ones that have tons of reviews on multiples review sites).
Build Separate Pages For Each Photography Service
Each photography service should have it’s own page and include the keyword in the page title, URL (permalink), and in Yoast’s SEO title + meta description. Pages should have at least 1,000 words of unique content and mention the keyword at least a couple times in the content body.

Google My Business
Separate from your photography websites, but very important considering it’s about 25% of how you rank in Google Maps. Make sure your Page is fill out completely, optimized, and that you are getting reviews and posting updates on your GMB page. It’s very important for SEO!
Build Citations
Citations are online mentions (eg. directories) and anything from your Google My Business to Yelp, Facebook, and WeddingWire. Moz Local helps make sure your top 10 citations are complete, consistent, and not duplicates. Whitespark has a list of citations for photographers.
Consistent NAP
NAP stands for business name, address, and phone number. These should be 100% consistent across website (eg. in your footer) and citations. And yes, having a physical address definitely helps especially if you’re trying to rank in Google Maps. It’s a good idea to list your NAP in the footer of your website so the info shows on every single page on your photography website.
Get Reviews
Getting reviews (especially on your Google My Business page) is especially important for ranking in Google Maps, but also helps you rank your website in localized organic results.
19. Configure SG Optimizer’s Plugin
A few tweaks in your SG Optimizer plugin will make your site load even faster.
These are found in SG Optimizer → Frontend Optimization + Media Optimization settings.

Just by using SiteGround, Astra, lightweight plugins, and avoiding large images, you’re already on your way to super fast website as shown in GTmetrix (one of the best speed testing tools).

20. Create Your Blog
If you want to add a blog to your photography website, it’s quite simple:
Step 1: Go to Pages → Add New → create a page called “Blog.”
Step 2: In your WordPress Customizer settings, set the Blog page as the “Posts Page.”

Step 3: Create a sidebar under Astra Options → Sidebar and make it a right sidebar layout.
Step 4: Customize your sidebar under Appearance → Widgets. Your “Main Sidebar” is the one you want to customize. Get familiar with the widgets in WordPress; you can use them to show an intro about yourself (plain text), popular blog posts, social profiles, or even an image gallery.

Step 5: Go to Settings → Permalinks and use the “post name” permalink structure.

Step 6: Add a few broad categories you want to write about under Posts → Categories.

Step 6: Write your first blog post under Posts → Add New. Research a keyword (ideally to drive traffic), write an enticing keyword-rich headline, and start adding content to your first post.

Here’s what the blog page looks like. Be sure to use featured images!

21. Get A Custom Photography Website Design
Want a WordPress photography website that’s a little more custom?
Our team builds completely custom (themeless) photography websites in WordPress. If you don’t want a template design or are just looking for something truly unique, get in touch with us about your project and we can schedule a time to talk. And of course, we can make your website SEO-friendly via Yoast, keyword research, on-page SEO, and integrated local SEO.
Hope this was helpful! Comment if you have any questions.
Cheers,
Tom


