
Autoptimize is a great plugin for optimizing CSS, JS, and HTML which all impact core web vitals. And it might do an even better job than your cache plugin.
It can minify, combine, defer, and inline files. It also has settings to serve files from a CDN URL and extra settings to optimize Google Fonts, remove Gutenberg CSS, and preload/preconnect.
But the core function of the plugin is to optimize CSS, JS, and HTML. This can be especially helpful if you’re on a host who blacklists cache plugins (such as Kinsta, GoDaddy, and WP Engine). You’ll still want to optimize your files which is where Autoptimize comes into play.
So how do you set up the Autoptimize settings? Let’s dive into each tab and see what they do.
1. JS, CSS, & HTML
JavaScript Options
- Optimize JavaScript code: ON – minifies JavaScript files.
- Aggregate JS-files: combining JS/CSS should usually only be done on smaller websites according to WP Johnny. Check your GTmetrix Waterfall chart and if your CSS/JS size is under 10KB, turn ON. If it’s larger, leave OFF. This should be tested.
- Also aggregate inline JS: OFF – if JS files are found in HTML, this combines them which Autoptimize discourages since it makes the cache grow quickly.
- Force JavaScript in <head>: OFF – loads JS files early which makes them render-blocking. If files need to be loaded in the head, exclude them instead.
- Add try-catch wrapping: OFF – if aggregating JS files breaks your site, this can be a solution. But you’re better off finding problematic files + excluding them.
- Do not aggregate but defer: Frank from Autoptimize says when this is checked, AO will minify files that are not minified based on the filename… example.js will be considered unminified and hence become an autoptimize_single_xyz123.js file.
- Also defer inline JS: you generally want this ON if the previous setting is on. AO recommends removing exclusions and only adding those that are needed.
- Exclude scripts from Autoptimize: if you see errors after enabling certain JavaScript settings, find the problematic JavaScript files and exclude them here.
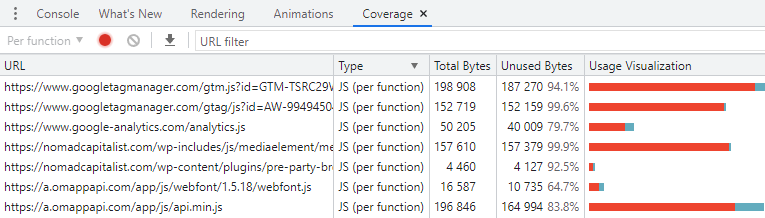
- Remove unused JavaScript: check the coverage tab in Chrome Dev Tools to see your largest CSS/JS files. They’re often from themes, plugins, or third-party code. Reducing this at the source (i.e. replacing plugins with lightweight options) is most effective. Otherwise, disable plugins where they’re not being used via Perfmatters.

CSS Options
- Optimize CSS code: ON – minifies CSS files.
- Aggregate CSS-files: same concept for aggregate JS-files. Small sites should usually combine and turn this ON, larger sites usually should not and leave OFF.
- Also aggregate inline CSS: OFF – same thing as aggregate inline JS-files only for CSS (again, this is usually discouraged since it can make the cache grow quickly).
- Generate data: URIs for images: OFF – CDNs warn that enabling it forces images to be served from your origin server instead of the CDN. Enabling it might initially result in fewer HTTP requests, but not after you setup your CDN and serve images.
- Eliminate render-blocking CSS: ON – Google recommends inlining styles above the fold. Use a free critical path CSS generator and paste the code in Autoptimize.
- Inline all CSS: OFF – increases HTML size + prevents CSS files from being cached.
- Exclude CSS from Autoptimize: similar to the JavaScript settings, you can exclude certain CSS files from being optimized if they cause problems on your site.
- Remove unused CSS: FlyingPress and Perfmatters do the best job at removing unused CSS/JS because they load used CSS in a separate file which can be cached and is better for real-world browsing (unlike WP Rocket which inlines the used CSS resulting in better scores, but slower browsing). As explained by Vikas in a FB post.

HTML Options
- Optimize HTML code: ON – minifies HTML to reduce whitespace and page size.
- Keep HTML comments: OFF – if you see SyntaxError errors or indent/spacing issues in comments, you can turn it ON. Otherwise, this setting should be OFF.
CDN Options
- CDN Base URL: rewrites Autoptimize files to be served from a CDN (BunnyCDN, KeyCDN, but not Cloudflare’s CDN which doesn’t use a CDN URL). If you view your GTmetrix Waterfall chart and view your files, you’ll notice they’re probably served from Autoptimize now. When you sign up for a CDN and add a pull zone, they will assign you a CDN URL which you’ll add here. I personally recommend BunnyCDN.


Misc Options
- Save aggregated script/css as static files: ON – the only reason you would disable this setting is if your server can’t handle the compression and expiry.
- Minify excluded CSS and JS files: ON – even when you exclude CSS and JS files, they will be minified by default. If this is still causing errors, uncheck this setting.
- Enable 404 fallbacks: ON – reduces chance of your site breaking from “not found” files by creating fallback versions, but it may also require configuring your server.
- Also optimize for logged in editors/administrators: OFF – you probably don’t want Autoptimize active for logged-in users especially if you use a page builder.
- Enable configuration per post/page: ON – adds a metabox which lets you control a few Autoptimize settings on a page-by-page basis (optimize the page, JS, CSS, and add an LCP image to preload). Useful if Autoptimize breaks parts of your site.


2. Images
You’re probably already using an image optimization service like Cloudflare Mirage + Polish, BunnyCDN Optimizer, or an image optimization plugin like ShortPixel or Smush. In this case, skip Autoptimize’s image settings. Autoptimize also doesn’t have nearly as many configurable settings compared to other services, but feel free to try it out. It optimizes images, serves them from ShortPixel’s image CDN in WebP, and also lets you lazy load images with exclusion settings.
- Optimize Images: rewrites image URLs to be served from ShortPixel’s CDN.
- Optimization exclusions: add classes/filenames of images you don’t want served from ShortPixel’s CDN (you usually shouldn’t have to do anything here).
- Image Optimization quality: choose lossy, glossy, or lossless compression.
- Lossy: most compression, most quality loss.
- Glossy: medium compression, little quality loss.
- Lossless: low compression, lowest quality loss, but fastest.
- Load AVIF in supported browsers: OFF – I would use WebP instead of AVIF.
- Lazy-load images: OFF – most cache plugins (and Perfmatters) have a lot more lazy load settings compared to Autoptimize, so you’ll probably use that instead.

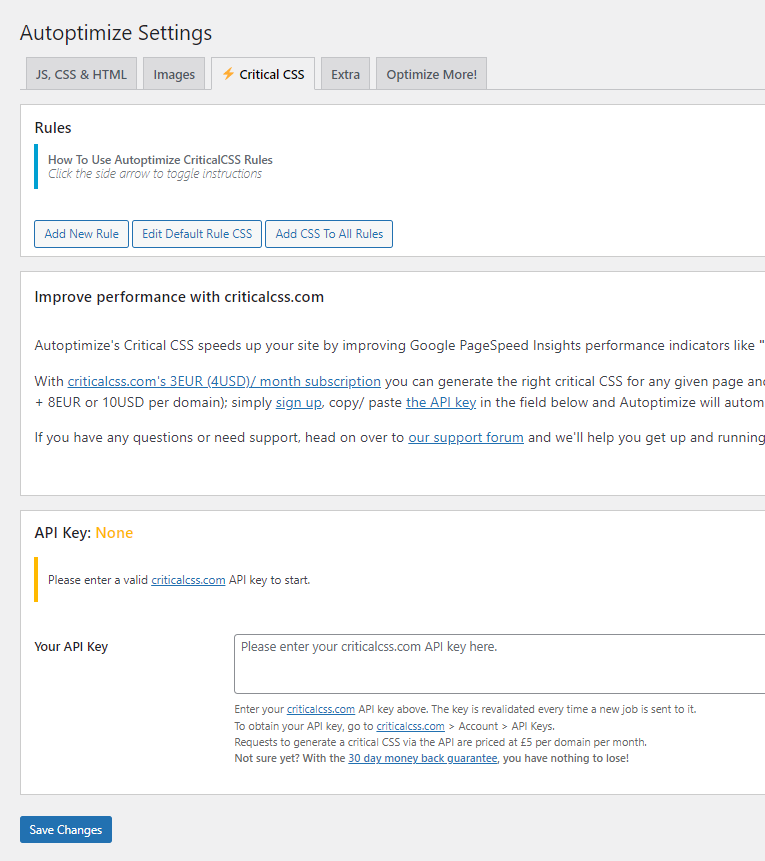
3. Critical CSS
To use critical CSS, make sure “eliminate render-blocking CSS” is on in the Autoptimize settings.
You can use a free critical CSS generator and paste the code into the field in Autoptimize. The main benefit of the paid criticalcss.com subscription is that it makes sure the right critical CSS is generated for all content (since pages/posts may have different CSS and therefore, different critical CSS). It costs $3/month so you can test this versus the free method and see your results.

4. Extra Settings
- Google Fonts: I prefer “combine and link in head” which is fastest, but “combine and link deferred in head” may give you better scores. Test each one then refresh your site to make sure you’re happy with how fonts are loaded as well as scores. Hosting fonts locally, preloading them, and reducing families/weights/icons is by far the best thing you can do to optimize fonts, however this option can help too.
- Remove emojis: disables emojis which aren’t good for load times.
- Remove query strings from static resources: old PageSpeed item and it shouldn’t make a difference whether it’s ON or OFF, but feel free to test it yourself.
- Remove WordPress block CSS: only disable if you’re sure your site doesn’t use block CSS or global styles, in which case this can reduce the amount of CSS files.
- Preconnect to 3rd party domains: preconnect is usually only done with third-party fonts (fonts.gstatic.com) and CDN URLs. However, fonts should always be preconnected using crossorigin which isn’t found in Autoptimize. You may want to use another plugin (if needed) or preconnect manually so you can use crossorigin.
- Preload specific requests: preloading should only be done with important elements above the fold (fonts, LCP image, even scripts/styles). Many cache plugins only preload fonts while Autoptimize can preload any file. Check your GTmetrix Waterfall chart and test how preloading key files impacts your results.
- Async Javascript-Files: if you need to apply async, Autoptimize suggests installing Async JavaScript instead of using this feature which is easier to setup.
- Optimize YouTube Videos: most cache plugins lazy load videos and replace the iframe with a preview image, or use WP YouTube Lyte. I prefer FlyingPress since it self-hosts YouTube placeholders to prevent third-party requests from ytimg.com.

5. Optimize More
Autoptimize is great but these recommendations aren’t so much. If I were to change them, here’s what they would look like:
- FlyingPress or LiteSpeed Cache: these do a better job of optimizing for real browsing than WP Rocket when comparing how they remove unused CSS, host fonts locally, lazy load background images, self-host YouTube placeholders, etc.
- ShortPixel: or you could just use Cloudflare Mirage + Polish or Bunny Optimizer.
- Hosting: I prefer either Cloudways or Rocket.net with Cloudflare Enterprise.
- Perfmatters: remove unused CSS/JS with settings for bloat removal, delay JavaScript, preload critical images, and things many cache plugins don’t do.
- GeneratePress, Kadence, Blocksy: c’mon, who uses Neve? These for the win.
- Cloudflare, BunnyCDN, QUIC.cloud Standard: faster than KeyCDN / RocketCDN.

How do I setup the Autoptimize settings?
Most sites can optimize JS, CSS, and HTML. You'll want to test aggregating files, turn on eliminate render-blocking CSS, and add critical CSS to Autoptimize. Add a CDN URL, turn off optimize for logged in editors/admins, then use the Extra settings to optimize Google Fonts and add preconnect/preload resource hints.
What Autoptimize settings do I use with Elementor?
When using Elementor with Autoptimize, make sure 'also optimize for logged in editors/administrators' is turned off.
How does Autoptimize handle Google Fonts?
Autoptimize can combine Google Fonts, link in head, and add font-display: swap. I prefer to combine and link in head.
Hope this helped! Drop a comment if you have questions. Frank’s always there to help too.
Tom


